
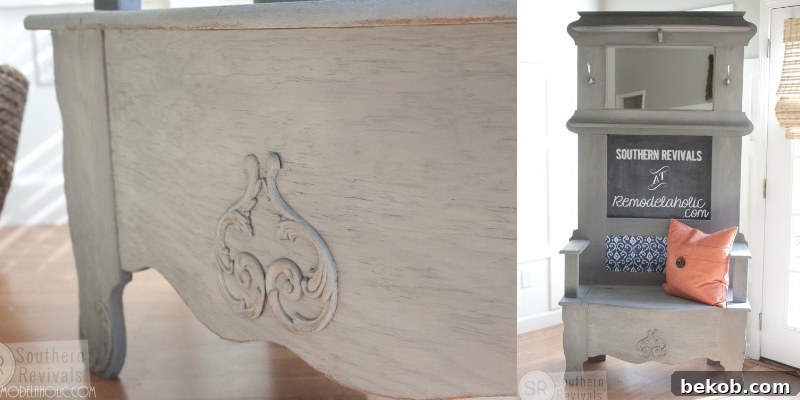
Hello fellow DIY enthusiasts and home decor lovers! Jamie from Southern Revivals here, eager to share another exciting furniture transformation with you. Today, we’re diving deep into the revival of a vintage hall tree bench – a project that proves you don’t need to break the bank to infuse new life and modern style into your living space. In a world increasingly focused on sustainability and personalization, giving old furniture a second chance is not just a trend; it’s a smart, budget-friendly alternative to buying new. If you’re anything like me, you’ve probably encountered those hidden gems – pieces with incredible potential but a dated appearance that simply doesn’t fit your current aesthetic. This article will guide you through the process of updating a classic hall tree, transforming it from an overlooked relic into a stunning, functional statement piece for your entryway or mudroom.
The Undeniable Charm of Vintage Furniture Makeovers
There’s something uniquely satisfying about taking an overlooked, forgotten piece of furniture and reimagining it for modern living. Beyond the creative challenge, furniture makeovers offer numerous benefits. Firstly, they are incredibly cost-effective. Acquiring a sturdy, well-built vintage piece and giving it a fresh coat of paint and some thoughtful updates is almost always significantly cheaper than purchasing a new, comparable item. Secondly, it’s an eco-conscious choice. Upcycling reduces waste and gives valuable resources a continued purpose, contributing to a more sustainable lifestyle. Lastly, and perhaps most importantly, a DIY furniture makeover allows for unparalleled personalization. You get to choose every detail, ensuring the finished piece perfectly complements your home’s decor and reflects your unique style. It’s an opportunity to craft a piece with a story, adding character and warmth that mass-produced items often lack.
From “Hideous” to Homely: Unlocking Potential in an Old Hall Tree
Consider this particular hall tree bench – a perfect example of hidden potential. It possessed robust construction and classic lines, the hallmarks of quality vintage craftsmanship. However, its previous owner had candidly described it as “this hideous thing” and was simply eager to have it removed. What one person considered an eyesore, I saw as a blank canvas awaiting a vibrant new chapter. This hall tree, like many older pieces, simply needed a modern touch to bring out its inherent beauty and make it relevant for contemporary homes. With a bit of vision and a few strategic updates, I was confident this piece could go from forgotten to fabulous, potentially prompting its former owner to wonder if they could have it back!
This post may contain some affiliate links. Please see our full privacy policy and disclosure here.
The Art of Painting: Choosing the Right Finish for Your Furniture
When embarking on a furniture makeover, the choice of paint is paramount, especially when dealing with pieces that boast beautiful wood grain or intricate details. My go-to for such projects is Miss Mustard Seed’s Milk Paint. This particular brand excels at providing vibrant color coverage while uniquely allowing the underlying wood grain and architectural features, like the delicate wooden appliques on this hall tree, to remain subtly visible. Unlike some heavier paints that can completely obscure these charming characteristics, milk paint offers a nuanced finish that celebrates the original craftsmanship.
Selecting the Perfect Shade: Trophy Milk Paint
For this vintage hall tree, I ultimately decided on the color Trophy. The decision wasn’t easy; I was initially torn between this elegant gray and a rich, deep navy blue. However, considering the sheer size and visual weight of the hall tree, I concluded that a lighter shade like Trophy would be more effective in modernizing the piece. A darker color, while sophisticated, might have made the large furniture feel even heavier, whereas the lighter gray creates a sense of airiness and contemporary appeal, aligning perfectly with the modern vibe I envisioned for its revival. The subtle gray also provides a versatile backdrop, allowing future decor changes without clashing.
Beyond the Brush: Adding Functional and Decorative Accents
While paint lays the foundation for a stunning transformation, sometimes a piece needs a little extra flair to truly shine. Think of it as adding “lipstick” to a beautifully made-up face! This hall tree, with its prominent mirror, had a noticeable empty space beneath it – a gaping void that cried out for both purpose and personality. My solution was a thin piece of plywood, precisely cut to fit the opening and then painted with chalkboard paint. This simple addition instantly transformed a dead space into a functional message center, grocery list holder, or even a playful drawing board for kids. When working with chalkboard paint, remember these crucial tips: always allow a full 24 hours for it to cure completely, and never forget to “prime” it by rubbing the side of a chalk stick over the entire surface before its first use. Failing to do so can result in a permanent etched message, undermining all your hard work!
A Touch of Whimsy: Decoupaging the Seat Back
Even with the fresh paint and the new chalkboard panel, I felt the hall tree was still missing a certain je ne sais quoi – that perfect decorative touch. The “lipstick” moment was yet to come. My answer: a vibrant royal blue and white Ikat design wrapping paper, sourced from a lucky find at TJ Maxx. I’ve always believed that beautiful wrapping paper is far too lovely to be reserved solely for gifts; its potential for DIY decor is immense! The process was straightforward: first, I cut a section of the wrapping paper slightly larger than the seat back area I intended to cover. Then, aligning one straight edge, I carefully ran my finger along all the other edges of the panel to create a precise crease. After removing the paper, I trimmed along these creased lines, re-positioned it to check for a perfect fit (adjusting as necessary), and then applied a generous layer of decoupage medium to the back panel. The paper was carefully placed and smoothed out to eliminate any air bubbles. Once dry, a final layer of decoupage sealed and protected the design, creating a durable and visually striking feature. This simple technique delivers an amazing statement, adding unexpected texture and pattern.
The Power of New Hardware: A Simple Yet Impactful Upgrade
One of the quickest and most impactful ways to modernize an older piece of furniture is by upgrading its hardware. The original hooks on this hall tree, while perhaps lovely in their own vintage right, undeniably contributed to its dated appearance. Replacing them was a non-negotiable step in achieving a contemporary look.
Fortunately, this doesn’t have to be a significant expense. I found these sleek, simple nickel-finish hooks at a local craft supply store for just over $5 each. The dramatic effect they had on instantly modernizing the entire hall tree was well worth the modest investment. They provide a clean, updated aesthetic that perfectly complements the newly painted surface and decoupage detail, proving that sometimes, the smallest changes yield the biggest results in furniture restoration.
The Magic of Milk Paint: Preserving Character, Adding Color
This project beautifully illustrates a key principle in furniture makeovers: even when you choose to paint a piece, you don’t necessarily want to obscure all its original details. The goal is often to enhance, not to hide. This is where milk paint truly shines. It’s not just about adding a new color; it’s about creating a finish that respects the history and natural beauty of the wood.
Miss Mustard Seed’s Milk Paint excels in providing rich, durable color coverage while still allowing the nuanced texture of the wood grain and the intricate patterns of wooden appliques to show through, much like a stain would. This unique characteristic means you achieve a fresh, updated color without sacrificing the inherent beauty of the wood beneath. The finish is remarkably natural and organic, offering a look that is both refined and authentic. Furthermore, once a protective furniture wax is applied, the surface is sealed, creating a super-rich, velvety finish that exudes luxury and quality. The final result looks like a million dollars, offering a high-end aesthetic that belies the significantly lower cost of a DIY restoration. It’s truly a testament to the power of thoughtful painting techniques.
Preparing Your Piece: The Foundation for Success
Before any paint can touch your chosen furniture piece, thorough preparation is key. This crucial step ensures optimal paint adhesion and a long-lasting, beautiful finish. For this hall tree makeover, I meticulously cleaned the entire surface using a simple yet effective mixture of water and white vinegar. This combination is excellent for removing any lingering oils, grime, or surface debris that could otherwise interfere with paint bonding. After cleaning, I performed a light sanding across all surfaces. This provides a slight “tooth” for the paint to grip onto, further enhancing adhesion. Following the sanding, I carefully wiped away all dust with a damp cloth, ensuring a pristine surface. Because the hall tree had a slight sheen to its original finish and I was aiming for a more uniform, full-coverage look rather than a distressed one, I opted to use a bonding agent mixed with the milk paint. This additive significantly improves paint adherence on slicker surfaces, guaranteeing a smooth and consistent application.
Supplies You’ll Need for Your Hall Tree Makeover:
Ready to embark on your own furniture transformation journey? Here’s a breakdown of the essential supplies:
- **Your Chosen Piece:** A vintage hall tree, dresser, or bench with good bones.
- **Paint & Sealer:** I used Miss Mustard Seed’s Milk Paint in Trophy and furniture wax for sealing.
- **Sandpaper:** Various grits for light sanding and smoothing.
- **Quality Paint Brushes:** Invest in good brushes for a smooth application.
- **Quality Wax Brush or Soft Cotton Cloth:** For applying and buffing furniture wax.
- **Cleaning Supplies:** White vinegar, water, and cloths.
Optional Embellishments:
- **Decorative Wrapping Paper:** For decoupage accents.
- **New Hardware:** Update dated knobs or hooks.
- **Plywood & Chalkboard Paint:** To add functional elements like a message board.
- **Decoupage Medium:** For attaching decorative paper securely.
Cost Breakdown: Making Over on a Budget
One of the most appealing aspects of DIY furniture makeovers is the potential for significant savings. The total cost will vary depending on your starting piece and the extent of your updates, but here’s a general idea:
- **Your Furniture Piece:** Can range from free to $200, depending on where you source it. (My hall tree was acquired for free, a fantastic score!)
- **Milk Paint Supplies:** A pot of Miss Mustard Seed’s Milk Paint, furniture wax, and a bonding agent typically cost around $60. This amount often provides plenty of product leftover for several additional projects.
- **Decorative Wrapping Paper:** A roll of designer paper might cost around $2.99.
- **New Hardware:** Simple nickel-finish hooks, like the ones I used, were approximately $5 each, totaling about $15-$20 for three.
Many other supplies, such as sandpaper and basic paint brushes, you might already have on hand. You can further control costs by choosing to clean and refresh existing hardware rather than replacing it, or by exploring affordable options at local craft stores or online. If you decide to incorporate chalkboard paint, as I did, a small container can typically be found at craft stores for $4-$10, depending on the size. With careful sourcing and smart choices, a stunning furniture makeover is entirely achievable within a modest budget.
Your Next DIY Adventure Awaits!
So, what are your thoughts? Are you feeling inspired to tackle your very first furniture makeover, or perhaps eager to try a new technique on your next project? The world of painted furniture and DIY restoration offers endless possibilities for transforming your home with unique, personalized pieces that tell a story. This hall tree bench, once destined for the discard pile, now stands as a testament to the power of vision and a little elbow grease, beautifully blending its historical charm with contemporary flair.
If this vintage hall tree revival has sparked your creativity, I encourage you to explore more of my furniture makeovers using milk paint. Discover the Anthropologie Inspired Typography Chest of Drawers Makeover for a bold artistic statement, or perhaps the cheerful Mustard Seed Yellow Dresser Revival for a pop of color. And for those who love a rustic, chippy finish, don’t miss the Vintage Chest with Pallet Top, showcasing a different application of milk paint’s versatile charm. Each project is an invitation to transform the ordinary into the extraordinary, proving that beautiful design is always within reach.
——————————————-
Love this makeover! If you can’t find an existing hall tree to make over, see how to make one from an old dresser.
Reviews and tips for using Old Fashioned Milk Paint and The Real Milk Paint Company