
Transform Your Kitchen on a Budget: The Power of Craigslist and Patience
A Binkies and Briefcases Success Story
Hello, I’m Stephanie from Binkies and Briefcases, and I am absolutely thrilled to share our kitchen transformation journey with you today! Remodelaholic has been a constant source of inspiration since I first started following blogs, making it the perfect platform to showcase our budget-friendly kitchen remodel. We reside in a charming, yet aged, split-level home built in 1965, a property that inherently comes with a plethora of renovation needs. As a family managing on a single income, with two young children and another on the way, every remodel project we undertake demands a meticulous approach to budgeting. This unwavering commitment to frugality led us directly to the treasure troves of Craigslist and ReStore when it was time to embark on our ambitious kitchen overhaul.
This is more than just a renovation story; it’s a testament to how unwavering patience, diligent searching, and good old-fashioned hard work can culminate in achieving your dream kitchen, even when faced with significant financial constraints. Allow us to take you through our two-year adventure, culminating in a space that truly feels like home.
Reflecting on Our Journey: Two Years of Transformation
It was exactly two years ago this past week that we officially kicked off our “Craigslist Kitchen” project. While there are still a few minor tasks remaining on our to-do list, looking back at how far we’ve come is incredibly rewarding. This journey truly illustrates the potential for remarkable change through strategic planning and resourcefulness.
The “Before”: A Kitchen in Desperate Need of an Overhaul
Let me paint a picture of our kitchen before the renovation – a space for which I genuinely struggle to find any flattering words. The old cabinets were literally disintegrating, constantly showering our clean dishes with sawdust. Their shelves were dangerously sagging and unsecured, rendering nearly half of the storage space unusable. Adding to the woes was a glaring burn mark scarring the laminate countertop, an unfortunate patch of fake bricks, and an undeniably uneven floor. The list of imperfections felt endless. Yet, amidst all these challenges, my husband and I always focused on one redeeming quality: the house’s generously sized rooms, brimming with untapped potential. This vision of what could be kept us motivated through the initial disheartening state.
Setting a Realistic Budget for Our Dream Kitchen
That particular year, we received an $8,000 tax refund, and I made a firm decision: this would be our entire budget for the kitchen and the adjoining dining room remodel. This ambitious sum needed to cover absolutely everything – new cabinets, countertops, appliances, flooring, and all the necessary incidentals for both rooms.
The dining room, much like the kitchen, was in a dire state. It was clear that a complete transformation was needed to make it a functional and inviting space for our growing family.
While $8,000 might sound substantial, it is, in reality, a remarkably modest budget for undertaking a full kitchen and dining room renovation. This fact was quickly underscored when we visited major retailers like Lowe’s. Their quote for cabinets alone soared to $12,000, immediately putting into perspective the chasm between conventional renovation costs and our limited funds. There was simply no way we were going to invest the typical $25,000 to $30,000 into this kitchen. Such an expenditure would be impossible to recoup in our local housing market. Furthermore, our commitment was to complete this project entirely with cash, avoiding any form of debt. The thought of burdening our young family with loans for amenities like granite countertops was entirely out of the question. Our goal was smart, debt-free home improvement.
My personal stubbornness and impatience meant I couldn’t endure living with such a dysfunctional kitchen for long. (Although I often say “I,” my wonderful husband, Eddie, deserves immense credit for the bulk of the physical labor. He graciously allowed me to make most of the design decisions, as the kitchen is largely my domain, though he did veto my tile choice – more on that later!).
The entire space required a complete gutting. Rest assured, we didn’t waste anything; the old cabinets and counters found new life providing much-needed storage in our garage and basement. This commitment to repurposing was an early indicator of our budget-conscious philosophy.
Defining Our Dream Kitchen: A Strategic Wishlist
Before diving into the actual work, I meticulously crafted a wishlist for my ideal kitchen. This wasn’t just a fantasy; it was a strategic guide that helped us prioritize and search effectively:
- High-quality cabinets that are both sturdy and aesthetically pleasing.
- Durable, solid surface countertops for longevity and ease of maintenance.
- Sleek, stainless steel appliances to modernize the space.
- A brand-new floor, with a strong preference for tile.
- An attractive new backsplash, ideally in tile.
- A functional kitchen island for added workspace and gathering.
- A refreshed pantry door to enhance the overall look.
- Elegant molding to add a polished finish.
While we ultimately opted for vinyl over tile for the floors and backsplash, I can honestly say I’m completely content with that decision. The significant savings and practical benefits outweighed my initial preference. The most exciting part? We managed to achieve *everything else* on this ambitious list. Want to see the stunning results of our two-year labor of love, countless thrift store visits, smart recycling, and a lot of sweat, all while staying well under our $8,000 budget?
The “After”: Our Dream Kitchen Realized for Under $8,000
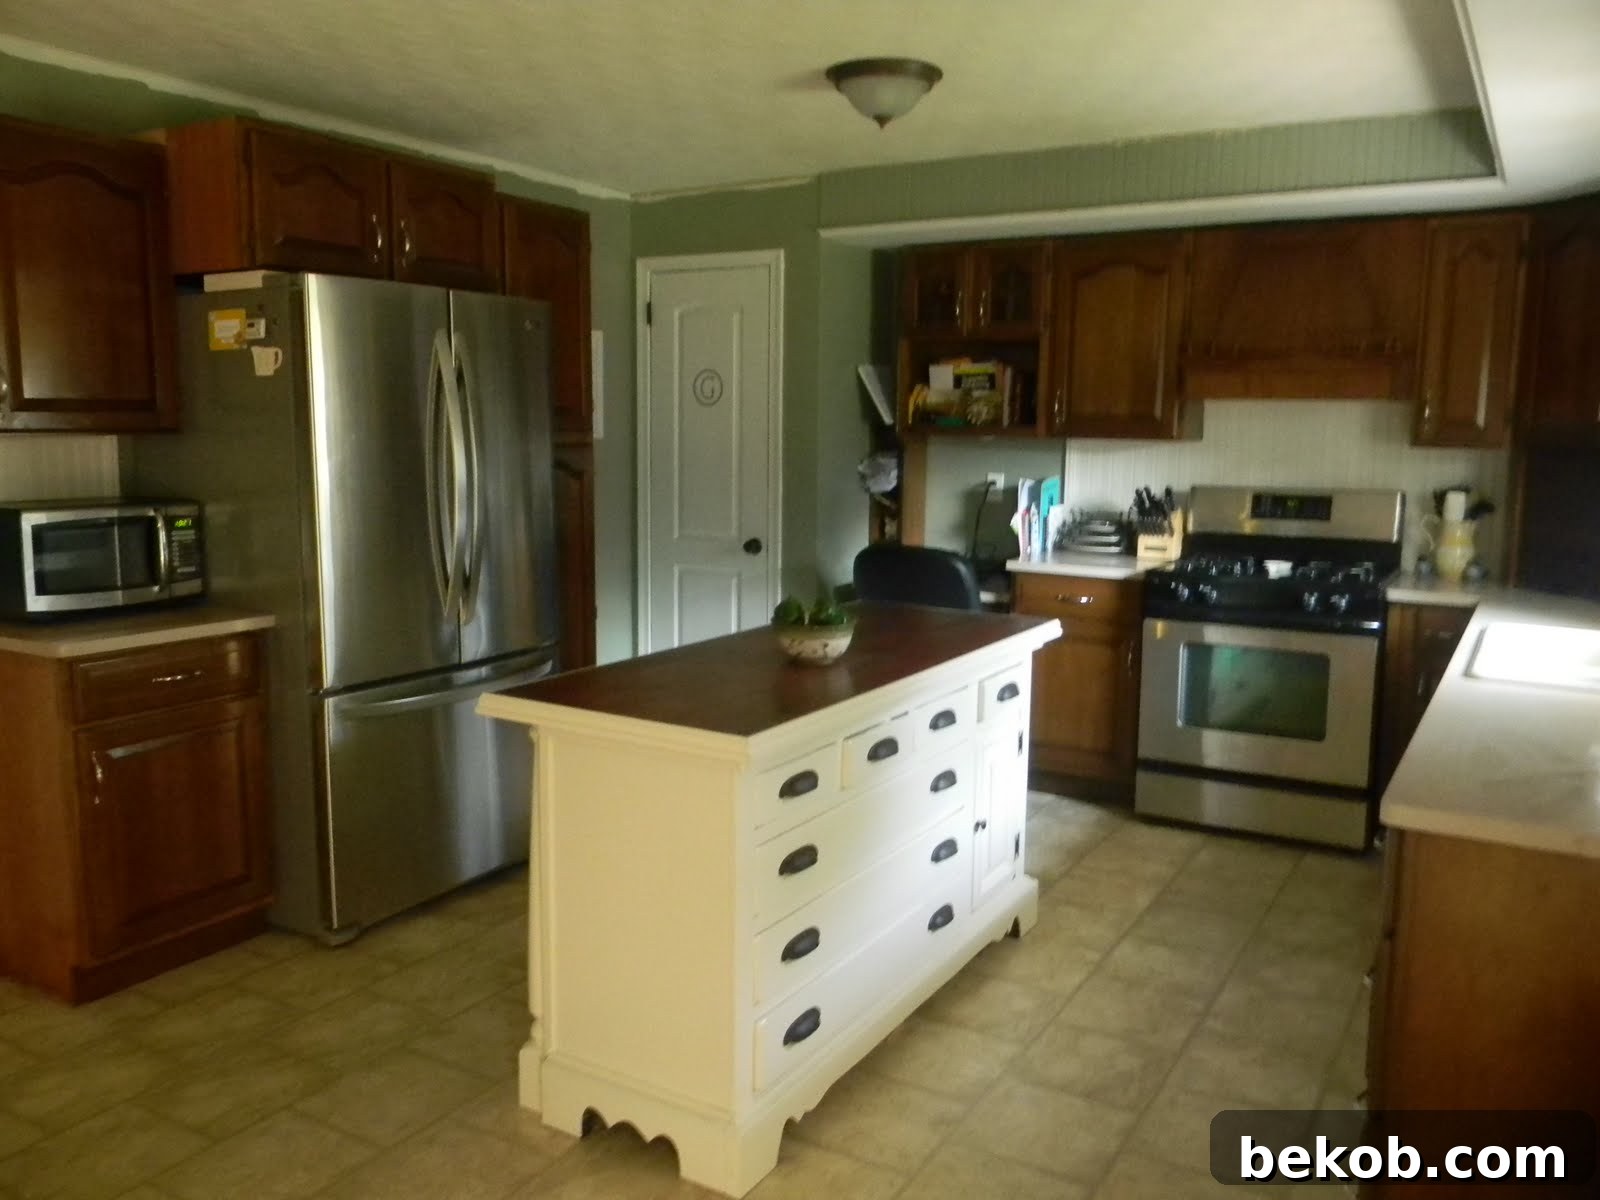
Here we stand, two years later, witnessing the incredible transformation that patience and perseverance can yield. Our kitchen and dining room are now vibrant, functional spaces that effortlessly blend style with practicality.
We were incredibly fortunate to find solid cherry wood cabinets paired with stunning Silestone counters. These weren’t just standard finds; they even came with fantastic custom features, including a convenient pull-out spice rack and clever sheet pan dividers – features that typically drive up the price significantly in custom orders!
(A little hint for later: Take a close look at the doors on both of these cabinets. There’s a subtle quirk that no one ever seems to notice!)
Beyond the quality materials, this Craigslist find also included a pantry cabinet, a decorative stove hood, an appliance garage, and lazy Susan corner cabinets – all features that dramatically inflated the original cabinet quote we received from Lowe’s. This comprehensive package was truly a game-changer for our budget kitchen remodel.
Our current “short” to-do list for the area includes adding crown molding to both the walls and the cabinets, installing shoe molding, and applying touch-up paint in a few spots. I also envision refinishing our hand-me-down dining table and eventually acquiring new chairs, but these items are currently lower on our priority list as we focus on finishing the structural and aesthetic details.
Budget Breakdown: Achieving Our Dream for Less
Transparency is key when discussing a budget renovation. Here’s a detailed breakdown of our expenditures, illustrating how every dollar was stretched to maximize impact:
- Cabinets, Counters, Sink & Faucet: Sourced as a complete set from Craigslist – $2,000
- U-Haul Rental (1 day): For pickup and transport – $100
- Hardware (knobs, pulls): Carefully selected to complement the cabinets – $150
- Professional Labor: For hanging cabinets, installing counters and sink, and relocating dishwasher (knowing when to hire pros is crucial) – $1,600
- New Floor: Home Depot, Allure Vinyl (a practical and affordable alternative) – $800
- Paint: Valspar Green Tea Leaf and Brandied Pear (transforming the mood for minimal cost) – $50
- Light Fixtures: A mix from Lowe’s and lucky Craigslist finds – $50
- Island: Creatively fashioned from an old dresser found at our local reuse center – $315
- Beadboard, Wainscoting, and Floor Boards: Adding architectural interest – $500
- New Window Treatments: From JC Penney, enhancing light and privacy – $150
- Stove: A true Craigslist success story – purchased for $75, old one sold for $80, effectively FREE!
- Accessories: Tempt-Tations line from QVC, all cherished gifts from family (who know my collection!) – $0
- Table and Chairs: Wonderful hand-me-downs from my dad – $0
- Dining Room Shelves: DIY ledges inspired by Ana White’s designs – $40
- Sewing Table: A Goodwill re-do project – $50
- Dining Room Bench (not pictured): A great find from JC Penney, purchased on sale with a promo code – $120
- Refrigerator: A necessary investment from hhgregg – $1,300
Total Project Cost: $7,225
With an initial budget of $8,000, we still have $775 remaining. This surplus will be allocated towards completing the moldings and potentially investing in a pot rack or a larger-scale light fixture to hang above the island, adding those final touches.
To truly underscore the value we created, we even had an architect visit our home. His professional estimation placed the value of our kitchen remodel at approximately $30,000. While we acknowledge that we won’t necessarily see that exact resale value in our specific neighborhood, hearing such an assessment certainly validates all our hard work and smart financial decisions. It truly feels like a sweet victory!
My Essential Tips for Successful Budget Kitchen Remodels
You didn’t ask, but I’m eager to share the invaluable lessons we learned throughout our kitchen renovation journey. These strategies were pivotal in transforming our outdated space into a beautiful, functional kitchen without breaking the bank.
1. Embrace the Hunt: Persistent Searching on Craigslist and Re-use Centers
Many people comment on how “lucky” we were to find our complete cabinet and counter set, and while there was certainly an element of good fortune, it was largely the result of persistent, strategic searching. This wasn’t a discovery made on the first day of looking. It involved months of dedicated research and daily checks. My advice is to commit to checking Craigslist every single day, and visiting your local re-use center at least once a week. You never know when a hidden gem will appear. Since our remodel, for instance, I’ve even stumbled upon a gorgeous set of antique white-painted walnut cabinets at a reuse center. While a part of me stung with regret that I hadn’t seen them earlier (I would have bought them in a heartbeat!), the fact that they were more than double what I paid for our existing set softened the blow.
Be proactive in your search. If you have specific items in mind, like stainless steel appliances, monitor the relevant sections of your local Craigslist multiple times a day. Quality items, especially at bargain prices, move incredibly fast. You can bet that our “free” stove was only listed for a few hours before I had already contacted the sellers and arranged an appointment for pickup! Set up alerts if your local platform allows, and be ready to act quickly. This consistent effort is what truly turns “luck” into a tangible outcome in budget remodeling.
2. Visualize, Adapt, and Problem-Solve: Making Found Items Work
There are two approaches here: either find something you love and creatively make it fit your space, or know precisely what you want and tailor it to work within your design. These are distinct strategies. In our case, the cabinets and counters we acquired were not custom-built for our kitchen, which naturally led to a few quirks. We had to ingeniously relocate our refrigerator and dishwasher to accommodate the new layout. Three of the cabinet doors open in the opposite direction from what one might expect (a detail so subtle that, to this day, no one has ever noticed it – can you find them in the photos?). There’s one faintly noticeable seam in a corner of the countertop, and the built-in desk doesn’t extend fully to the wall.
However, these minor imperfections were an incredibly small price to pay for an estimated savings of approximately $25,000 on the overall project. Furthermore, I knew I desperately wanted a kitchen island, but our space was too narrow for one constructed from traditional cabinetry. So, I embarked on another months-long search, eventually discovering an old, rather cruddy dresser with fantastic “bones” that we brilliantly transformed into the perfect, functional island. This adaptability and willingness to see potential in unconventional items are vital when renovating on a tight budget.
3. The Indispensable Virtues: Patience and Flexibility
This was, without a doubt, the most challenging aspect for me. There were moments of intense frustration, wondering why, after two years, the space still wasn’t completely finished, or why a brilliant idea I had was financially out of reach at that precise moment. However, I learned a profound truth: the truly best deals are cultivated and collected over time. It means trusting that eventually, the right opportunity will present itself, even if it’s not on your immediate timeline (which, for me, would have been “yesterday, please!”).
For instance, there was over a year between the installation of our cabinets and counters and finding that amazing deal on our stove. Yes, it was incredibly frustrating to continue using an old, unsightly stove with a wonky oven door that constantly lost heat. But by exercising patience, I eventually acquired a beautiful, “new-to-me” stove for free.
Flexibility also proved crucial, particularly concerning the flooring. I had always yearned for a tile floor; I’ve owned three houses and never had real tile in my kitchen. Given the substantial savings we achieved in other areas, I felt justified in splurging on tile. However, it quickly became apparent that installing tile would necessitate replacing the entire subfloor, an undertaking that would have been a HUGE project, not to mention a significant added expense. Moreover, it would have been an “over-improvement” for our specific neighborhood, meaning we wouldn’t recoup the cost. So, vinyl it was.
I admit, I pouted for a while over the vinyl, especially knowing that whatever flooring we chose for the kitchen would also extend into both bathrooms and the foyer. But over time, my perspective shifted. I’ve actually grown to appreciate the vinyl’s ease of cleaning and its family-friendly nature, particularly with young children. This experience taught me that sometimes, you truly can learn to love, or at least deeply appreciate, the compromises you make for a greater goal. It’s about finding satisfaction in the overall achievement and adapting your vision along the way.
This project was lovingly contributed by one of our fabulous readers! We cherish the opportunity to share your creative projects with our wonderful blogging community. So, whether you have innovative kitchen renovation ideas, inspiring small bathroom remodels, beautifully overhauled and repurposed furniture, clever spray paint updates, or any other home transformation, please don’t hesitate to send it in! Thank you for reading Remodelaholic!
If you enjoyed this post, we invite you to explore these past kitchen renovation features!