
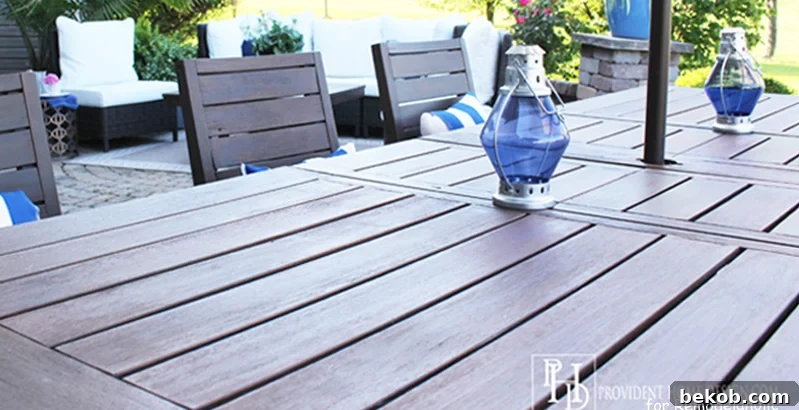
Transform Your Furniture: The Ultimate Guide to Faux Wood Stain with Paint
Have you ever wished for the beautiful, rich look of wood stain without the mess, the unpredictable results, or the arduous sanding? The good news is, there’s a revolutionary technique that allows you to achieve a flawless wood-stained appearance using ordinary paint. Yes, you can create a stunning faux wood stain on almost any surface, breathing new life into old furniture or giving a rustic charm to new pieces. In this comprehensive guide, we’ll walk you through the entire process, empowering you to master the art of painting to look like stained wood.
If you’re interested in adding custom hues to natural wood, explore our favorite color wash wood stain trick for unique finishes.
For those tackling furniture refinishing, discover how to mimic wood stain with paint below, or for traditional methods, follow this step-by-step wood refinishing tutorial.
Master the Art of Faux Staining: How to Make Paint Look Like Wood Stain
by Tamara of Provident Home Design
Welcome, DIY enthusiasts! Today, I’m thrilled to share an incredible method for achieving the coveted stained wood aesthetic without ever touching a can of traditional wood stain. The secret lies in a clever painting technique that perfectly simulates the depth and natural variations of stained wood. Prepare to be amazed by the versatility and simplicity of using paint that looks like wood stain!
Over the years, I’ve encountered numerous frustrations with both oil- and water-based wood stains when trying to finish or refinish furniture. These challenges often lead to extended project timelines, unexpected results, and a general sense of exasperation. Let’s explore some of these common staining woes and how our faux stain paint technique sidesteps them entirely.
Common Problems with Traditional Wood Staining
Wood Stain Problem #1: The Dreaded Sanding Process
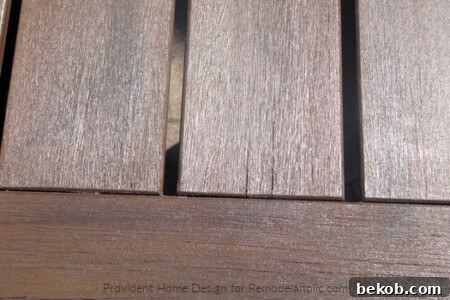
One of the most significant drawbacks of traditional staining is the mandatory pre-sanding. For stain to penetrate properly and achieve an even finish, surfaces must be meticulously sanded, often down to bare wood. This is an incredibly arduous and time-consuming task, particularly for large furniture pieces like dining tables, cabinets, or even intricate chairs. Sanding generates substantial dust, requires specialized equipment, and demands significant physical effort, commonly known as “elbow grease.” Skipping this step or doing it improperly can lead to blotchy, uneven stain application that is difficult to correct.
Related Reading: How to Refinish Furniture: The Low to No Sanding Method
Wood Stain Problem #2: The Inevitable Mess Factor
Traditional wood stains are inherently runny liquids, making them considerably harder to control than paint. Drips, spills, and accidental splatters are common occurrences, leading to extensive cleanup. Stains are often applied with rags, which necessitates the use of gloves unless you’re prepared for temporarily stained hands and potentially ruined clothing. Furthermore, the strong fumes associated with many stain products require excellent ventilation, often making indoor projects challenging and less enjoyable. The overall “mess effect” can be a major deterrent for many DIYers.
Wood Stain Problem #3: Achieving Consistent Color is a Gamble
My personal experience with wood stains has frequently involved unpredictable color outcomes. The final shade often differs significantly from the sample, especially with darker stains. This inconsistency stems from the varying porosity and natural undertones of different wood types, which absorb stain differently. Achieving a desired shade frequently requires multiple coats, each needing adequate drying time, prolonging the project significantly. It’s a frustrating trial-and-error process that consumes valuable time and resources.
Related Reading: How to Use Paint to Adjust Wood Stain Tone
Revolutionize Your Refinishing: Painting Furniture to Mimic Wood Stain
This post contains affiliate links. Learn more and read the full disclosure policy here.
The truly fantastic news is that you can achieve the gorgeous, deep look of stained wood with remarkable ease using paint – no sanding, minimal mess, and absolutely no surprise stain colors! This innovative technique puts you in complete control of the final aesthetic.
The beauty of most stained wood lies in its dimensional appearance, characterized by two primary colors or tones, with numerous varying shades in between. This natural variation is key to its authentic appeal.
The ingenious trick to creating a realistic faux stained wood look with paint involves two simple steps:
- First, accurately identify the natural wood stain you wish to replicate.
- Second, select two paint colors that precisely match the lightest and darkest tones found within your chosen wood stain sample.
Once you have your two carefully selected paint colors, the magic happens by layering them strategically. You’ll use brushes to meticulously create a faux wood grain, also known as “faux bois” – a French term meaning “false wood.” This technique allows you to imbue any surface with the texture and warmth of real wood.
Continue reading below to discover my detailed, step-by-step approach to this transformative technique!
Related Reading: Faux Bois Finish – DIY Painted Paper Faux Wood Flooring
While many similar tutorials might suggest various specialized tools or wet glazes for different wood grain styles, my 2-layer painting technique stands out for its simplicity, ease of execution, and consistently impressive results. It’s a straightforward method that delivers a high-impact, authentic look without unnecessary complexity.
What Surfaces Can I Paint to Look Like Wood?
The versatility of this faux staining technique is truly one of its greatest assets. For my recent budget patio makeover, I faced a common DIY dilemma:
- A weathered wooden table that had seen better days.
- Bright blue wooden chairs I rescued from the curbside.
- And a free kitchen table, expertly repurposed into a coffee table by shortening its legs.
My challenge was to unify these disparate pieces into a cohesive, stylish set. Applying the same “faux stained” paint effect was the perfect solution, effortlessly transforming mismatched items into a harmonious collection.
Despite their vastly different original finishes, this opaque faux stain paint technique successfully unified them all. Now, they boast a beautiful, coordinated wood-like appearance, proving the power of this method to create visual continuity.
While I frequently use this technique to refinish wood furniture without the need for stripping and sanding, its application extends far beyond. You can confidently use it on plywood, MDF, laminate furniture, and most other flat, clean surfaces. This opens up a world of possibilities for customizing inexpensive or worn-out pieces.
When applying this paint-to-look-like-wood technique on laminate or other exceptionally smooth, non-porous surfaces, it’s crucial to first scuff up the surface lightly with sandpaper to create a “tooth” for the paint to adhere to. Additionally, applying a high-quality primer is highly recommended to ensure maximum adhesion and durability of your faux finish.
For larger projects like garage doors or vinyl shutters, a similar effect can be achieved using gel stain or specifically formulated glazes, which offer a more translucent, less opaque finish than the paint method described here. If you’re tackling an exterior door, consider dedicated kits like the Giani Wood Look Paint kit for front doors or for garage doors; they have excellent reviews and are designed for these specific applications.
Step-by-Step Guide: Faux Stain Wood with Paint
Achieving a convincing faux wood stain finish with paint is a straightforward process when you follow these steps carefully. Let’s get started!
Preparation: The Foundation for a Perfect Finish
Proper preparation is crucial for any painting project, ensuring durability and a professional-looking result. My initial wood surfaces were in relatively good condition, requiring minimal prep. However, depending on your piece, you may need to take a few extra steps:
- Surface Repair: If your furniture has any chips, gouges, or rough spots, begin by using a good quality wood filler to mend them. Once the filler is dry, use fine-grit sandpaper or a sanding block to smooth the repaired areas flush with the surrounding surface.
- Hardware Removal/Protection: Before painting, meticulously remove all hardware such as hinges, drawer pulls, knobs, or handles. If removal isn’t feasible, cover them securely with painter’s tape to prevent accidental paint application.
- Cleaning: Thoroughly clean your entire piece to remove any dirt, grime, grease, or dust. A mild detergent solution or a dedicated furniture cleaner works well. Rinse thoroughly and allow to dry completely.
- Glossy Surfaces/Primer: If your piece has a very glossy finish (like varnish, laminate, or previously painted slick surfaces), it’s always best practice to lightly scuff the surface with fine-grit sandpaper (220-grit) or use a liquid deglosser. This creates a slightly rough texture that vastly improves paint adhesion. For laminate or MDF, a good quality primer (especially a bonding primer) will ensure your paint sticks well and lasts for years.
Step 1: Pick Your Paint Colors to Look Like Wood Stain
The first and most critical step is to accurately identify the two paint colors that will replicate the darkest and lightest tones present in your desired wood stain. This careful selection is what gives your faux finish its authentic depth and dimension.
I typically opt for regular latex paint because it offers an incredible variety of colors and tones, is readily available, and provides excellent durability once cured, often without requiring an additional top coat for indoor pieces. Plus, using leftover paint from other projects is a fantastic budget-friendly bonus! However, feel free to use chalk paint, milk paint, or any other type of paint you prefer, as long as you can find the perfect light and dark shades.
Related Reading: 5 Different Furniture Paint Options – Pros & Cons Explained
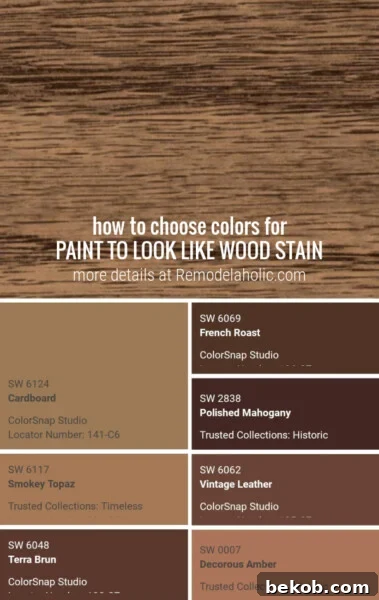
To aid in your selection, gather a few paint color fan decks and hold them directly against a sample of the wood stain you wish to mimic. Observe how the light and dark variations in the real stain translate to solid paint colors. For my dark walnut wood stain replication, I chose Sherwin-Williams Urbane Bronze (representing the darkest tone) and Behr Moroccan Henna (for the lightest tone), purchased in quart sizes.
Remember, you’ll only need a small amount of the darkest paint, so for smaller projects, a sample size might be sufficient, saving you money and minimizing waste. Pay close attention to the undertones of the paint colors and the wood stain sample – you want to avoid an overly orange or red faux finish unless that’s your explicit goal. The beauty of paint is its forgiving nature: if the color isn’t quite right, you can simply paint over it and try again!
Struggling to perfectly match your paint colors to a specific wood stain? Take advantage of technology! Use one of these handy paint color apps to match a photo or a wood grain swatch.
For example, our Remodelaholic team recently used a swatch of BEHR Jacobean Stain (a current favorite for light to medium farmhouse wood stains on our DIY projects and furniture builds). By importing this swatch into the “Match a Photo” option in the Sherwin-Williams ColorSnap app, we generated a palette of suggested paint colors. These apps provide an excellent starting point, and remember, most paint stores can custom color-match any brand’s color to another brand’s paint, giving you ultimate flexibility.
Step 2: Paint the Base Coat – The Lightest Tone
With your lightest paint color chosen, it’s time to apply the base coat. Paint the entire piece of furniture thoroughly and evenly with this lighter shade. This layer serves as the foundation for your faux stain, providing the underlying “wood” color.
For this initial paint layer, you have several tool options: a bristle brush, a foam brush, or a paint roller. Choose the tool that best allows you to achieve smooth, consistent coverage on your specific piece. I used Behr enamel paint and found that just one coat was sufficient to completely cover my previously blue chair, demonstrating the excellent coverage paint offers compared to many stains.
Step 3: Paint on the Faux Wood Grain – The Darkest Tone
Once your base coat is dry to the touch (typically around 10-15 minutes, but always check your paint’s specific drying instructions), you’re ready for the transformative second layer: adding the wood grain detail. This is where your piece truly begins to take on the character of stained wood.
Using a standard 3-inch synthetic bristle brush or a chip brush, barely dip the very tip of the brush into your darkest paint color. This “dry brushing” technique is crucial. Then, wipe any excess paint against the top rim of the can or a paper towel. The goal is to have hardly any paint on the brush – just enough to create subtle streaks, not solid coverage.
This technique is aptly named dry brushing for a reason – too much paint will obscure your base coat and prevent the natural wood grain effect. Start with very little, you can always add more!
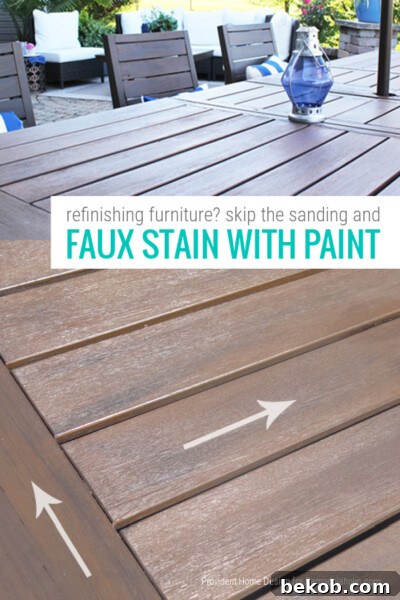
Now, with a very light hand, pull the brush in a quick, long, and continuous stroke across the surface. Imagine the direction of natural wood grain on the piece you are working on. If it’s a planked surface, follow the direction of each “plank.” If it’s a solid piece, consider which direction the original grain would run, or create a consistent, flowing direction.
This second coat is entirely about adding texture, depth, and the illusion of wood grain to your base color. Cover your entire furniture piece with these quick, light strokes of the darkest paint color until you achieve your desired result. It’s crucial to ensure that some areas retain only the lightest base color, allowing for the natural variations seen in real stained wood.
For a visual reference, observe the photo below of my friend’s beautifully stained kitchen table. You’ll notice how, particularly in the areas under the checkmark, there are distinct lighter variations of tone. These lighter areas are vital for creating dimension and preventing the finish from looking flat.
This natural variation of tone is a hallmark of genuine stained wood, lending it beauty and character. Make a conscious effort to recreate this effect by leaving some sections of your piece with just the lightest paint color showing through. This layering technique is what ultimately sells the illusion.
Below, you can see the coffee table I ‘faux stained’ using the Sherwin-Williams Urbane Bronze and Behr Moroccan Henna paints mentioned previously. The result is a unified, rich, and dimensional finish.
If you’re new to dry brushing or unsure about your strokes, I highly recommend practicing on a scrap piece of wood or even cardboard first. This allows you to get a feel for the brush, the amount of paint needed, and the pressure required to achieve the desired effect without risking your main project.
Working on a solid flat surface that needs extra texture and knots for a faux wood finish? See how to use a faux bois comb wood grain tool to add intricate woodgrain texture.
Remember, the beauty of this paint technique is its forgiving nature. If you “mess up” or apply too much dark paint in an area, simply let it dry and paint over it with a bit of the lighter base coat. You can always go back and reapply the darker grain until you’re completely satisfied with the look.
Step 4: The Protective Top Coat for Durability and Sheen
Once you’ve achieved your desired faux stained wood finish and the paint has completely dried and cured (check the paint can for recommended curing times, usually 24-72 hours), it’s time to apply a protective top coat. This step is essential for sealing your beautiful work, enhancing its durability, and bringing out the depth of your faux wood grain.
Since my patio pieces were exposed to outdoor elements, I opted for an outdoor polyurethane – specifically a clear spar urethane in a satin finish. Spar urethane provides excellent protection against moisture and UV rays, ideal for exterior furniture. For indoor pieces, a clear top coat is often optional if you used a durable paint like enamel, but it’s highly recommended. A top coat of polyurethane, polycrylic, or even a furniture wax will significantly increase the longevity of your finish and make cleaning easier.
A clear top coat truly makes the faux wood grain “pop” and look like the real thing, adding a professional, finished appearance. Apply thin, even coats according to the manufacturer’s instructions, allowing proper drying time between each coat. Multiple thin coats are always better than one thick coat, which can lead to drips or an uneven finish.
And there you have it! This incredible technique sure beats hours of messy sanding and the unpredictable nature of traditional staining. My workspace remained free of strong chemical fumes and the pervasive dust that sanding creates. The satisfaction of transforming old, mismatched pieces into a unified, beautifully ‘faux stained’ ensemble is immense.
I invite you to visit my blog at Provident Home Design to see more of my Patio Makeover Reveal, or take a virtual tour of my friend’s Gorgeous Home. If you enjoy DIY, painting, and repurposing projects, you’ll find lots of fun ideas to inspire your next home transformation!
Thank you for joining me on this creative journey, and please don’t hesitate to reach out if you have any questions about this faux staining technique!
If you’re working with bare wood and prefer an alternative to traditional stains, consider this easy color washing technique! It’s a fantastic way to introduce color while still allowing the natural wood grain to show through.
- I successfully used it on my DIY Dutch barn door to perfectly complement my painted interior doors.
- It also worked wonderfully on this easy carved wood sign, adding a subtle yet impactful finish.
- And it provided our DIY Swedish Mora clock with a cheerful pop of yellow, all while beautifully preserving the intricate wood grain.
Alternatively, if you’re prepared for the effort of stripping down to bare wood, then follow this comprehensive tutorial for refinishing furniture – with helpful tips for minimal sanding to ease the process!
More Furniture Painting Techniques and Info:
- How to Use Paint to Stain Wood Any Color
- Which Paint For Furniture? 5 Paint Options Explored
- How to Prevent Tannin Knot Bleed-through on Painted Wood Furniture
- Best Painting Tips and Tricks from Experts and DIYers
First published 24 Aug 2015 // Last updated 25 Mar 2022