
Hello, fellow DIY enthusiasts and pet parents! I’m Tamara from Provident Home Design, thrilled to be back sharing innovative design, decorating, and budget-friendly DIY projects. Today, we’re diving into a special project that combines functionality with style: crafting two distinct DIY pet feeders that will elevate your pet’s dining experience and seamlessly blend with your home decor. Say goodbye to messy feeding areas and hello to beautifully organized spaces!
Transform Your Pet’s Feeding Station: Stylish & Functional DIY Solutions
Anyone with pets understands the delightful chaos they bring, along with an assortment of supplies—cages, litter boxes, food, bowls, leashes, and toys. Wouldn’t it be a dream to have a dedicated room just for all their gear? While a luxurious pet-specific room remains a fantasy for most of us, creating an organized and stylish feeding area is entirely achievable. This project offers practical solutions to common pet-owner dilemmas, ensuring both you and your furry friends enjoy a cleaner, more attractive home environment.
The Inspiration: Solving a Common Pet Parent Predicament
My friend Lolly, much like many of us, uses her laundry room as a dual-purpose space that also houses her pet supplies. A few months ago, while helping Lolly with a glamorous laundry room makeover, it became clear that a key step to enhancing both the room’s aesthetic and its orderliness was to replace the simple towel-and-bowls setup with a proper, attractive pet feeder. This realization sparked the idea for a DIY project that would not only be functional but also complement her revamped space.
While a quick search reveals many gorgeous wood bowl feeders on the market, their price tags can often be prohibitive. For Lolly and me, a DIY approach was not just a preference but a necessity to achieve the desired look without breaking the bank. This led us to craft a beautiful, rustic pet feeder for her dog, using readily available materials for an incredibly low cost—just $10 for the two large silver dog bowls!
Crafting Your Own Rustic Elevated Pet Feeder
For those who appreciate the charm of natural wood and a touch of farmhouse style, our first project is a rustic elevated pet feeder. Crafted from leftover oak hardwood flooring, this design proves that elegance and functionality don’t require expensive materials. It’s a fantastic beginner-friendly woodworking project that adds a personalized touch to your pet’s space.
Ready to learn how to make this fantastic “puppy” (pun absolutely intended for this woodworking adventure)? Let’s get started on creating a custom feeding solution that your pet will adore, and that you’ll be proud to display.
DIY Elevated Pet Feeder: Step-by-Step Guide
This project introduces you to the versatile Kreg Jig, a tool that might seem intimidating at first but is incredibly easy and rewarding to use. If you’ve never worked with one, don’t worry—I was in the same boat when I made a pet feeder for my cat, and it was significantly simpler than I expected! This guide will walk you through every step, ensuring a successful build.
For a visual walkthrough of these steps, be sure to watch our video tutorial! Watch it here on our YouTube channel and don’t forget to subscribe for more DIY videos!
This post contains affiliate links, which means we may earn a small commission if you make a purchase through them, at no extra cost to you. See our full disclosure policy here. Thank you for supporting Remodelaholic!
Essential Supplies for Your DIY Pet Feeder Project:
- Kreg K4L Pocket Hole Jig: This kit is highly recommended as it typically includes the necessary drill bits and screws to get you started. It’s the secret to strong, hidden joints. (Find it here)
- Drill: A standard power drill is essential for operating the Kreg Jig and making pilot holes.
- Jigsaw: This tool will be used to cut the circular openings for your pet bowls.
- Wood Glue: While optional, wood glue adds significant strength and durability to your joints, ensuring your feeder stands the test of time.
- Wood: We creatively used leftover oak hardwood flooring, but any 3/4-inch thick wood planks will work wonderfully. Consider reclaimed wood for a truly rustic feel, or smooth MDF for a modern look.
- For a Big Dog Feeder: Aim for dimensions of approximately 22.5″L x 12″W x 6.5″H.
- For a Cat or Small Dog Feeder: Dimensions around 15″L x 7.75″W x 4.5″H are ideal. Adjust these based on your pet’s size and bowl dimensions.
- Pet Bowls: Crucially, choose bowls with a lip! This lip is what will rest on the wood, preventing the bowls from falling straight through the cutouts. Stainless steel bowls are excellent for hygiene and durability. (These are a great, affordable option)
Step-by-Step Tutorial: Building Your Rustic Pet Feeder
1. Mastering the Kreg Jig: Setting Up Your Wood
The Kreg Jig might look technical, but it’s surprisingly user-friendly. Begin by placing the Kreg Jig on a stable workbench or surface. To secure your wood, lift the lever on the right side of the jig to open the clamp. Slide your piece of wood into position, ensuring it’s firmly seated. Once aligned, push the lever to the left to lock the clamp, holding your wood securely in place. Proper clamping is key for accurate drilling.
2. Drilling Perfect Pocket Holes
Insert the stepped Kreg Jig drill bit (which comes with your Kreg Jig kit) into your drill. Position the drill bit into one of the guide holes on the jig. With firm, steady pressure, drill downwards through the guide hole. This action creates a precise “pocket hole” – an angled hole designed to conceal the screw head. These holes are essential for strong, hidden joints when connecting two pieces of wood. The video tutorial provides an excellent visual demonstration of this crucial step.
3. Selecting the Right Screws for Optimal Strength
An often-overlooked detail for Kreg Jig beginners is choosing the correct screw size. Fortunately, your Kreg Jig typically has helpful markings or a guide on its side that indicates the appropriate screw length based on the thickness of the wood you are using. Always refer to this guide to ensure you select screws that will create a strong, secure connection without protruding through the other side of your wood piece.
4. Assembling the Pet Feeder Base
Now for the assembly! For my cat feeder, I made two pocket holes in each side board to connect them securely to the top board. Lolly’s dog feeder, being larger and requiring more stability, included an additional back piece. For her design, she created a total of four pocket holes in each side board – two for attaching to the back panel and two for connecting to the top board. Finally, two more pocket holes were drilled from the back panel into the top board, creating a robust, box-like structure. This method results in a very sturdy feeder, perfect for even the most enthusiastic eaters!
Still with me? Fantastic! The hardest part of the Kreg Jig is understanding its purpose; the actual execution is quite straightforward. Once you’ve created all your pocket holes, position the first two pieces of wood you wish to join together. Using your drill with the Kreg Jig bit, drive the Kreg Jig screws all the way into the pocket holes, forming a strong, flush joint. You can add a dab of wood glue to the joint surfaces before screwing for even greater durability.
Once all the screws are securely drilled in and your feeder frame is assembled, give yourself a pat on the back! You’ve successfully used a Kreg Jig, a skill many DIYers aspire to master. Now, gently flip the feeder over so the top surface is facing upwards, ready for the next phase of customization.
5. Marking and Cutting Bowl Openings
This step is crucial for ensuring your pet bowls fit perfectly. Take your chosen pet bowls and turn them upside down onto the top surface of your assembled feeder. Carefully position them where you want them to sit, ensuring even spacing if you have two bowls. Lightly trace around the outer edge of each bowl with a pencil. This initial circle marks the full diameter of the bowl.
Next, remove the bowls. Inside each of the circles you just traced, draw a second, parallel circle approximately 1/4 inch inwards. This inner circle is your actual cutting line. The reason for this smaller inner circle is vital: it creates a ledge for the bowl’s lip to rest on, preventing the bowl from falling straight through the hole. After drawing the inner circles, erase the outer pencil marks to avoid confusion during cutting.
To prepare for jigsaw cutting, use a large drill bit to drill a couple of interconnected holes just inside the perimeter of your inner circle. These holes create a starting point and enough space for your jigsaw blade to easily enter the wood. Again, refer to the video tutorial for a clear demonstration of this technique.
With your jigsaw, carefully follow along the inner pencil line of each circle. Move slowly and steadily to ensure a smooth cut. Once you’ve completed the full circle, the waste wood piece will drop out, leaving a clean opening. Remember, the edge of this newly cut hole doesn’t have to be absolutely perfect, as the lip of your pet bowls will cover and conceal any minor imperfections, creating a neat finish.
6. Finishing Touches for Your Rustic Pet Feeder
Now for the satisfying part: simply slip your pet bowls into their newly cut openings. They should sit snugly, with their lips resting securely on the wooden ledge. If you prefer a cleaner look and wish to conceal the pocket holes created by the Kreg Jig, you have a couple of easy options. You can purchase specialized caps or plugs designed to fit perfectly into Kreg Jig holes. Alternatively, a bit of wood filler can be used to seamlessly fill the holes, which can then be sanded smooth and stained or painted to match your feeder. And just like that, your rustic elevated pet feeder is complete!
Beyond Rustic: Creating a Modern Chic Pet Feeder
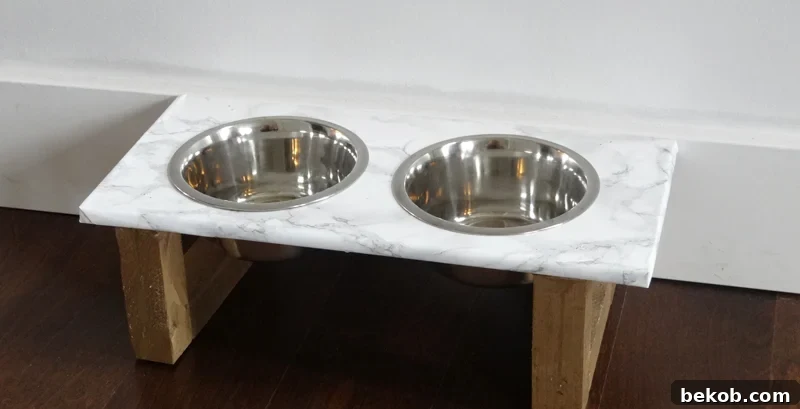
If your home decor leans more towards contemporary elegance or a sleek, minimalist style, then this modern chic pet feeder option is perfect for you. This design incorporates a sophisticated faux marble top with stylish metallic legs, offering a completely different aesthetic while maintaining the practical benefits of an elevated feeder. It’s a fantastic way to spoil your pet with a designer-look feeding station that truly complements a modern interior.
Above, you can see my beautiful cat, Bengal, demonstrating her impeccable taste (and perhaps a touch of sass!). This modern feeder was inspired by my earlier DIY marble console table, using the same ingenious material to achieve a luxurious look without the high cost or heavy lifting of real marble.
The key to this elegant design is high-quality faux marble contact paper, which offers an incredibly realistic marble appearance with the ease of application of contact paper. It’s a versatile material that I initially purchased for another project but quickly realized its potential for creating stunning, budget-friendly surfaces.
Step-by-Step Tutorial: Building Your Modern Pet Feeder
1. Constructing the Stylish Base Legs
This modern feeder is surprisingly simple to construct. Start by cutting a 2×2 piece of wood into six individual 5-inch segments. These pieces will form the elegant base of your feeder. Arrange these segments into the desired formations as shown in the accompanying photo. Once you have your design, use strong wood glue or Liquid Nails to securely bond the pieces together. It’s important to allow the glue to dry completely for at least 24 hours to ensure maximum stability and durability for the base.
2. Adding a Touch of Glamour: Gold Spray Paint
After the glue on your base legs has fully cured, it’s time to add a touch of modern sophistication. Thoroughly spray all exposed sides of the wooden base legs with a high-quality gold metallic spray paint. Apply several light coats, allowing each coat to dry according to the manufacturer’s instructions, to achieve a smooth, even, and radiant finish. This metallic touch is what truly elevates the “chic” aspect of this feeder.
3. Preparing the Faux Marble Top
While your gold spray paint is drying, prepare the top surface of your feeder. Cut a piece of wood or MDF, approximately 1/2 to 3/4 inch thick, into an 8″ x 17″ rectangle. This will be the foundation for your elegant marble top. Carefully place this wooden rectangle onto the sticky side of your chosen faux marble contact paper, ensuring it’s centered and aligned. Take your time to smooth out any air bubbles as you adhere the paper.
Now, meticulously wrap the remaining contact paper around the edges of the board, much like you would wrap a present. The self-adhesive nature of the contact paper means you won’t need any additional tape. Smooth down all edges and corners for a crisp, seamless finish, making sure the marble pattern extends beautifully over the sides.
4. Creating Bowl Openings for the Modern Top
Once your faux marble top is perfectly wrapped, it’s time to create the openings for the pet bowls. This process is identical to the one described for the rustic pet feeder. Carefully mark the bowl positions, draw the essential inner circle for the bowl’s lip to rest upon, create pilot holes with a drill, and then use your jigsaw to cut out the circles. Precision here will ensure a clean, professional look for your modern feeder. The video tutorial (linked above) also demonstrates this step clearly.
5. Final Assembly of Your Modern Chic Pet Feeder
With both the base and top prepared, it’s time for the final assembly. Apply a generous amount of wood glue or Liquid Nails to the top surfaces of your gold-painted base structures. Carefully measure and place the faux marble board evenly spaced onto the bases, ensuring perfect alignment. Once positioned, allow the glue to cure completely for at least 24 hours before handling the feeder to prevent any shifting. For enhanced durability and long-term stability, I opted to shoot a couple of small nails from the top of the board into each leg using a nail gun. Afterward, I simply filled the minor nail holes with a speck of spackle for a flawless finish.
And there you have it – a stunning, modern pet feeder ready to enhance your home and provide a comfortable dining spot for your beloved pet!
Which DIY Pet Feeder Style Suits Your Home Best?
We’ve walked through the creation of two distinct yet equally charming elevated pet feeders: the warmth of the rustic wood design and the sleek sophistication of the modern faux marble and gold stand. Both offer fantastic benefits, from promoting better digestion for your pet to simply keeping your feeding area neat and tidy. The choice truly comes down to your personal aesthetic and how you envision integrating your pet’s accessories into your home decor. Do you prefer the cozy, natural appeal of the rustic feeder, or the bold, contemporary statement of the modern design?
OR
I sincerely hope you enjoyed these detailed tutorials and feel inspired to tackle your next DIY project! Building custom pieces for your home and pets is incredibly rewarding. Please don’t hesitate to leave comments or ask any questions you might have about these projects—I’m here to help!
For more creative ideas, budget-friendly tips, and design inspiration, be sure to visit me over at Provident Home Design. You can also explore the complete transformation of Lolly’s laundry room makeover, which is packed with fantastic ideas, right here!
———————————————
More Ways to Repurpose Flooring (Beyond Your Floors!)
Discover innovative and resourceful ways to utilize flooring materials in your DIY projects, proving that these versatile planks aren’t just for walking on!
DIY Butcher Block Style Countertop from Flooring
(Learn how to create a stunning, cost-effective countertop, and read about its long-term performance here)
Transform Peel-and-Stick Vinyl Flooring into a Chic Backsplash
(An incredibly easy and affordable way to update your kitchen or bathroom backsplash with stylish plank flooring)
Expert Tips for Installing Hardwood Flooring (The Traditional Way!)
(For when you’re ready to put flooring where it truly belongs—on the floor—get our comprehensive installation advice)
Our Latest Flooring Choice and Installation Journey
(Follow along as we share our recent experience with selecting and installing new flooring in our home)