
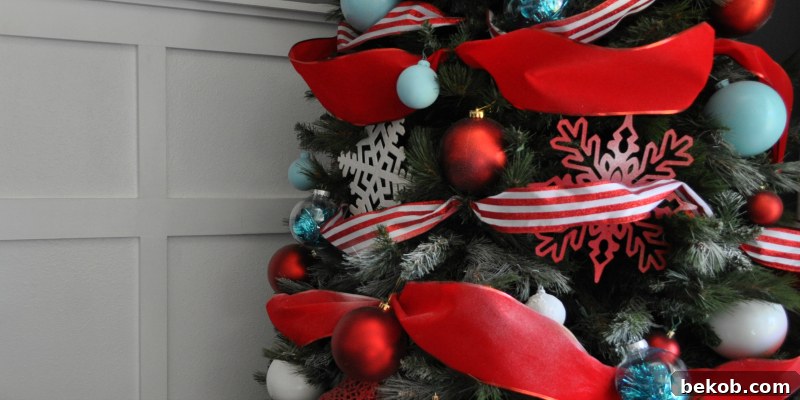
Transform your Christmas tree into a breathtaking festive masterpiece that looks professionally styled, all while keeping your budget happily intact! Our ultimate guide reveals brilliant decorating tips and clever tricks that enabled us to adorn a magnificent 10-foot tree for an astonishingly low cost – less than $50! Prepare to impress your guests and create cherished holiday memories with a tree that sparkles with designer flair.
For more inspiration on decorating a stunning Christmas tree without overspending, explore our other budget-friendly Christmas tree decor ideas featuring smart dollar store finds. Discover a range of styles including classic red and gold, elegant white and silver, and vibrant gold and blue themes.
Don’t miss our exclusive YouTube video tutorial, offering a visual walkthrough of these incredible budget-friendly decorating techniques! Be sure to subscribe to our YouTube channel for a wealth of DIY and home decor content.
This fantastic guide is brought to you by Corey of Sawdust2stitches.
Step-by-Step Guide to Decorating a Professional Christmas Tree on a Budget
Step 1: Illuminating Your Tree with Lights
The foundation of any spectacular Christmas tree begins with its lights. While we assume most households already possess a collection of lights, and thus won’t factor them into our budget total, it’s crucial to apply them correctly for that professional glow. There are various approaches to lighting a tree, but a method that consistently delivers excellent results is starting from the top and systematically working your way down, ensuring even coverage and a radiant sparkle.
Pro Tip for Lighting: Always plug in your lights before you start wrapping them around the tree. This simple trick allows you to immediately spot any dark patches, tangled sections, or areas that are either too sparse or overly crowded. It ensures a balanced and brilliant illumination across your entire tree.
Clever Money-Saving Hack: For trees placed in a corner or against a wall, strategically skip lighting the hidden back section. This clever “cheat” conserves strands of lights that would otherwise be unseen, allowing you to use them more effectively on the visible parts of the tree or even for other holiday decor. Of course, if your tree is a 360-degree display, visible from all angles, ensure every side is equally adorned with lights for a consistent and magical effect.
Step 1.5 (Optional): Embracing Little Helpers for a Family-Friendly Tree
If your home is filled with the joyful energy of little ones, involve them in the magic of tree decorating! This optional, yet highly recommended, step creates wonderful memories. Allow your children to take the lead, giving them the freedom to place ornaments (with gentle supervision to ensure items are handled carefully, especially if using any fragile pieces). After a few days, a common and delightful compromise can be reached where the adults “decorate the top half,” ensuring a harmonious blend of childlike wonder and sophisticated design. This approach truly offers a win-win, fostering family tradition while still achieving a beautifully styled tree.
Step 2: The Transformative Power of Ribbon
If there’s one single secret weapon you take away from this entire tutorial, let it be the ribbon! Seriously, ribbon is an absolute game-changer in Christmas tree decorating. It’s incredibly versatile, available in an endless array of colors, patterns, and textures, allowing you to customize your tree’s aesthetic effortlessly.
Smart Money-Saving Tip: Ribbon doesn’t have to be expensive! With a keen eye, you can find fantastic deals. Keep an eye out at warehouse clubs like Sam’s Club, dollar stores, and craft store sales. We once snagged a generous 25-yard roll of 5-inch wide ribbon for under $7 and only used 15 yards for our 10-foot tree. The key is to find wide, high-quality ribbon at an unbeatable price.
The most compelling reason to prioritize ribbon in your decorating strategy is the sheer amount of visual space it fills. By strategically weaving ribbon throughout your tree, you significantly reduce the number of expensive ornaments you’ll need to achieve a full, luxurious look. If saving money on your Christmas tree decor is a priority, do not skip the ribbon! The initial investment of approximately $5.00 for this first ribbon pays dividends by minimizing ornament costs.
Essential Decorating Tip for Ribbon: Please, whatever you do, avoid simply resting the ribbon on top of the branches. This common mistake makes the ribbon look flat and lacks dimension. Instead, create depth and interest by “scrunching” the ribbon into the tree. For artificial trees, gently bend the branches around the ribbon to secure it in place and give it a natural, flowing appearance. If you have a real tree, use a metal ornament hook (bending it like a bread twist-tie) to wrap around the ribbon and then attach it firmly to a sturdy branch. This scrunching technique not only keeps the ribbon securely in place but also adds beautiful variation and prevents it from masking too much of the lovely tree foliage.
Step 3: Layering More Ribbon for Depth and Texture
Don’t be shy when it comes to ribbon! As emphasized before, utilizing plenty of ribbon is a fantastic way to achieve a full, opulent look without the need for an overwhelming number of expensive ornaments. Think of ribbon as a cost-effective filler that adds immense visual impact.
For this project, we introduced a second ribbon – a stylish striped option that was 3 inches wide and an impressive 50 yards long, purchased for just $6.98! We used approximately 15 yards on our tree, leaving plenty leftover for garlands, gift wrapping, wreaths, or other festive crafts. The approximate cost for this second ribbon, allocated to the tree, was a mere $2.00, proving its incredible value.
Expert Decorating Tip: Create visual interest and sophistication by pairing a patterned ribbon with a solid-colored one. This layering technique adds depth and breaks up any monotony. Apply the second ribbon using the same “scrunching” method as the first, weaving it into the blank spaces of the tree. Don’t be afraid to let it cross over or under the solid ribbon – this natural intertwining creates an organic, professional appearance.
Related Reading: Craft a Winter Tablescape on a Dollar Store Budget
Step 4: Incorporating Extra Large Decorations for Dramatic Flair
To truly achieve a designer look, it’s essential to incorporate extra-large decorations that provide visual weight and break up the uniformity of smaller ornaments. These statement pieces draw the eye and add a luxurious, full appearance to your tree. The best part? You don’t need to splurge on these! Our secret weapon for oversized decor is, once again, the dollar store!
All the extra-large ornaments featured on our tree, such as the charming snowflakes (which often come in packs of two) and the elegant bells (typically $1 each), were sourced from a dollar store. These items are fantastic because they introduce diverse textures and shapes, preventing your tree from looking like it’s solely adorned with traditional spherical bulbs. They add an exciting dimension and variety that is characteristic of professionally decorated trees. The total cost for these impactful extra-large decorations was approximately $9.00.
Related Reading: Discover More Dollar Store Christmas Tree Decor Hacks
Key Decorating Tip: When placing these substantial ornaments, resist the urge to hang them on the very tips of the branches. Instead, nestle them slightly deeper into the tree’s foliage. This strategic placement creates incredible depth and dimension, making the tree appear richer and more layered. You’re not necessarily “hanging” them in the traditional sense; rather, you’re arranging them carefully on a sturdy branch or two, allowing them to become integral parts of the tree’s structure.
Combined Money-Saving & Decorating Tip: Unlock endless customization possibilities with spray paint! Many dollar store decorations come in basic colors. A can of spray paint can transform these inexpensive finds into unique, high-end looking pieces that perfectly match your desired color scheme. For instance, we spray-painted some snowflakes a vibrant red to add a bold pop of color and variation to our tree.
Step 5: Integrating Large Ornaments to Fill the Canvas
After placing your extra-large statement pieces, it’s time to introduce large ornaments. These bridge the gap between the oversized decorations and smaller fillers, contributing significantly to the tree’s overall fullness and visual appeal. While a dollar store pack of 16 smaller ornaments might cost $5, individual large ornaments at $1 apiece may seem pricier. However, their ability to fill substantial blank spaces makes them an invaluable investment in achieving a professional look on a budget.
Observe the image below: a mere $10 worth of these large dollar store ornaments dramatically filled a majority of the remaining empty areas on our tree. This demonstrates how a relatively small investment in larger items can have a massive impact, saving you money on needing dozens of tiny ornaments. The total cost for these essential large ornaments was $10.
Inspired Decorating Tip: Dollar stores often have limited color palettes for their ornaments. Don’t let this constrain your vision! Remember, spray paint is your ultimate ally. It allows you to transform inexpensive, plain ornaments into custom-colored pieces that perfectly match your festive theme. You can learn more about how we painted our ornaments for a cohesive look here. This DIY approach not only saves money but also gives your tree a uniquely curated feel.
Step 6: Adding Winter Magic with Spray Snow
For an enchanting touch of winter wonderland charm, spray snow is an excellent, budget-friendly addition. This temporary spray product adds a beautiful, subtle texture that enhances dimension and fills visual space without the need for additional costly ornaments. It creates a delightful frosted effect, transforming your tree into a picturesque snowy pine.
Economical Money-Saving Tip: The key to using spray snow effectively is moderation. Apply it in short, controlled bursts and resist the urge to cover every inch of the tree. The goal is to create a delicate, frosted pine tree look, reminiscent of freshly fallen snow, rather than a completely white, artificial appearance. A light touch goes a long way in achieving that magical, natural winter effect.
Optimal Decorating Placement: Apply the spray snow at this stage, after the lights, ribbon, and larger ornaments have been placed. This ensures the delicate frosting adheres well and won’t get brushed off or obscured while you’re arranging other decorations. This sequence guarantees the spray snow acts as a beautiful finishing layer. The cost for a can of spray snow is typically around $1.50.
Step 7: Adding Small (Traditional-Sized) Ornaments
Now it’s time to bring in the traditional-sized ornaments, which, while “small” in comparison to our earlier larger pieces, are crucial for filling in the remaining gaps and adding a detailed finish to your tree. These classic bulbs are readily available and incredibly affordable, especially at dollar stores. We scored packs of 8 ornaments for just $1.00 each – an unbeatable deal! For our 10-foot tree, two such packs were sufficient to create a full and vibrant display.
The total cost for these essential small ornaments was a mere $2.00.
Customizing Your Tree’s Style: When selecting these smaller ornaments, consider your desired aesthetic. While we opted for traditional colors to complement our theme, you can easily shift the mood. For an elegant look, choose cream or gold bulbs. If a rustic vibe is more your style, opt for browns or deep reds. Use these accent colors to personalize your tree and make it perfectly suit your home’s decor and your holiday vision.
Step 8: Adding a Pop of Color for Vibrancy and Personality
Introducing a “pop” color is where your tree truly comes to life and expresses its unique personality. Surprisingly, many of our vibrant “pop” color ornaments are actually the same dollar store ornaments we used in steps 5 and 7. The magical difference? A simple can of spray paint! This year, we chose a beautiful light turquoise/seafoam shade, and we absolutely adore the fresh, modern feel it brings.
The beauty of this method is the freedom it offers. You’re never “married” to a specific color scheme because a can of spray paint is incredibly affordable (typically around $3.79). This means you can easily refresh your tree’s entire look year after year with minimal effort and expense.
Unbeatable Money-Saving Tip: The ability to change your accent color annually for just about $4.00 by simply repainting your previous years’ bulbs is an unparalleled hack. It’s an eco-friendly way to recycle and refresh your decorations, keeping your holiday decor exciting and on-trend without breaking the bank.
Beyond spray paint, another ingenious way to introduce a pop of color is by using basic clear ornaments filled with tinsel. This technique is equally versatile, allowing you to easily swap out tinsel colors each year to match your evolving decor preferences. You can delve into the full tutorial for creating these easy tinsel ornaments here. The combined cost for our vibrant pop color elements, including spray paint and any new small ornaments, was approximately $13.50.
Step 9: Crowning Your Creation with a Dazzling Tree Topper
As tradition dictates, the tree topper is the grand finale, symbolically completing your magnificent Christmas tree. While many opt for elaborate, expensive toppers, our budget-friendly approach proves that you can achieve stunning results with dollar store finds. For our tree, we chose a simple yet elegant $1 star and paired it with a $0.50 snowflake (purchased in a 2-for-$1 pack) for a total cost of just $1.50. This small investment delivers significant impact.
Clever Decorating Tip: To elevate a simple tree topper and give it a more luxurious, custom appearance, consider layering. By combining the star and snowflake, we created a unique, dimensional topper that looks far more expensive than it actually was. Experiment with different combinations of inexpensive elements to craft a truly bespoke crown for your tree.
Step 10: Adding Personalized Touches with DIY Extras
To truly make your Christmas tree unique and infuse it with personal charm, consider adding a few DIY “extras.” These handcrafted elements not only stand out but are also incredibly cost-effective. For instance, we created some delightful, quirky ornaments for virtually nothing! These intriguing decorations were fashioned from small dollar store ornaments (the 16-pack for $1.00 variety), white pony beads, a white metal coat hanger, hot glue, and a drill. A little creativity goes a long way in transforming humble materials into bespoke holiday treasures.
The total cost for these inspiring DIY additions was approximately $3.00, demonstrating how much character and artistry you can achieve with minimal expenditure. By incorporating such unique pieces, your tree will tell a story and reflect your individual style, setting it apart from mass-produced displays.
The Grand Total: A Designer Tree for Under $50!
Here’s a transparent breakdown of how we decorated a stunning 10-foot Christmas tree with a professional, high-end aesthetic for an unbelievably low price:
- 5″ Wide Ribbon: $5.00
- 3″ Wide Ribbon: $2.00
- Extra Large Decorations: $9.00
- Large Ornaments: $10.00
- Spray Snow: $1.50
- Small Ornaments: $2.00
- Pop Color Ornaments (including spray paint): $13.50
- Tree Topper (Star & Snowflake): $1.50
- DIY Extra Something: $3.00
- TOTAL COST: $49.50
Beyond the Beauty: Practical Benefits of Our Budget Tree
One of the most remarkable features of this dazzling Christmas tree isn’t just its beauty or its affordability – it’s incredibly practical! This entire setup is robustly kid-proof. By opting for durable, often plastic, ornaments and decorations, we’ve created a festive display that withstands curious little hands and playful moments without ever looking “cheap.” Parents can relax and enjoy the holidays without constant worry about fragile glass ornaments breaking.
Another fantastic selling point is the unparalleled ease of packing away Christmas at the end of the season. Forget the tedious chore of individually wrapping delicate ornaments! With this tree’s resilient decorations, you can literally toss most of them into a bin. This dramatically cuts down on cleanup time, making post-holiday tidying a breeze. No more worrying over glass shards or meticulously boxing up each piece; simply store them away until next year’s festivities. Happy Holidays, and may your professionally styled, budget-friendly tree bring immense joy and ease!
Explore More Affordable Christmas Inspiration
Dive deeper into the world of creative, budget-friendly Christmas decorating. Discover more affordable Christmas ideas here, and specifically, explore additional Dollar Store Christmas Tree themes:
- Dapper Gold and Blue Nutcracker Dollar Store Christmas Tree Decor
- Enchanting Winter Wonderland White and Silver Dollar Store Christmas Tree Decor
- Video Tutorial: Creating a Classic Red and Gold Dollar Store Christmas Tree
Plus, explore a variety of Christmas tree decorating tips and captivating themes:
- Sparkling Silver and Gold Christmas Tree complemented by a Luxurious Faux Fur Tree Skirt
- Whimsical Pink, Blue, and Gold Nutcracker Christmas Tree
- Rustic Woodland Christmas Tree Decor
- Sophisticated Black and Gold Christmas Tree Decorating Tutorial
- Effortless Elegant Christmas Tree Decor in 5 Simple Steps
Originally published 11.21.2014 // Updated 09.18.2020