
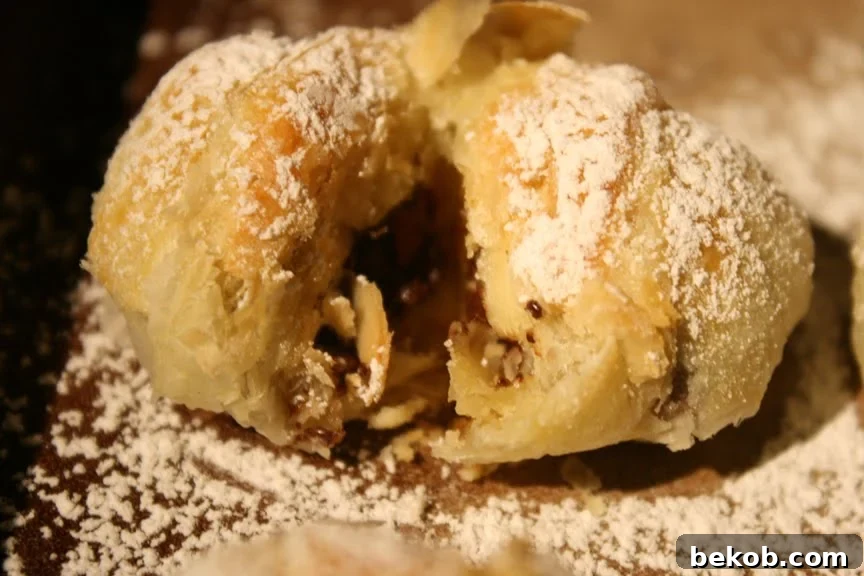
Indulge in Homemade Bliss: The Ultimate Mini Chocolate Croissant Recipe
Have you ever experienced the sheer delight of a truly exquisite chocolate croissant? That moment when your teeth break through layers of delicate, buttery pastry to reveal a molten core of rich, dark chocolate? If you haven’t, you’re in for a treat, and if you have, prepare to recreate that magic in your own kitchen.
For me, a perfectly baked chocolate croissant isn’t just a pastry; it’s a small piece of edible art, a breakfast revelation, and a comforting companion to a morning coffee. It’s an indulgence that truly elevates any day. (And for those lucky enough to be in Logan, Utah, a visit to Crumb Brothers for one of their legendary croissants is an absolute must – trust me, you’ll be thinking of me wishing I could join you!)
From College Challenge to Culinary Triumph: My Easy Croissant Secret
The journey to perfecting an effortless chocolate croissant recipe began during my college days. I was tasked with providing food for our Senior Exhibit, and while I wanted something impressive and sophisticated, my budget and time constraints were, let’s just say, “student-friendly.” I needed a dish that would wow my peers and professors without requiring hours of complex baking techniques.
That’s when inspiration struck: a shortcut so simple, so effective, it felt like cheating. My solution was a “put-together,” not “made-from-scratch” version of mini chocolate croissants. It quickly became my go-to “never fails to impress” recipe, a testament to how elegant results can be achieved with minimal effort. This recipe is designed to be super simple, requiring no actual dough-making, just the assembly of a few key ingredients. It’s proof that you don’t need to be a pastry chef to create something truly delicious and beautiful.
The Magic Ingredient: Why Puff Pastry is Your Best Friend
The secret weapon behind these effortlessly impressive mini chocolate croissants is store-bought puff pastry. For centuries, croissants have been a symbol of French bakery excellence, renowned for their intricate layers, achieved through a laborious process of folding and rolling butter into dough. While the traditional method is a beautiful art form, it’s also incredibly time-consuming and often intimidating for the home baker.
This is where puff pastry steps in as a culinary hero. It’s a miracle ingredient, pre-prepared with all those wonderful, buttery layers, ready to be transformed. Each sheet of puff pastry is a testament to careful craftsmanship, containing hundreds of delicate laminations that, when baked, puff up into a light, airy, and impossibly flaky texture. Using it means you skip the most labor-intensive part of croissant making, allowing you to focus on the fun and creative aspects of filling and baking. It’s not just a shortcut; it’s a gateway to enjoying gourmet pastries with everyday ease.
By harnessing the power of ready-made puff pastry, you unlock a world of baking possibilities, turning what seems like an advanced baking project into a simple, enjoyable endeavor. This recipe truly embraces the beauty of simplicity without compromising on taste or texture, delivering croissants that are just as golden, flaky, and delightful as their more labor-intensive counterparts.
Yields: Approximately 16-24 mini croissants
Prep time: 15-20 minutes
Bake time: 12-15 minutes
Ingredients:
- One package (typically 2 sheets) frozen puff pastry, thawed according to package directions
- 1/2 bag (about 6 ounces) semi-sweet chocolate chips (or chocolate batons/chopped chocolate bar for an authentic touch)
- 1-2 large eggs, beaten (for egg wash)
- Non-stick cooking spray or parchment paper
- Powdered sugar, for dusting (optional, but highly recommended)
Equipment You’ll Need:
- Baking sheet(s)
- Parchment paper (recommended for easy cleanup)
- Pastry brush
- Sharp knife or pizza cutter
- Wire cooling rack
Step-by-Step Instructions:
- Thaw the Puff Pastry: Remove the puff pastry package from the freezer and let it thaw in the refrigerator for several hours or at room temperature for about 30-40 minutes. It should be pliable but still cool. Do not over-thaw, as it can become sticky and difficult to work with.
- Prepare Your Workspace: Lightly flour a clean work surface. Carefully unroll one sheet of thawed puff pastry. If it cracks, gently press the edges together to seal.
- Cut the Pastry: Using a sharp knife or pizza cutter, trim the edges to create a neat rectangle. Then, cut the rectangle into smaller triangles. A common method is to cut the pastry in half lengthwise, then cut each half into triangles (e.g., if you have a 10×10 inch square, you might cut it into 2 rectangles of 5×10, then cut each rectangle into 4-5 triangles, resulting in 8-10 triangles per sheet). Aim for roughly 3-4 inch bases for mini croissants.
- Add the Chocolate: Place a small spoonful of semi-sweet chocolate chips (about 5-7 chips) or one chocolate baton at the wider base of each pastry triangle. Ensure the chocolate is centered and not too close to the edges, as it will melt and spread.
- Roll the Croissants: Starting from the wide base, gently but firmly roll each triangle towards the point. The goal is to create the classic croissant shape. You can slightly curve the ends inward to form a crescent if desired. Place the rolled croissants seam-side down on a baking sheet lined with parchment paper or lightly sprayed with non-stick spray.
- Apply Egg Wash: In a small bowl, lightly beat 1-2 eggs. Using a pastry brush, gently brush the tops and sides of each mini croissant with the egg wash. This will give them a beautiful golden-brown color and a subtle sheen as they bake.
- Preheat Oven & Bake: Preheat your oven to 425°F (220°C). Once preheated, place the baking sheet in the oven and bake for 12-15 minutes, or until the croissants are puffed up, golden brown, and the chocolate is melted and slightly oozing. Baking time may vary depending on your oven and the size of your croissants.
- Cool and Serve: Carefully remove the baking sheet from the oven. Transfer the mini croissants to a wire cooling rack to cool slightly. While still warm, you can lightly dust them with powdered sugar for an extra touch of sweetness and visual appeal.
Pro Tips for Perfect Croissant Perfection:
- Quality Chocolate Matters: While semi-sweet chocolate chips work wonderfully, consider using good quality chocolate batons (pain au chocolat) or chopping a high-quality semi-sweet or dark chocolate bar for an even richer, more sophisticated flavor and melt.
- Don’t Skip the Egg Wash: The egg wash isn’t just for color; it helps create that desirable glossy finish and contributes to the crispness of the outer layers.
- Give Them Space: Ensure your croissants are not overcrowded on the baking sheet. Leave at least an inch between each one to allow for proper airflow and even puffing. If necessary, use two baking sheets.
- Cooling is Key: While tempting to devour them straight from the oven, allowing them to cool on a wire rack for a few minutes helps them set and prevents the bottoms from becoming soggy.
- Freezing for Later: As mentioned in the original recipe, these mini croissants are fantastic for preparing ahead! After step 7 (rolling and egg washing), you can arrange them on a baking sheet and freeze them until solid. Once frozen, transfer them to an airtight freezer-safe bag or container. When you’re ready to bake, simply place the frozen croissants on a prepared baking sheet and let them thaw at room temperature for about 20-30 minutes before baking as directed. This makes them perfect for impromptu brunches or last-minute cravings.
Serving Suggestions and Customizations:
These mini chocolate croissants are incredibly versatile. They make an ideal addition to a weekend brunch spread, a delightful accompaniment to your morning coffee or tea, or even a charming dessert after dinner. Pair them with fresh fruit, a dollop of whipped cream, or a dusting of cinnamon for an extra touch.
Feeling adventurous? Don’t stop at chocolate! Experiment with other fillings like Nutella, a spoonful of fruit jam, cream cheese, or even savory options like ham and cheese for a different twist. The beauty of using puff pastry is its adaptability – let your creativity shine!
A Glimpse into Croissant History:
While often associated with France, the croissant actually has its origins in Vienna, Austria, dating back to the late 17th century. Legend has it that the “kipferl,” a crescent-shaped pastry, was created to celebrate the defeat of the Ottoman siege of Vienna. The crescent shape was inspired by the crescent moon on the Ottoman flag.
It wasn’t until the 19th century that the kipferl made its way to France, evolving into the iconic flaky pastry we know today. French bakers adapted the recipe, incorporating puff pastry techniques (pâte feuilletée) to give it its characteristic airy, layered texture. The “pain au chocolat,” or chocolate bread, followed, cementing the chocolate croissant’s place as a beloved staple in French patisseries worldwide. Understanding this rich history only adds to the enjoyment of each bite, connecting you to centuries of culinary tradition.
Now, Go Forth and Bake! (And Try Not to Eat Them All at Once!)
This recipe is more than just a quick fix; it’s an invitation to bring the aroma of a French patisserie into your home, effortlessly. You’ll be amazed at how simple it is to create these stunning, delicious mini chocolate croissants that taste like they came from a high-end bakery. Whether you’re impressing guests, treating your family, or simply indulging yourself, this recipe promises flaky, chocolatey perfection every single time.
So, gather your ingredients, follow these easy steps, and prepare to embark on a delightful baking adventure. Your taste buds (and your ego!) will thank you. Just remember the final, most challenging step: trying not to devour the entire batch in one sitting!