
Transform Your Kitchen: 5 Super Easy DIY Projects for Instant Impact
The kitchen, often considered the heart of the home, is a space where countless memories are made – from daily meals to festive gatherings. Yet, it’s also a room that can quickly feel outdated or cluttered, constantly demanding our attention. Many homeowners dream of a complete kitchen overhaul, but the reality of time, budget, and disruption often puts those plans on hold. What if we told you that achieving a fresh, inviting, and highly functional kitchen doesn’t always require a major renovation? Sometimes, the most impactful changes come from small, clever, and surprisingly simple DIY projects.
This article is dedicated to empowering you with quick and easy kitchen transformations. We’ve curated five brilliant ideas that focus on adding charm, organization, and a touch of personal style without breaking the bank or consuming your entire weekend. These projects are perfect for anyone looking to inject new life into their kitchen – whether you’re a seasoned DIY enthusiast or just dipping your toes into home improvement. Get ready to discover how a few thoughtful details can make a world of difference, enhancing both the aesthetics and practicality of your culinary sanctuary.
1. Stylish Cookbook Storage: Repurposing a Wood Crate
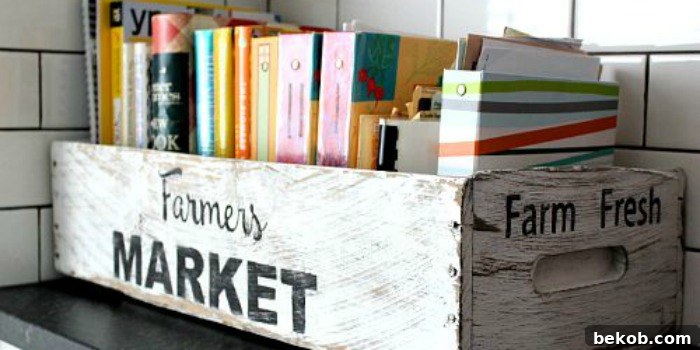
Cookbooks are more than just recipes; they are often cherished collections, visual delights, and sources of culinary inspiration. However, keeping them organized and easily accessible can be a challenge, especially in a busy kitchen. Cluttered countertops or overflowing cabinets can detract from the overall aesthetic. This is where a simple, rustic wood crate comes into play, offering a charming and incredibly practical solution for cookbook storage.
A repurposed wood crate effortlessly blends functionality with a distinct farmhouse or rustic appeal, but its versatility means it can complement a variety of kitchen styles. Imagine a vintage-inspired crate, perhaps with original markings or a fresh coat of paint, sitting gracefully on your counter or a shelf. It instantly adds character while neatly containing your most frequently used cookbooks.
Why Choose a Wood Crate for Cookbooks?
- Aesthetic Appeal: Wood crates bring warmth, texture, and a touch of vintage charm to any kitchen decor. They can be found in various sizes and finishes, allowing you to choose one that perfectly matches your space.
- Cost-Effective: Compared to custom-built shelving or specialized organizers, wood crates are often inexpensive, especially if you can source them from flea markets, antique shops, or even craft stores.
- Portability: A crate can be easily moved, allowing you to reconfigure your kitchen layout or bring your cookbooks closer to your prep area when needed.
- Versatility: Beyond cookbooks, a crate can store spices, oils, utensils, or even small potted herbs, making it a multi-functional piece for your kitchen.
Customizing Your Cookbook Crate:
While a raw wood crate has its own rustic beauty, you can easily customize it to fit your personal style. Consider sanding and staining it for a richer, more polished look. A coat of chalk paint can give it a charming distressed finish, perfect for shabby chic or French country kitchens. You could even add small caster wheels to the bottom for effortless mobility, or stencil a fun phrase like “Farm Fresh” or “Recipes & Remedies” on the side. The possibilities are endless, allowing you to transform a simple crate into a unique statement piece that reflects your kitchen’s personality and helps keep your culinary collection tidy and inspiring.
2. Instant Greenery: Crafting a DIY Succulent Centerpiece
Sometimes, the quickest way to refresh a room is not by overhauling the furniture or repainting walls, but by introducing a single, vibrant element. In the kitchen or dining room, a well-chosen centerpiece can dramatically elevate the space, adding life, color, and a focal point. For a touch of natural beauty that’s both stylish and low-maintenance, a DIY succulent centerpiece is an excellent choice.
Succulents are incredibly popular for a reason: their unique shapes, varied textures, and vibrant hues bring an organic elegance to any setting. Plus, they are famously resilient and require minimal care, making them perfect for busy households or those without a green thumb. A succulent centerpiece isn’t just a decorative item; it’s a living piece of art that can transform your dining table, kitchen island, or even a sunny windowsill.
Benefits of a Succulent Centerpiece:
- Low Maintenance: Succulents thrive on neglect, requiring infrequent watering and tolerating a range of indoor conditions.
- Year-Round Beauty: Unlike cut flowers, a succulent arrangement will last for months, providing continuous greenery and color.
- Versatile Style: From modern minimalist to bohemian chic, succulents can fit into almost any decor style. Choose your container wisely to set the tone.
- Air Purifying: Like all plants, succulents contribute to better indoor air quality, making your kitchen a healthier environment.
Designing Your Succulent Masterpiece:
Creating your own succulent centerpiece is a fun and rewarding project. You’ll need a suitable container – think shallow bowls, rustic wooden boxes, vintage teacups, or even repurposed tin cans for a more industrial look. Layer the bottom with drainage pebbles, then add a specialized succulent potting mix. Arrange a variety of succulents, mixing different shapes, sizes, and colors for visual interest. Consider adding decorative elements like small stones, pebbles, or moss to complete the look. The beauty of a DIY succulent centerpiece lies in its ability to be customized, reflecting your personal taste and adding a fresh, organic touch that brightens your kitchen instantly.
3. Rethinking Utility: Crafting Your Perfect Rolling Trash Can
The humble trash can – often overlooked, sometimes an eyesore, but undeniably an essential part of any functional kitchen. While it might not traditionally be considered a “design feature,” its presence and performance significantly impact the cleanliness, organization, and overall flow of your culinary space. Instead of settling for a generic, uninspiring bin, imagine a trash can that perfectly meets your needs, blends seamlessly with your decor, and offers enhanced functionality. This is where the concept of a DIY rolling trash can solution shines.
A custom-designed, rolling trash can unit addresses common kitchen dilemmas: where to hide the bin, how to make it easy to use, and how to keep odors at bay. By transforming a standard trash can into a more integrated and mobile solution, you’re not just creating a place for waste; you’re optimizing your kitchen’s efficiency and aesthetic appeal.
Why Invest in a DIY Rolling Trash Can?
- Enhanced Mobility: Casters or wheels allow you to easily move the trash can closer to your prep area while cooking, or tuck it away discreetly when not in use.
- Custom Integration: You can build a custom enclosure around your trash can, making it look like a piece of furniture rather than a standalone bin. This allows for better integration with your existing cabinetry and decor.
- Improved Hygiene & Odor Control: A well-designed enclosure can help contain odors more effectively. You can also incorporate features like a lid that opens with a foot pedal, minimizing contact.
- Additional Counter Space or Storage: If you build an enclosure with a flat top, it can serve as extra counter space, a small staging area, or even a spot for a cutting board.
- Personalized Aesthetics: Paint or stain your custom enclosure to match your kitchen’s color scheme, making a utilitarian item a stylish component of your kitchen.
Designing Your Ideal Trash Solution:
Consider the size and type of trash can you use. Will it be a single bin for general waste, or will you integrate recycling compartments? For a simple rolling solution, attach heavy-duty casters to the bottom of a sturdy bin. For a more sophisticated approach, you could construct a wooden cabinet with a pull-out drawer mechanism or a tilt-out front panel, resembling a custom-built kitchen island extension. This project offers incredible flexibility to create a trash management system that is truly “perfect” for your unique kitchen layout and lifestyle, proving that even the most practical items can be elevated through thoughtful design.
4. Elevating Open Shelving: Adding Texture with Interior Planking
Open shelving has become a hallmark of modern kitchen design, offering a blend of functionality and aesthetic appeal. It allows you to display cherished dishware, artisanal pottery, or frequently used ingredients, making your kitchen feel more spacious and inviting. The simple act of removing cabinet doors can instantly transform the look and feel of your kitchen, creating an airy, contemporary vibe. However, to truly make your open shelves stand out and add a layer of sophisticated detail, consider going a step further by adding texture to the interior back of the cabinet.
This project, as exemplified by Two Feet First, involves installing planked detailing inside the cabinet, creating a visually interesting backdrop for your displayed items. This simple addition not only enhances the aesthetic but can also cleverly hide imperfections, like old anchors or uneven walls, giving your shelves a professional, custom-built look.
Why Texturize Your Open Shelves?
- Adds Depth and Interest: A plain painted back can look flat. Planking introduces shadows and lines, giving the display area more character.
- Defines the Space: It visually frames your items, making them pop against the textured background.
- Hides Imperfections: As mentioned, it’s an ingenious way to conceal minor wall damage or previous fixtures.
- Enhances Style: Whether you opt for beadboard, shiplap, or simple tongue-and-groove planks, this texture can reinforce a specific design aesthetic, from farmhouse rustic to coastal chic.
- Cost-Effective Upgrade: Compared to replacing entire cabinets or installing custom shelving, adding interior planking is a relatively inexpensive way to achieve a high-end look.
Implementing Interior Planking:
The process is straightforward: measure the interior back of your cabinet, cut thin wood planks (or even MDF panels routed to look like planks) to size, and secure them with adhesive and/or small nails. You can choose to paint them the same color as your cabinet, a contrasting color, or a complementary shade to create a subtle feature. This textured backdrop not only elevates the perceived value of your cabinetry but also makes your displayed items look more curated and intentional. It’s a small detail that yields a significant impact, transforming simple open shelves into captivating focal points within your kitchen.
5. Creative Backsplash Solution: DIY Wood Shim Herringbone Design
A kitchen backsplash is much more than a functional surface protecting your walls from splashes; it’s a powerful design element that can define the style and character of your entire kitchen. While traditional tile backsplashes are always a classic choice, they can sometimes be costly and labor-intensive to install. For those seeking a unique, budget-friendly, and strikingly visual alternative, a DIY wood shim herringbone backsplash offers an ingenious solution, as expertly demonstrated by DIY Passion.
Wood shims, typically used for leveling, are inexpensive and readily available at any hardware store. When cut and arranged in a herringbone pattern, they transform into a stunning, textured backsplash that brings warmth, depth, and an unexpected element of design to your kitchen. This project is particularly effective under open shelving or in smaller areas where you want to make a big impact without overwhelming the space.
Advantages of a Wood Shim Backsplash:
- Unique Aesthetic: The herringbone pattern, combined with the natural variations in wood grain and thickness of the shims, creates a captivating, dimensional look.
- Budget-Friendly: Wood shims are incredibly affordable, making this a high-impact upgrade that won’t strain your wallet.
- Warmth and Texture: Wood inherently adds warmth and an organic texture that contrasts beautifully with common kitchen materials like stone countertops or metal appliances.
- DIY Accessibility: While it requires patience for cutting and arranging, the process is generally manageable for DIY enthusiasts, offering a satisfying sense of accomplishment.
- Customizable Finish: You can leave the shims natural, stain them to match existing wood tones, paint them for a pop of color, or whitewash them for a coastal feel.
Creating Your Herringbone Masterpiece:
The key to this project lies in precision cutting and careful arrangement. Start by ensuring your wall surface is clean and dry. You’ll cut the wood shims into equal lengths (or varying lengths for a more distressed look) and then arrange them in the characteristic ‘V’ shape of the herringbone pattern, securing them to the wall with a strong adhesive. Once the pattern is complete, you can seal the wood for protection against moisture and wear, and then finish it with your desired paint or stain. The result is a bespoke backsplash that feels luxurious and handmade, proving that creativity and simple materials can lead to truly remarkable kitchen transformations.
Beyond the Basics: Empowering Your Kitchen Transformation Journey
As we’ve explored these five super easy kitchen projects, it becomes clear that transforming your kitchen doesn’t have to be an overwhelming or expensive endeavor. From clever organization solutions like a repurposed wood crate for cookbooks to a vibrant, low-maintenance succulent centerpiece, and from the ultimate custom rolling trash can to visually striking open shelving with added planking, and finally, a unique wood shim herringbone backsplash – each idea offers a tangible way to enhance both the beauty and functionality of your culinary space.
These DIY kitchen upgrades are more than just quick fixes; they are opportunities to infuse your personality into your home, solve everyday frustrations, and create an environment that truly reflects your style and needs. They demonstrate that thoughtful details, executed with a little creativity and effort, can yield results that feel custom-designed and high-end, without the associated price tag or professional installation.
Whether your goal is to add a touch of rustic charm, introduce modern minimalist elegance, or simply make your kitchen more organized and enjoyable, these projects provide a fantastic starting point. Don’t underestimate the power of small changes; they often build up to create the most profound and satisfying transformations. So, gather your tools, spark your imagination, and get ready to turn your kitchen dreams into a beautiful, functional reality. Your ideal kitchen is just a few easy projects away!