
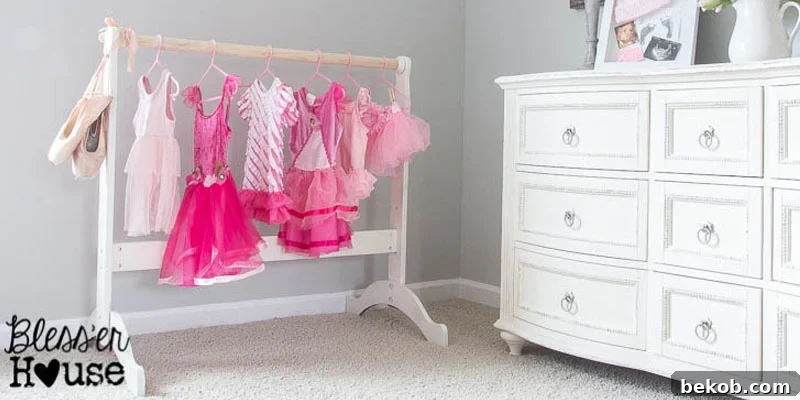
Welcome, fellow DIY enthusiasts! Amy here from Hertoolbelt, thrilled to share another exciting build project with you. Today, we’re diving into creating a delightful and incredibly functional DIY Dress Up Rack – the perfect storage solution for your little one’s imaginative play costumes. This project draws inspiration from the wonderfully creative Lauren at Bless’er House, who ingeniously upcycled a cheap yard sale bassinet into the cutest DIY Dress Up Rack for her daughters. You can admire her original creation and read all about it here.
Lauren has graciously allowed us to develop detailed build plans for her charming dress-up rack. This means that even if you don’t stumble upon a lucky yard sale find, you can still easily construct this fantastic piece of furniture. It’s designed to be both sturdy and stylish, providing a dedicated space for all those princess gowns, superhero capes, and fantastical outfits that fuel hours of creative play. Get ready to transform your child’s room into an organized and inspiring haven for make-believe!
Isn’t that so adorable! A dream come true for any aspiring princess or mighty superhero!
The Ultimate Guide to Building Your Own DIY Dress Up Storage Rack
Creating a dedicated space for dress-up clothes not only helps keep costumes tidy and organized but also encourages imaginative play. When children have easy access to their costumes, they are more likely to engage in creative role-playing, which is vital for their development. This DIY Dress Up Storage project is designed to be affordable, achievable, and utterly charming, making it a perfect addition to any child’s bedroom or playroom. You’ll be amazed at how simple it is to construct, even if you’re a beginner woodworker!
Planning Your DIY Dress Up Rack: Dimensions and Design
Before we gather our tools and materials, let’s take a moment to visualize the final product. Understanding the dimensions and overall design will help you with each step of the build process. This rack is designed to be compact yet spacious enough to hold a variety of costumes, from floor-length gowns to smaller accessories. The gentle curves of the feet and vertical supports add a touch of elegance, making it more than just a functional piece but also a beautiful addition to your home décor.
The following diagram provides a clear visual of all the necessary measurements, ensuring you can replicate this project with confidence. We’ve carefully calculated these dimensions to provide ample hanging space while maintaining a stable and child-friendly structure. Remember, a little planning goes a long way in achieving a professional-looking finish.
Gathering Your Essential Materials
One of the best aspects of this DIY dress-up rack is its affordability. We’ve optimized the design to use standard lumber sizes, keeping the cost under $20 for the wood alone. Here’s a detailed list of what you’ll need, along with some helpful tips for selecting your materials:
- 1 3/8″ Round Dowel x 36″ Long (Closet Rod Dowel): This will serve as the sturdy hanging rod for all the costumes. Opt for a smooth, straight dowel without any cracks or splinters. Standard closet rods are perfect for this.
- 2 – 1″ x 4″ x 8′ Boards (Actual 3/4″ x 3 1/2″ – 3 1/4″): These boards will form the vertical supports and the crossbar. Choose pine or a similar soft wood for easy cutting and a lighter structure. Look for boards that are straight and free from warps or significant knots.
- 1 – 1″ x 6″ x 6′ Board (Actual 3/4″ x 5 1/2″): This larger board is for the stylish feet of the rack. Again, a clear, straight piece of pine will be ideal.
- 1 1/2″ Minimum Length Screws: These will be used for attaching the feet to the crossbar and the hanging rod to the vertical supports, ensuring strong, secure joints.
- 1 1/4″ Screws: Slightly shorter screws are perfect for attaching the vertical supports to the feet.
- Wood Glue: Don’t underestimate the power of wood glue! It provides a much stronger bond than screws alone and is crucial for the longevity of your rack.
- Sandpaper: You’ll need various grits to achieve a smooth finish. Start with a coarser grit (like 80-100) for shaping and smoothing rough cuts, then move to a medium grit (120-150) for fine finishing.
- Wood Filler: Essential for filling any screw holes, cracks, or minor imperfections, creating a seamless surface for painting or staining.
- Primer/Paint or Stain: (See Lauren’s post for specific product recommendations). The finishing touch that truly brings your project to life.
Approximate Wood Cost – Under $15
Note on Customization: While following these plans, I’ve slightly adjusted the crossbar height to allow a little more room for longer dresses to hang without touching the floor. Feel free to customize the length and height of this dress-up storage rack by adjusting the rod length, crossbar position, or the vertical support dimensions to perfectly suit your child’s needs and room space. This flexibility allows for a truly personalized piece!
Precision Cutting: Your Comprehensive Cut List
Accuracy is key when cutting your wood pieces. Double-check your measurements before making any cuts to ensure all components fit together perfectly. Use a reliable tape measure and a sharp pencil for marking. Remember the old adage: “Measure twice, cut once!”
- 2 – 3/4″ x 5 1/2″ x 22″: These pieces will form the decorative base feet of your rack.
- 2 – 3/4″ x 3 1/4″ x 34″: These are your vertical support pieces that will hold the hanging rod.
- 1 – 3/4″ x 3 1/4″ x 34 1/2″: This piece will serve as the horizontal crossbar connecting the feet.
- 1 3/8″ Round Dowel x 36″: This is your sturdy clothes hanging rod. If your dowel comes longer, you’ll trim it to size.
Step-by-Step Construction: Bringing Your Dress Up Rack to Life
Now that you have all your materials and cuts ready, it’s time to assemble your beautiful dress-up rack. Take your time with each step, ensuring precise alignment and strong joins. Don’t be afraid to ask for help if needed, especially with holding pieces during assembly.
Step 1: Crafting the Sturdy Base and Elegant Feet
Begin by taking your two pieces of 1×6 lumber, cut to 22 inches. These will become the distinctive feet of your dress-up rack. Next, you’ll need the pattern for the feet. Download and print the foot patterns: dress up feet 1 and dress up feet 2. It’s crucial that your printer settings are set to 100% scale, not ‘fit to page’, to ensure accurate sizing. Carefully line up the pattern pieces using the gray alignment lines as a guide, then tape them together to form the full pattern.
Trace this combined pattern onto your 1x6s. For cutting these curves, a band saw, scroll saw, or jig saw will work perfectly. Always wear appropriate safety gear, including eye protection, when operating power tools. Once cut, take the time to sand the feet thoroughly, smoothing any rough edges and refining the curves. This attention to detail now will make a big difference in the final look and safety of the rack.
Now, take your 1x4x34 1/2″ crossbar piece. Along the vertical center of each foot, carefully pre-drill pilot holes. These pilot holes are essential to prevent the wood from splitting when you drive in the screws. Apply a generous amount of wood glue to the ends of the crossbar where it will meet the feet. Attach the feet to both ends of the crossbar using the wood glue and 1 1/2″ minimum length screws. Make sure to countersink the screw heads so they are flush with or slightly below the wood surface, allowing for a smooth finish later.
Step 2: Erecting the Graceful Vertical Supports
Next, grab your two 1x4x34″ pieces. These will form the elegant vertical supports that hold your hanging rod. Just like with the feet, you’ll need a pattern for these supports. Download and print the vertical support pattern from dress up vertical pattern, again ensuring your printer settings are at 100% scale. Trace the pattern onto your 1x4s, carefully marking the center of the circular hole where the dowel will eventually sit.
Using a band saw, scroll saw, or jig saw, meticulously cut out the vertical supports, paying close attention to the smooth curves. Once the cuts are made, thoroughly sand all the curved edges to eliminate any roughness and ensure they are smooth to the touch. This step is crucial for both aesthetics and safety, as children will be interacting with this piece frequently.
With your vertical supports ready, align them carefully with the center of the feet you assembled in Step 1. Pre-drill pilot holes through the bottom of the vertical supports into the feet. Apply wood glue to the mating surfaces for maximum strength, then firmly attach the vertical supports to the feet using 1 1/4″ screws. Ensure they are plumb (perfectly vertical) before the glue sets. Clamps can be incredibly helpful here to hold the pieces steady while the glue dries and you drive in the screws.
Step 3: Installing the All-Important Hanging Rod
Now for the piece that will hold all those wonderful costumes! If your 1 3/8″ round dowel is longer than 36 inches, carefully cut it down to the precise 36-inch length. Remember those circles you marked on the vertical supports in Step 2? These marks indicate the exact location for your hanging rod.
Pre-drill pilot holes into the ends of the dowel where it will meet the vertical supports, and also through the vertical supports themselves, aligning with the marked circles. This ensures a clean attachment and prevents any splitting. Apply a bead of wood glue to the ends of the dowel before inserting it between the vertical supports. Secure the 1 3/8″ round rod by driving 1 1/2″ minimum length screws through the pre-drilled holes in the vertical supports and into the dowel ends. Make sure the rod is level and firmly attached, capable of holding the weight of several costumes.
And there you have it, the structural framework of your DIY Dress Up Storage is complete! You can already imagine the hangers filled with vibrant costumes.
Step 4: The Flawless Finish: Sanding, Filling, and Painting
The final step is where your dress-up rack truly comes to life with a professional and personalized finish. Begin by removing any excess wood glue that may have squeezed out during assembly. A damp cloth can wipe fresh glue, or a sharp chisel can scrape off dried glue.
Next, apply wood filler to all screw holes, any small cracks, or minor blemishes on the wood surface. Use a putty knife to press the filler firmly into the imperfections, then scrape away any excess, leaving a smooth surface. Allow the wood filler to dry completely according to the manufacturer’s instructions, which typically takes a few hours.
Once dry, it’s time for thorough sanding. Start with a medium-grit sandpaper (like 100-grit) to smooth the wood filler and initial rough areas. Then, switch to a finer grit (120-150 grit is ideal) to achieve a silky-smooth finish. Always sand in the direction of the wood grain to avoid unsightly scratches. After sanding, wipe down the entire rack with a tack cloth or a damp cloth to remove all dust, ensuring a clean surface for your chosen finish.
Finally, you’re ready to prime and paint or stain your dress-up rack. If painting, apply a good quality primer first; this will ensure better paint adhesion, a more uniform color, and a more durable finish. Once the primer is dry, apply your chosen paint in thin, even coats, allowing adequate drying time between each coat. If staining, follow the manufacturer’s instructions for application and wiping. For specific paint and finish ideas, be sure to check out Lauren’s original post, where she shares her choices and tips. A clear protective topcoat can also be applied for added durability and a professional sheen.
Personalize Your Creation and Enjoy!
Once your DIY dress-up storage rack is fully dry and cured, it’s ready for action! You can further personalize it by adding decorative hooks to the sides for accessories like hats, belts, or necklaces. Consider adding a small mirror nearby for the full dress-up experience. This project not only provides practical storage but also serves as a beautiful piece of furniture that enhances your child’s play area. It’s a rewarding project that will bring endless joy and inspire countless adventures for your little princess, superhero, or explorer!
Explore More Inspiring DIY Projects from Hertoolbelt
If you enjoyed building this dress-up rack, you’ll love the other creative and functional projects available from Hertoolbelt! We’re passionate about empowering you to create beautiful and useful items for your home. Check out some of our other popular build plans:
Curvy Side Table // Scroll Console Table // Crate Coffee Table
———————————
Beyond Costumes: Smart Toy Storage Solutions for a Tidy Home
Keeping a child’s room organized can be a continuous challenge, but with the right storage solutions, it becomes much more manageable. If you’re looking for more ways to conquer toy clutter and create a harmonious living space, explore these fantastic ideas for organizing all the toys:
easy rolling wire baskets
chalkboard toy boxes
built-in armoire + shelving
plus 50 more great toy storage ideas