
The Heart of Our Home: House Four’s Inspiring Kitchen Transformation (Before & After)
Welcome to House Four! To kick off our blog, we’re diving straight into the heart of our home—the kitchen. This isn’t just any kitchen renovation story; it’s a testament to vision, patience, and smart budgeting, culminating in a dramatic before-and-after transformation. So, grab a warm drink, settle in, and prepare for a comprehensive look at how we revitalized our kitchen, proving that dream spaces are achievable even on a “for now” budget. You’ll find plenty of photos, insights, and perhaps a little inspiration for your own home improvement journey.
For many, the concept of a “dream kitchen” is a vivid one, often compiled from years of magazine clippings, Pinterest boards, and architectural inspiration. I’m certainly no exception; I’ve meticulously curated a binder of kitchen ideas since 1999, envisioning a space with light-toned cabinetry (leaning towards a soft white, not stark), a generously sized island serving as a family hub for meals and homework, a sophisticated mix of dark and painted wood finishes, and integrated stainless steel appliances—or, ideally, completely concealed ones for a seamless look. Our previous home, House Two, a custom-built residence, came close to this ideal, boasting a spacious, bright kitchen, yet it never quite captured the essence of my ultimate vision.
Upon moving into House Four, we quickly recognized the potential to integrate several of our long-held kitchen desires, igniting a spark of excitement. This particular house, built approximately 20 years ago, was clearly heading towards a major kitchen overhaul within the next few years. However, a full-scale renovation wasn’t financially feasible when we purchased the property two years prior. This reality led us to embrace a “for now” renovation strategy—a series of impactful, cost-effective updates designed to dramatically improve the kitchen’s functionality and aesthetics without breaking the bank, setting the stage for future, larger projects.
A quick glance at the “before” photographs below will clearly illustrate the magnitude of the task ahead of us. The kitchen was a stark reminder of a bygone era. Dominating the countertops and backsplash was a questionable dusty rose ceramic tile, made even more jarring by a strip of black and pink accent tile. It was a design choice that seemed more appropriate for a 1980s bathroom than a kitchen. Compounding this visual assault were solid knotty pine cabinets, whose stain had aged into a rather pronounced orange hue. The cumulative effect was, to put it mildly, an assault on the senses—a kitchen desperately crying out for a modern touch and a cohesive design.
Adding to the kitchen’s dated charm was an extensive bank of plastic, fluorescent cove lighting that snaked around the ceiling perimeter above the upper cabinets. This feature, beyond its unappealing aesthetic, served an additional, unintended purpose, as we discovered during its removal: a veritable graveyard for flies. The sight was, frankly, quite gross, and its dismantling was one of our first and most satisfying steps towards reclaiming the space.
Here are a few “before” photos. Please note, these images were taken prior to our purchase of the home, so all furniture and decor belong to the previous owner, offering an unvarnished glimpse into its original state:
Indeed. The images speak for themselves.
The first item on our demolition checklist was that egregious cove lighting. Its removal immediately revealed a rather unfinished ceiling beneath, complete with numerous dangling wires—a clear indication of deferred maintenance. Our initial project was to meticulously repair these holes and seamlessly blend the rough ceiling texture with the rest of the room, preparing a clean canvas for our new design. Simultaneously, we decommissioned the oddly placed “boob” light above the modest island and removed the ceiling fan that had hovered over the previous owners’ kitchen table. These outdated fixtures were swiftly replaced by a quartet of modern pot lights, strategically positioned over the newly planned island area. Additionally, we installed a new fixture (which you’ll soon see in upcoming photos) designed to illuminate the stove, sink, and surrounding counter spaces effectively, enhancing both functionality and ambiance.
Next, we consulted a kitchen company for a quote on re-facing the entire kitchen and constructing a brand-new island with a solid surface top. The estimate for merely the cabinet doors came in at a staggering $8,000, and for a basic, rather uninspired white thermofoil door, no less. This was emphatically *not* the aesthetic or value we were seeking. If memory serves, the island alone would have added another $8,000, *plus* the cost of the counter, with desirable features like soft-closing drawers and wood interiors being significant additional expenses. This experience underscored the importance of exploring all available options, especially when working within a defined budget for a “for now” solution.
Remembering that our existing cabinet doors were solid wood, a lightbulb moment occurred: why not paint them? To spare you the exhaustive details of my research, we eventually sought out Benjamen Furniture Refinishing in Toronto—a highly regarded professional known for his meticulous work, even favored by design expert Sarah Richardson. He meticulously sprayed all 36 of our cabinet and drawer fronts with a durable lacquer paint for approximately $1,200, including taxes. Seriously. The transformation was beyond my expectations; they emerged more beautiful and refined than I had ever imagined. My only task was to paint the cabinet boxes to ensure a perfect match, a relatively straightforward DIY project. (Please note, this service was rendered in 2009, so current pricing may vary).
While our cabinet fronts were away undergoing their stunning transformation, I dedicated my efforts to the arduous task of removing the truly awful pink tile backsplash. This was a project that tested my resolve:
The original backsplash was unequivocally ugly, and the removal process was equally unglamorous. It consumed an entire weekend of intense labor, and that was just for the backsplash alone; the countertops would follow. My arms were barely functional afterward, giving me a profound appreciation for why professional tile removal commands such a significant cost. This phase truly highlighted the physical demands of a DIY renovation, but the vision of a cleaner, brighter kitchen kept me motivated.
I can hardly believe I’m about to share this next photo. Taken, I believe, directly after lunch, it starkly illustrates the sheer chaos that consumed our kitchen. There is literally “crap EVERYwhere.” However, it’s an honest snapshot of what we endured for several weeks while patiently awaiting the return of our cabinet doors, the arrival of new backsplash tiles, the installation of fresh counters, and the construction of our new island. It was undeniably a challenging period, but a necessary evil in the journey towards our dream kitchen:
This post is becoming quite lengthy, so let’s fast forward to the more aesthetically pleasing progress photos!
Just a few weeks later, the transformation was rapidly taking shape. We had successfully installed the new backsplash, the sturdy base for our custom island was in place, and—to our immense delight—our beautifully painted cabinet doors had returned from the refinisher. It was a truly happy day, marking a significant milestone in our kitchen’s journey:
The finish line was finally in sight. Believe it or not, we were absolutely thrilled to even have a temporary cardboard counter on the island for the few weeks we had to wait after the granite supplier took their precise measurements. We affectionately joked that it felt like dining out at a particularly kid-friendly restaurant, with a counter the children could freely color on! This temporary setup, while unconventional, served its purpose and even added a touch of humor to the final stretch of our renovation.
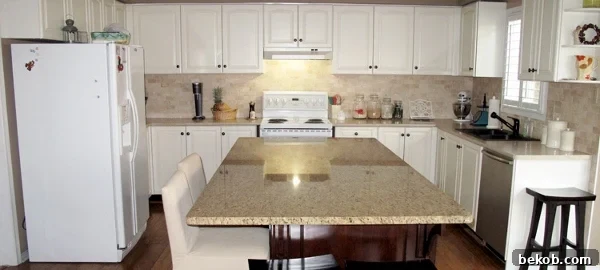
Finally, the last crucial steps were completed: the backsplash was meticulously grouted, and the stunning granite counter for the island was expertly installed. I then painted the entire room a fresh color (a choice I now somewhat regret, but more on that in a future post!). The result is the beautiful and highly functional kitchen you see in the following “after” photos, a testament to our vision and hard work:
While there are still a few minor details to attend to, we absolutely adore our renovated kitchen, and its functionality has dramatically improved. Just as I had envisioned, our new, spacious island has become the central hub for breakfasts and lunches, making daily routines smoother and more enjoyable. Dinners are now typically enjoyed in our actual dining room, a welcome change as this space was rarely utilized in our previous homes. Furthermore, the island serves as the perfect spot for our boys to complete their homework after school, allowing me to prepare dinner nearby, fostering a wonderful sense of family connection. We initially harbored some reservations about making the island so large, knowing it would eliminate space for a traditional kitchen table and chairs. However, after living with this design for two years, I have absolutely no regrets and would wholeheartedly choose the same configuration again. It’s truly transformed how our family uses and experiences the kitchen space, proving the value of a well-thought-out kitchen island design.
This post has indeed become quite extensive, so I’ll wrap things up by sharing a few links to the trusted suppliers and resources we utilized for this kitchen renovation project. We believe in transparency and hope these recommendations can assist you in your own home improvement endeavors:
- **Island Cabinetry:** Our island features high-quality KraftMaid cabinetry, sourced from Home Depot. We were incredibly impressed with the installer and their efficient project management, making them a highly recommended choice for renovation projects. While the specific door finish linked might not be identical, it precisely matches our door profile and is very close to our darker, cherry-toned finish.
- **Painted Cabinetry:** The stunning white finish on our existing cabinets is a custom color match of Benjamin Moore’s Timid White. This soft, inviting shade truly brightened the entire space.
- **Cabinet Refinisher:** For the professional spraying of our cabinet fronts, we entrusted Benjamen Furniture Refinishing in Toronto. If you’re in Canada and a fan of HGTV or Candice Olson, you’ve likely seen his exceptional work featured!
- **Perimeter Countertops:** The laminate countertops along the kitchen’s perimeter were also a Home Depot acquisition. While I don’t recall the exact color name, it was chosen to beautifully complement the granite on our island, creating a harmonious overall look.
- **Knobs and Pulls:** The hardware for our entire kitchen, including all knobs and pulls, came from Lee Valley Tools. They offer an extensive selection, making it easy to find the perfect style to match any kitchen aesthetic.
We’ve since installed a new dishwasher, necessitated by the ‘Flintstone-era’ appliance that decided to catch fire shortly after we moved in! However, the rest of the major appliances are awaiting a larger, future kitchen renovation—a topic we’ll delve into in an upcoming post, detailing our long-term kitchen plans. For now, we are fortunate that everything is functioning perfectly, allowing us to fully enjoy our newly refreshed space.
If you’ve made it this far, you absolutely deserve a virtual cookie! Writing this comprehensive account has been quite the journey, and I’m currently too exhausted to bake. I’ll endeavor to keep future posts a bit more concise, but the story of this kitchen transformation truly needed the space to unfold. Thank you for taking the time to visit and read about our home’s evolution. We hope you’ll check back soon for more updates and inspiration!
Like what you see? Explore more kitchen inspiration:
- New Ikea Kitchen Island Ideas
- Kitchen Renovation: Stained Wood to Beautiful White Transformation
- Stylish Charcoal Grey Kitchen Cabinets