
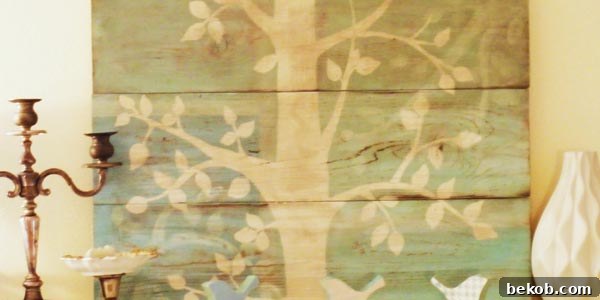
Crafting Your Dream Home: An Anthropologie-Inspired DIY Tree of Life on a Budget
Embark on a creative journey to transform your living space with stunning, personalized artwork, all while adhering to a budget! Today, we’re diving into an incredibly fun and rewarding DIY project inspired by the exquisite, yet often unattainable, aesthetics of high-end home decor. This particular piece, a captivating “Tree of Life,” was sparked by the ingenious creativity shared by Lorilyn from A Crummy Marriage Blog, and it beautifully illustrates how resourcefulness can lead to breathtaking results. Forget the hefty price tags – get ready to unleash your inner artist and craft a masterpiece that truly reflects your unique style and financial savviness.
Financial Freedom Meets Creative Expression: My Journey to Budget-Friendly DIY
Like many, I’ve recently embarked on a conscious effort to rein in my finances. A significant life change, transitioning from a full-time to a part-time work schedule, has been an absolute blessing – every day feels like a mini-weekend! However, it also means adjusting to a smaller income. To navigate this new financial landscape effectively, I’ve joined countless others on the “Total Money Makeover” journey championed by Dave Ramsey. This involves meticulously tracking expenses and making deliberate choices to ensure every dollar serves its purpose.
Our family has several major financial goals looming in the next five years: a much-needed kitchen renovation, an updated bathroom, welcoming new babies into our home, and even exploring international adoption. These significant aspirations necessitate substantial savings, which, in turn, requires thoughtful cutbacks in various areas of our daily lives. Upon reviewing our spending habits since moving into our house, a clear pattern emerged: a considerable portion of my budget (dare I say, even more than I spend on food for myself!) was dedicated to craft supplies and creative projects. While my passion for crafting is undeniable, it was time for a sustainable change.
This realization sparked a new challenge: how to continue indulging my love for art and home decor without breaking the bank? The answer lay in tapping into my innate creativity and utilizing resources already at hand. This commitment means that, going forward, you can expect to see a significant increase – perhaps 99% – in projects that cost absolutely nothing to create. It’s a testament to the power of imagination and the satisfaction of transforming overlooked items into cherished pieces.
Discovering the “Tree of Life”: High-End Inspiration, DIY Execution
The true catalyst for this specific project came from a recommendation by my mom. She suggested browsing Anthropologie’s website for creative inspiration – a brilliant idea, as their aesthetic is truly captivating. While perusing their unique offerings, I stumbled upon a piece that immediately caught my eye: a stunning “Tree of Life” artwork. Its intricate design and artistic appeal were undeniable, yet its price tag of $2,000 was equally startling. While I couldn’t fathom spending such a sum on a single piece of art, the image itself provided the perfect muse for a budget-conscious recreation.
(Inspiration image: View the Anthropologie Tree of Life inspiration)
The challenge, however, was replicating its grandeur without a large, expensive canvas readily available. This is where the beauty of resourcefulness truly shines. Instead of purchasing new supplies, I looked around my home, specifically at my collection of scrap wood – a treasure trove for any DIY enthusiast. It’s amazing what you can create when you start seeing potential in discarded materials!
Crafting Your Own Masterpiece: A Step-by-Step Guide to the “Tree of Life” Art
From Scrap Wood to Stately Canvas: Building Your Foundation
The first step was to create a sturdy, unique canvas from materials I already owned. Venturing into my workshop (affectionately dubbed my “fun house mirrors of death room” due to its quirky nature and the tools within), I gathered several 1×8 planks of scrap wood. The beauty of using scrap wood lies in its inherent character – imperfections become features, adding an authentic, rustic charm to the final piece. Carefully, I assembled these pieces, securing them together to form a solid, expansive panel that would serve as the perfect foundation for my “Tree of Life” vision. This improvisational approach not only saved money but also ensured the artwork had a backstory as rich as its impending design.
(Image: Scrap wood panel in progress)
(Image: Close-up of assembled wood canvas)
A Palette of Possibilities: Layering Colors for Depth and Texture
With the canvas ready, it was time for the fun part: painting! Sticking to my zero-cost commitment, I rummaged through my existing collection of house paints and acrylics. This often meant a lot of creative mixing and diluting to achieve the desired hues and transparencies. The intention was to create a layered, almost ethereal effect, allowing underlying colors to subtly peek through. This technique adds immense depth and complexity, mimicking the nuanced appearance of high-end art.
(Image: Paints and brushes laid out)
The painting process involved several stages, each building upon the last to create a rich tapestry of color:
- Starting with a Serene Base: I began by applying a soothing light blue base coat across the entire wood panel. This initial layer set a calming tone and provided a soft backdrop for the subsequent colors.
- Strategic Taping for Dynamic Sections: Next, I carefully taped off various sections of the canvas. This allowed me to introduce different color blocks and create distinct areas without everything blending uniformly. The goal was to build a vibrant, multi-tonal background that would make the “Tree of Life” pop.
- Washed Layers and Subtle Sanding: Over these initial colors, I applied numerous layers of diluted paint, or “color washes.” By mixing the paints with water, each subsequent layer was translucent, allowing glimpses of the colors beneath. This technique creates a beautiful, aged effect. Between certain layers, I lightly sanded the surface. Sanding not only smooths the transitions but also helps reveal underlying colors and adds a wonderfully distressed texture, much like an antique piece.
(Image: Light blue base coat applied)
(Image: Taped sections with initial colors)
(Image: Applying washed layers)
Bringing the Tree to Life: The Art of Freehand Drawing
Once the background was complete and had achieved the desired depth, it was time to introduce the iconic “Tree of Life.” My approach began with drawing subtle branches along the edges of the panel, allowing them to organically integrate with the colorful background. Following this, I referenced the Anthropologie inspiration piece and freehanded the main structure of the tree. This is where a bit of artistic confidence comes in handy, but it’s a skill anyone can develop.
For those apprehensive about freehand drawing, here’s a tip I’ve used since childhood: break the drawing down into one line at a time. Don’t try to visualize the entire complex image at once. Focus on one small segment, draw it, then move to the next connecting line. This method makes even intricate designs manageable. It’s how I learned to draw Disney characters with impressive accuracy, and it applies perfectly to organic shapes like trees. Embrace small, incremental strokes, and watch your vision come to life.
(Image: Branches drawn on edges)
(Image: Tree outline begins)
After the tree outline was established, I continued with more coats of paint, applying subtle washes to the tree itself, and further sanding. This iterative process allows for continuous refinement, ensuring the tree integrates seamlessly with its background while maintaining its distinct presence.
(Image: Further painting and sanding)
(Image: Detailed view of ongoing work)
(Image: Close-up of the tree drawing)
(Image: Another angle of the drawn tree)
(Image: Developing the tree’s form)
(Image: Tree drawing nearing completion)
The Art of Distressing: Adding Depth and Character
Upon stepping back to admire the nearly finished piece, a critical observation emerged: it was “too matchy-matchy.” The colors, while harmonious, lacked the raw, organic depth I envisioned. The goal was to achieve that perfectly imperfect, antique-inspired look that so often characterizes high-end decor. To remedy this, I reached for a dark brown stain, a tool perfect for adding age and character.
(Image: Initial look, feeling “too matchy-matchy”)
I applied the stain sparingly, then meticulously rubbed and rubbed it into the wood, ensuring it settled into the crevices and grain. This process, while seemingly simple, can sometimes be tricky. There’s a fine line between a beautifully distressed finish and one that simply looks “muddy.” I’ve often found myself thinking, “Is this looking good, or does it just look like I smeared dirt all over it?” (A humorous thought, especially when trying to save money – maybe when I really cut back, that’s exactly what I will do!).
(Image: Applying dark brown stain)
To refine the distressed look, I grabbed my sander once more. This time, I focused its gentle abrasion specifically on the muddier areas of the tree, carefully lifting away excess stain and revealing the layers of color underneath. This final touch was key to achieving that perfectly weathered, natural appearance. The result? Pure perfection – a piece that felt both ancient and fresh, with a story embedded in every texture and hue.
(Image: Final sanding for perfection)
The Rewarding Outcome: Beauty on a Budget, Created with Passion
The most incredible part of this entire endeavor? The cost was absolutely nothing. Every single material used – from the scrap wood to the paints and stains – was already on hand. This truly embodies the spirit of sustainable, budget-friendly DIY.
And what about the time investment? While the process spanned approximately six days, it wasn’t a continuous marathon. The beauty of projects involving multiple paint layers and drying times is their flexibility. Each wash or layer might take a mere 30 seconds to a minute to apply. The waiting periods in between, often an hour or more, allowed me to multitask, attend to other responsibilities, or simply enjoy life. So, while it took nearly a week from start to finish (including weekend breaks and sporadic weekday efforts), the actual active working time was minimal – perhaps two hours total. This makes it an incredibly easy and manageable project, even for those with busy schedules.
Why DIY Matters: More Than Just Saving Money
Beyond the undeniable financial benefits, engaging in DIY projects offers a wealth of advantages. It’s a powerful way to foster creativity, encouraging you to see everyday objects with new eyes and imagine their transformative potential. There’s immense satisfaction in crafting something beautiful with your own hands, knowing that it’s a unique reflection of your effort and vision. This “Tree of Life” isn’t just a piece of art; it’s a tangible symbol of resilience, resourcefulness, and the joy of creation.
DIY also promotes sustainability by encouraging upcycling and reducing waste. Instead of buying new, you’re giving a second life to materials that might otherwise be discarded. It’s a practical skill builder, enhancing your problem-solving abilities and potentially leading to the discovery of new talents. Moreover, personalized home decor creates a living space that truly feels like “you,” imbued with stories and memories.
Your Turn to Create!
Doesn’t it look absolutely fantastic? I am so thrilled with the result!
What are your thoughts on this Anthropologie-inspired “Tree of Life” art? Have you embarked on any similar budget-friendly DIY projects lately? Share your creative endeavors and insights in the comments below – I’d love to hear from you and see what inspiring things you’re creating!
Final Thoughts on Embracing Creative Frugality
This project stands as a shining example that stunning home decor doesn’t require a hefty investment. With a bit of imagination, some readily available materials, and a willingness to experiment, you can transform your home into a personalized sanctuary. This “Tree of Life” represents not just an artistic achievement but also a successful step on a journey toward financial mindfulness, proving that creativity and fiscal responsibility can indeed go hand-in-hand. Happy crafting!