
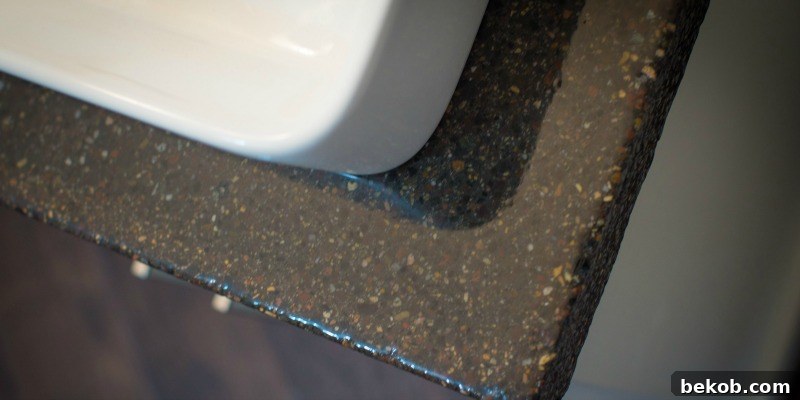
Embarking on a home renovation, especially for key areas like kitchens and bathrooms, often conjures images of endless expenses, unexpected delays, and mounting frustration. We all strive to save time, money, and most importantly, our sanity during these extensive projects. While it’s a noble goal to preserve all three, the reality is that home overhauls usually require prioritizing two out of three – because maintaining absolute calm, a tight budget, and a speedy timeline simultaneously is a near-impossible feat when your home is in pieces!
Today, we’re thrilled to welcome back the incredibly talented duo, Jamie and Morgan from Construction2Style. You might remember their impressive projects, including a striking fireplace makeover, a stunning DIY curved staircase transformation, and an ingenious under-$40 kitchen range hood tutorial. This time, they’re here to guide us through their masterful master bathroom renovation, demonstrating how they elevated a dated space into a contemporary sanctuary. The highlight of their incredible journey? A comprehensive tutorial on crafting your very own custom DIY concrete countertops – a project that promises durability, style, and significant cost savings.
Transform Your Home: Explore Budget-Friendly DIY Countertop Solutions
While Jamie and Morgan will share their detailed process for stunning concrete countertops, there are many other creative and cost-effective ways to update your surfaces without breaking the bank. If you’re eager to save cash and embrace the DIY spirit for your next countertop project, consider these fantastic alternatives:
1. DIY Solid Wood Countertops for Under $100
Achieve a warm, natural aesthetic with beautiful solid wood. This budget-friendly option offers a rustic charm or can be sealed for a sleek, modern look, proving that high style doesn’t always come with a high price tag.
2. Budget-Friendly Marble Tile Countertops
Indulge in the luxurious look of marble without the hefty investment. Marble tiles can be a sophisticated choice, offering elegance and a high-end feel at a fraction of the cost of a full slab. Perfect for a classic or modern update.
3. Concrete Over Existing Countertops
For a truly transformative DIY project, learn how to apply a concrete overlay directly onto your existing countertops. This method is excellent for refreshing tired surfaces with a durable, industrial-chic finish without the need for full demolition.
4. Painted Faux Marble Countertops
Unleash your inner artist with painted countertops! Mimic the look of high-end materials like marble or stone with specialized paint kits and techniques. This option is incredibly versatile and allows for endless customization. For more inspiration, check out painted faux stone countertops here and read reviews on their durability.
And before you make your final decision, we highly recommend diving into how other DIYers rate their countertop experiences and durability! Real-world reviews can provide invaluable insights for your project.
A big welcome back to Morgan and Jamie! Let’s dive into their master bathroom transformation.
Master Bathroom Renovation with DIY Concrete Countertops
by Jamie and Morgan of Construction2Style
We’re thrilled to be back and share our complete master bathroom renovation journey, culminating in a detailed tutorial on crafting your very own custom concrete countertops. We previously had the pleasure of detailing our kitchen remodel in this same home, including how to construct a stylish kitchen range hood for under $40, complete with design plans. Our passion for transforming homes led us to purchase this second property a few years ago with the goal of renovating and selling it for profit. Over the past two years, through dedication and hard work, we’ve systematically updated every corner, and this spring, it will finally be ready for the market, paving the way for our next exciting renovation project!
Among all the rooms we tackled, the master bathroom quickly became one of our favorite transformations. Built in the 1970s, this home’s master bathroom was, as many homes of that era tend to be, in dire need of a modern refresh. It featured outdated fixtures, an uninspired layout, and surfaces that had definitely seen better days. The potential was there, but it required a complete overhaul to bring it into the 21st century.
Our initial steps involved completely gutting the entire bathroom. This meant meticulously removing old wallpaper, laying down brand-new flooring, expanding the shower for a more spacious feel, installing contemporary fixtures, applying fresh coats of paint, updating cabinetry, and of course, adding our custom countertops. We approached this project with a flexible mindset, not entirely sure of the exact style we wanted to achieve in the room. This allowed for creative exploration and adaptation as the renovation progressed.
Crafting Your Own DIY Concrete Countertops: A Step-by-Step Guide
One of the many DIY projects we had always dreamed of attempting was making concrete countertops. Their unique aesthetic, coupled with their durability and cost-effectiveness, made them incredibly appealing. We initially considered them for our kitchen, but given that we had no prior experience, we wisely decided to start with a smaller, more manageable project: the master bathroom vanity countertop. This allowed us to experiment and refine our technique on a less imposing scale.
The buzz around DIY concrete countertops had been growing, and when I proposed the idea to Jamie, he was immediately enthusiastic, eager to take on the challenge. His excitement confirmed that this would be a rewarding collaborative project. After conducting some initial research, Jamie decided to develop his own unique method, combining insights from various sources with his own practical ingenuity. Here’s how we created our stunning DIY concrete countertops:
1. Building the Mold: The Foundation of Your Concrete Countertop
The first critical step was constructing a robust base form, or mold, into which the concrete would be poured. We envisioned a substantial countertop, opting for a 2-inch thickness to give it a solid, luxurious feel. For the mold material, we chose melamine lumber. Melamine is an excellent choice because it naturally possesses a smooth, slick finish, which translates directly to a smoother concrete surface, minimizing post-pour finishing work. While plywood can also be used, it typically requires additional sealing and finishing to prevent imperfections like bubbles or texture marks from transferring to the concrete. By using melamine, we effectively skipped an extra step, streamlining our process. For enhanced structural integrity and crack resistance, it’s always wise to incorporate some form of steel mesh or rebar. We cut our mesh slightly smaller than the outer dimensions of the mold, ensuring it would be fully embedded within the concrete without protruding.
2. Preparing Your Concrete Mix
For our concrete mix, we used Quikrete, a readily available and reliable product. The quantity of concrete required will, of course, depend on the size and thickness of your countertops. Always check the coverage rate printed on the bags to accurately estimate your needs. For our master bathroom vanity, we used approximately three 80-pound bags of concrete. Careful measurement and mixing are key to achieving a consistent and strong countertop.
PRO TIP: USE MELAMINE LUMBER FOR THE MOLD FOR A SMOOTHER FINISH!
3. Integrating Plumbing and Creating Rounded Edges
To accommodate the necessary plumbing for the bathroom sink and faucets, we strategically placed PVC piping directly into the mold. This foresight is crucial, as it eliminates the arduous task of drilling holes into cured concrete later on. Always double-check that the PVC pipe diameters match your drain and faucet specifications. Additionally, we applied silicone caulking along the inside edges of the mold. While not strictly essential, this step allowed us to achieve beautifully rounded edges on our finished countertop, lending a softer, more refined look compared to sharp, angular corners.
4. Mixing and Tinting Your Concrete
With the mold meticulously prepared, it was time to mix the concrete. We combined the Quikrete and water in a large bucket, thoroughly mixing with a shovel until we achieved a uniform consistency. For our design, we wanted a darker, more sophisticated look, so we incorporated a charcoal-colored dye into the mix. This allowed us to achieve a rich, deep hue that resembles high-end granite but at a significantly lower cost. The amount of water added is critical for achieving the desired workability; aim for a consistency that is pourable but not too watery.
5. Pouring and Layering with Reinforcement and Decorative Elements
Ensuring your mold is on a perfectly level surface is paramount before pouring. We began by shoveling approximately half of the concrete mix into the mold. This initial layer provides a base for the steel mesh, which should be positioned roughly in the middle of the concrete slab for optimal reinforcement. Before placing the mesh, we added small decorative pebbles along the edges and partially within this first layer of concrete. This step allowed us to incorporate unique texture and visual interest. Whether you choose colored glass, crushed stone, or other materials, adding decorative aggregates is a fantastic way to personalize your concrete countertops and prevent them from looking too plain. Once the mesh was carefully settled into place, we poured the remaining concrete mix, ensuring full coverage.
TIP: USE PVC PIPING FOR HOLES TO AVOID DRILLING LATER!
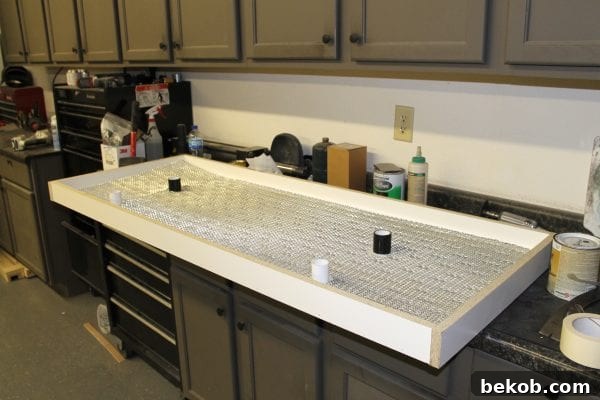
After pouring, we used a simple piece of wood to scrape off any excess concrete, ensuring the surface was perfectly firm and level. This step, known as “screeding,” is essential for a smooth and even countertop.
We then sprinkled additional pebbles on top of the fresh concrete, gently pressing some into the surface while allowing others to remain slightly exposed. This technique creates a beautiful, varied texture that highlights the natural aggregate within the concrete, making each countertop truly unique.
6. Eliminating Air Pockets for a Solid Finish
Once the mold was filled, we employed a palm sander (any tool that vibrates will work) to gently vibrate the mold. This crucial step helps release any trapped air pockets from the concrete mix, ensuring a denser, stronger, and more aesthetically pleasing slab. The vibration also helps the concrete settle into all the tight corners and edges of the mold, resulting in a perfectly formed countertop.
PRO TIP: A PALM SANDER IS EXCELLENT FOR REMOVING AIR BUBBLES AND ENSURING DENSITY!
7. The Curing and Demolding Process
Then came the waiting game – the most challenging part for eager DIYers! We allowed our concrete countertops to dry and cure for a little over a week before carefully removing them from the mold. Rushing this stage can compromise the structural integrity and finish of your slab. To demold, we simply unscrewed the melamine edge boards and gently separated them from the cured concrete. After removal, we let the concrete slabs sit out of the mold for a few additional days to ensure they were 100% solid, dry, and free from any potential shifting or cracking before proceeding to the next steps.
8. Grinding and Sealing for Durability and Aesthetics
To achieve the desired exposed aggregate look, where the beautiful pebbles within the concrete are visible, we used a 4-inch angle grinder fitted with a diamond wheel to carefully grind off the top layer of cement once it was thoroughly dry. This step requires precision and attention to detail. **Safety is paramount here:** always perform this task outdoors in a well-ventilated area and wear a high-quality respirator mask, as it generates a significant amount of dust. Once we reached the desired level of aggregate exposure, we proceeded to seal the countertop. Concrete is inherently porous, making sealing absolutely essential to prevent stains and simplify cleaning. We opted for a bar top sealer, typically used on wood, and were delighted with how effectively it worked on the concrete! For the ultimate, long-lasting finish and maximum durability, it’s recommended to allow the countertop to fully cure for a total of 30 days before applying the sealer. This ensures no residual moisture is trapped, which could lead to sealer failure over time.
The Stunning Reveal: A Modern Masterpiece
The final result exceeded all our expectations – it was even better than we had initially envisioned! The success of this project was so profound that we’ve since been commissioned to create similar concrete surfaces for various clients, from unique bar tops to elegant bathroom vanities. Our next personal home project will undoubtedly feature an even larger concrete creation!
Ultimately, we settled on a simple, clean, and modern design for the master bathroom. This aesthetic was achieved through a neutral color scheme, thoughtful asymmetrical balance in the layout, and a focus on clean, uncluttered lines. The DIY concrete countertops perfectly complement this contemporary vision, adding an industrial-chic touch that ties the entire space together beautifully.
Here’s a look at our finished remodeled bathroom, complete with details on where we sourced our chosen finishing selections:
This post may contain affiliate links. Please see our full privacy policy and disclosure here.
- Custom Vanity Built by Construction2Style
- Vessel Sinks | Build.com
- Faucets | Build.com
- Mirrors | Walmart (spray painted silver)
- Frames | Home Goods
- “I Love Us” Signage | Paper Source
- Towels | Pottery Barn
- Herringbone Wood-Looking Tile Flooring | Home Depot
- Shower Tile | The Tile Shop
———————————————————-
Jamie and Morgan, thank you so much for sharing your incredible talent and inspiring renovation journey with us once again!
For all our Remodelaholics eager for more inspiration, be sure to visit Morgan and Jamie at Construction2Style. There, you can delve deeper into the specifics of that gorgeous herringbone wood tile floor and discover the details behind their lovely Carrara marble fireplace update. Their blog is a treasure trove of innovative DIY ideas and expert renovation advice!