
Submitted By Orange Sugar
Transform Your Bedroom: Create a Custom DIY Upholstered Bed Frame and Headboard
For many homeowners, the dream of a beautifully furnished bedroom often collides with the reality of high retail prices. Custom furniture, in particular, can be astronomically expensive, making it feel out of reach. However, with a little inspiration, ingenuity, and a willingness to embrace the do-it-yourself spirit, creating a luxurious, custom upholstered bed frame and headboard is entirely achievable. This guide will walk you through the journey of transforming a basic bedroom setup into a sophisticated sanctuary, demonstrating how to achieve a high-end look without the high-end cost.
Our journey began with a common challenge: a new home with sloped ceilings that rendered our existing metal bed frame unusable due to its height. For months, our mattress and box spring rested directly on the floor, a temporary solution that lacked both style and comfort. The desire for an upholstered bed was strong, but the thought of paying retail prices for a quality piece was unappealing. This is where the power of DIY truly shone through. Discovering Ana White’s incredible website was a game-changer. Her detailed plans and empowering philosophy provided the courage and practical skills needed to embark on building our own furniture, turning ambitious dreams into tangible projects.
From Floor to Fabulous: Crafting the Upholstered Bed Frame
Inspired by the elegant aesthetic of West Elm’s Nailhead Bed Frame, we set out to build a custom upholstered bed. We adapted Ana White’s highly acclaimed Chunky Leg Bed Frame plan, making a few strategic modifications to suit our specific needs and ensure a polished, professional finish. The goal was not just to build a bed, but to create a centerpiece that was both visually stunning and highly functional.
Customizing for Convenience: Easy Disassembly and Upholstery
A critical consideration during the design phase was the need for easy disassembly and relocation. Given the potential for future moves or reconfigurations, we wanted a bed frame that wouldn’t be a permanent fixture, yet would remain sturdy and reliable. To achieve this, we incorporated robust corner supports from Home Depot and specialized Bed Rail Fasteners. These fasteners allow the side rails to be securely joined and easily separated, making transport and setup significantly simpler than with permanently joined components.
Another key modification involved the upholstery process itself. Rather than constructing the entire wooden box frame and then upholstering it as a single unit – a common method seen in many DIY tutorials – we opted to upholster each individual board separately. This approach offered several distinct advantages: it made the individual components much lighter and easier to handle during upholstery, allowed for cleaner, more precise fabric wrapping around each piece, and simplified any future repairs or re-upholstering. It also resulted in a more tailored and refined appearance, with crisp seams and edges that truly elevate the finished product.
Innovative Support for Your Box Spring
Our bed design specifically accounted for the use of a box spring, meaning we didn’t require the traditional slats and center support commonly found in many bed frames designed for mattresses alone. Instead, we devised a robust and efficient support system. We securely screwed 2×2 lumber pieces to the bottom interior of each side rail of the bed frame. These 2x2s acted as ledges, providing a sturdy foundation for 2x4s, which were then laid across the width of the bed. Crucially, these 2×4 cross supports were themselves reinforced in the center, ensuring even weight distribution and exceptional stability for both the box spring and the mattress. This clever solution not only saved space but also provided superior support, guaranteeing a comfortable and long-lasting sleeping experience.
Crafting the Perfect Retreat: The DIY Tufted Headboard
No bed frame is truly complete without a perfectly matched headboard. Having built a stunning new bed frame, it was time to bid farewell to the old headboard and embark on creating a new one that would seamlessly integrate with our upholstered bed. This project presented an exciting opportunity to further personalize our bedroom aesthetic and achieve a cohesive, designer-inspired look.
Inspiration Meets Reality: Designing the Headboard
Our initial design aspirations for the headboard were drawn from three exquisite examples of high-end furniture: the Sanctuary Bed and Madison Bed from High Fashion Home, and the Woodhouse Bed by Jonathan Adler. All three featured elegant, arched headboards that exuded sophistication and charm. However, the unique architectural challenge of our home’s slanted cape ceilings meant that an arched design simply wouldn’t work. The sloped angles would interfere with the arch, creating an awkward and visually disruptive line. This necessitated a practical compromise, leading us to settle on a classic rectangular shape for our headboard. Despite this adaptation, we found fresh inspiration in a clean, upholstered design showcased by Heller Furniture, proving that even a simpler form could achieve remarkable elegance.
Essential Tools and Materials for Upholstery Success
While I won’t be providing a step-by-step tutorial here, as many excellent resources already exist, I will share crucial tips and insights gathered during the process. First and foremost, a non-negotiable tool for this project is an air-powered or electric stapler. Attempting to tackle the sheer volume of stapling required for an upholstered headboard with a manual stapler would be an exercise in extreme frustration and physical exhaustion. Invest in a powered stapler; it will save you countless hours and ensure a much more professional finish.
For the headboard’s plush feel and luxurious appearance, we utilized 2-inch thick foam as the primary padding layer. Over this, we applied two layers of batting: one high-loft batting for added volume and softness, and another standard layer we had on hand for extra cushioning and to smooth out any imperfections. The combination of these layers creates a deep, inviting surface that is both comfortable and visually appealing.
Mastering the Tufting Technique: Tips and Tricks
One of the most critical techniques for achieving a professional tufted look, especially when planning to incorporate nailhead trim, involves how you manage the foam edges. You absolutely do not want foam directly where your nailheads will be placed. To create a softer, seamless transition and allow the nailheads to sit properly, you need to “round over” the foam edges. This is achieved by strategically stapling the edge of the foam down along the intended line of your headboard’s shape. This simple yet effective step creates a gentle slope, allowing the fabric to drape smoothly and the nailheads to be inserted without battling a thick foam layer. For a clearer visual understanding of this technique, I highly recommend watching this helpful video.
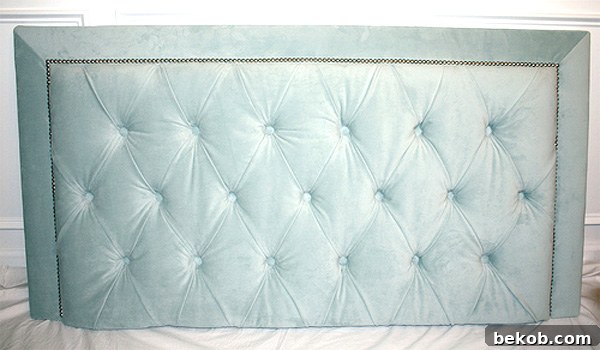
Our headboard was designed for a queen-size bed, featuring a 4-inch wide border. The tufting holes were meticulously spaced 7 3/4 inches apart to create a consistent diamond pattern. A small but significant learning curve involved the size of the initial buttonholes we cut. We initially made them roughly the same size as the buttons themselves. However, we quickly discovered that this wasn’t quite large enough to accommodate the fabric and allow the buttons to sink in properly. We later had to go back and slightly enlarge these holes, a minor adjustment that made a big difference in the final tufted effect.
The choice of fabric also plays a crucial role. We selected a faux suede, which, while beautiful, was on the thicker side. This thickness made covering our own buttons a somewhat challenging prospect to achieve a perfectly smooth finish. Instead of struggling, we opted for a smart, cost-effective solution: we took our fabric to a local upholstery shop and had 20 custom buttons made for an incredibly reasonable price of just $10. This small investment saved us time, effort, and guaranteed professionally covered buttons that perfectly matched our headboard fabric.
Learning from the Experts: Recommended Tutorials
For those embarking on a similar headboard project, I wholeheartedly recommend consulting the following resources, which provided invaluable guidance and inspiration during our build:
- GACMKC on YouTube: While the specific headboard they create might appear dated, this channel offers a wealth of fundamental upholstery techniques and smart ideas that are timeless and highly applicable to modern designs.
- Diamond Tufted Headboard at Addicted to Decorating: This comprehensive tutorial provides excellent visual and written instructions for achieving the coveted diamond tufting pattern.
- Diamond Tufted Headboard Part Two and Three at Brick City Love: These detailed follow-up posts offer further insights and practical tips for navigating the intricacies of button tufting, ensuring a successful outcome.
Your Dream Bedroom Awaits: Conclusion and Encouragement
Embarking on a DIY project like an upholstered bed frame and headboard is a rewarding endeavor that yields not only a stunning piece of furniture but also immense satisfaction. What began as a practical necessity – moving a mattress off the floor – evolved into a custom design inspired by high-end brands, perfectly suited to our unique living space and budget. By carefully planning, modifying existing plans, and learning from experienced DIYers, we were able to create a bed that is both a functional necessity and a beautiful statement piece in our bedroom.
The journey from concept to creation taught us valuable skills, reinforced the power of perseverance, and demonstrated that true luxury isn’t always bought; sometimes, it’s meticulously crafted with your own hands. If you’re dreaming of a custom bedroom look but are deterred by retail prices, I strongly encourage you to explore the world of DIY. With the right resources, tools, and a bit of determination, you too can build the bed of your dreams, tailored precisely to your style, your home, and your budget. Dive in, get creative, and enjoy the profound satisfaction of building something beautiful and functional for your home.