
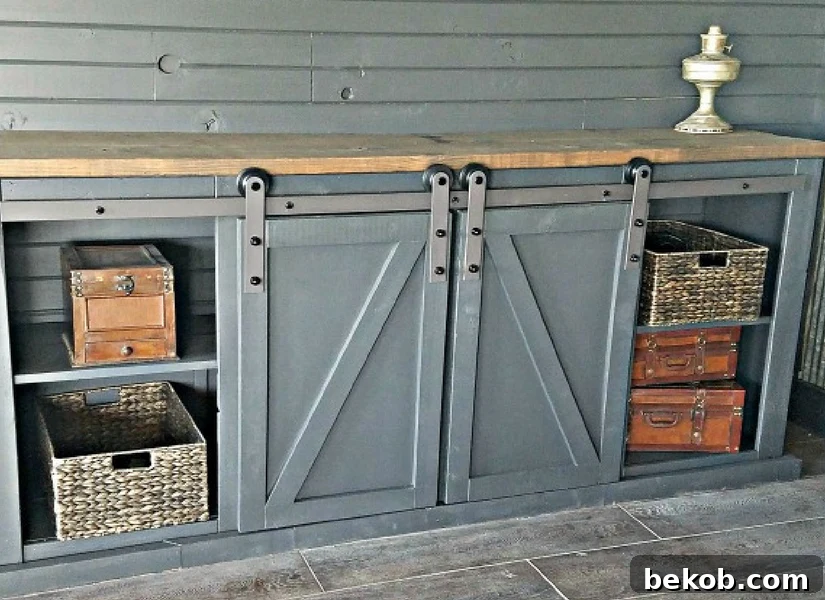
Transform your living space, game room, or dedicated “man cave” with a show-stopping DIY project: a custom sliding barn door entertainment center. This versatile piece of furniture isn’t just a stylish focal point; it’s the ultimate solution for organizing all your media essentials, from gaming consoles and controllers to DVDs, smart devices, and cable boxes. Say goodbye to cluttered wires and visible electronics, and hello to a sleek, organized, and truly personalized media hub.
Crafted with functionality and farmhouse charm in mind, this entertainment console offers both ample storage and undeniable aesthetic appeal. Whether your style leans rustic, modern, or somewhere in between, the adaptable design of a sliding barn door unit makes it a perfect fit for any home. Imagine easily tucking away messy gadgets behind beautiful, gliding doors, only to reveal them with a smooth slide when it’s game time or movie night. This project empowers you to create a high-end look without the custom price tag, all while adding a touch of DIY pride to your home.
Looking for more inspiration to elevate your space? Explore our Modern Man Cave mood board for contemporary design ideas, discover How to Add Storage to a Manly Space for practical solutions, or find creative designs in 25 Bedrooms for Teen Boys.
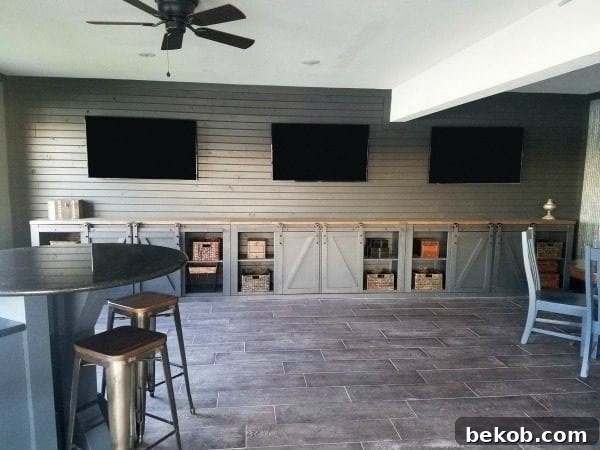
By Leanne from Diva of DIY, built in her Lake House Fixer Upper.
Building Your Dream Media Center: A Personal Journey
When my family undertook the exciting remodel of our lake house, a dedicated game room or “man cave” was a top priority on our wish list. With teenage boys who love gaming with friends and a husband passionate about sports, a room with multiple televisions and organized media storage was essential. The goal was to create a functional yet stylish space where everyone could relax and enjoy their hobbies without the visual chaos of cables and consoles.
My inspiration stemmed from Ana White’s Grandy Sliding Door Console plans. While her specific design didn’t perfectly match the dimensions of my intended space, it provided a robust foundation and the confidence needed to tackle a customized, modified version. This project became a testament to the power of DIY – adapting existing plans to perfectly suit individual needs and preferences, resulting in a console that was not only practical but also deeply personal.
Why Choose a DIY Sliding Barn Door Entertainment Center?
Opting to build your own entertainment center, especially one with sliding barn doors, offers a multitude of benefits that extend beyond simply acquiring a piece of furniture. It’s an investment in customization, savings, and personal satisfaction.
- Unmatched Customization: Unlike mass-produced furniture, a DIY project allows you to tailor every aspect to your specific needs. From dimensions that perfectly fit your wall to internal shelving configurations designed for your unique collection of electronics and media, customization is key. You can choose the exact wood species, paint color, or stain that complements your existing decor, ensuring a seamless integration into your home.
- Significant Cost Savings: Custom-built furniture can be prohibitively expensive. By sourcing materials yourself and investing your own time, you can achieve a high-end, bespoke look for a fraction of the cost. The satisfaction of knowing you built it yourself, combined with the financial savings, makes this an incredibly rewarding endeavor.
- Style and Character: Sliding barn doors are more than just functional; they are a design statement. They instantly infuse a room with farmhouse charm, rustic elegance, or even a touch of industrial chic, depending on your choice of hardware and finish. This console serves as a unique focal point that elevates the entire aesthetic of your entertainment area.
- Superior Organization and Clutter Control: The primary benefit of this design is its ability to hide clutter. Game systems, wires, routers, and other unsightly components can be neatly tucked behind the sliding doors when not in use. This creates a clean, serene environment, allowing the room’s design to shine without distraction. The internal shelving provides dedicated spaces for DVDs, games, and accessories, making everything easily accessible yet out of sight.
- A Sense of Accomplishment: There’s immense pride in stepping back and admiring a piece of furniture you’ve built with your own hands. This project is a chance to develop new skills, solve problems creatively, and demonstrate your craftsmanship. It transforms a functional need into a personal achievement.
Planning Your Ultimate Media Hub: Design & Space Considerations
Before diving into the build, careful planning is crucial for the success of your sliding barn door entertainment center. Consider these aspects to ensure your console meets both your aesthetic desires and practical needs:
- Room Assessment: Evaluate the designated space. What are the dimensions of the wall? How much vertical and horizontal space do you have? Consider traffic flow around the console and where the barn doors will slide when open.
- Functionality Needs: List all the items you intend to store: TV size, gaming consoles (PS4, Xbox, Nintendo Switch), soundbars, receivers, cable boxes, remote controls, DVDs, games, and smart home devices. This will dictate the internal shelf heights, depths, and overall console size. Will you need openings for ventilation or cable pass-throughs?
- Aesthetic Integration: Think about the style of your existing room. Do you want the console to blend in or stand out as a feature piece? The choice of wood, paint, stain, and barn door hardware will significantly impact the final look.
- Material Selection: While the plans specify certain woods, research different types of plywood for their durability and finish quality. Consider the look and feel of solid wood versus plywood for different components.
Build your own farmhouse TV console following this woodworking plan.
How To Build A Sliding Barn Door Entertainment Center: The Supplies
This comprehensive supply list is designed for constructing a single console unit. Please note that the finished images you see may feature three consoles integrated together for a larger installation. This post may contain affiliate links, meaning we may earn a small commission if you make a purchase through them, at no extra cost to you. You can read our full disclosure here.
- 2 – 1×8 @ 8 feet long (for shelves)
- 2 – 1×10 @ 8 feet long (for shelves)
- 1 sheet of 1/4″ thick PureBond plywood (for barn door panels)* – PureBond plywood is known for being formaldehyde-free and durable, making it an excellent choice for interior projects.
- 1 sheet of 3/4″ thick PureBond plywood (for side panels)
- 3 – 1×3 @ 8 feet long (for door trim, if opting for this specific design)
- 2 – 1×2 @ 8 feet long (for middle shelf supports and cleats)
- 4 – 1×4 @ 8 feet long (for face frame components)
- 8 – 2×3 @ 8 feet long (for the main structural frame and bottom trim)
- Hardware for sliding doors (explore our Remodelaholic picks for budget-friendly sliding door hardware here) – Choosing the right hardware is crucial for both functionality and aesthetic appeal.
- 2 1/2″ screws (for robust structural connections)
- 1″ finish nails (for securing trim and less load-bearing components)
- Wood Glue (for strong, long-lasting joints)
- Wood Filler (for concealing screw holes and imperfections, creating a smooth finish)
- Paint or Stain (to customize the console’s look and provide protection)
How To Build A Sliding Barn Door Entertainment Center: The Cut List
Accuracy in cutting is paramount for a professional finish. Take your time with these measurements:
Frame Components:
- 4 – 2×3 @ 84″ (long horizontal supports for the main frame)
- 4 – 2×3 @ 17″ (vertical supports for the main frame)
- 4 – 2×3 @ 14″ (additional frame supports)
Side Panels:
- 2 – 3/4″ thick plywood cut 36″ x 17-1/4″ (for the solid sides of the console)
Face Frame Elements:
- 5 – 1×4 @ 36″ (horizontal pieces of the front face frame)
- 8 – 1×4 @ 17-3/4″ (vertical pieces of the front face frame, defining shelf openings)
Shelves:
- 2 – 1×8 @ 87″ (upper, shallower shelves)
- 2 – 1×10 @ 87″ (lower, deeper shelves, perfect for larger media components)
Middle Shelf Supports and Cleats:
- 5 – 1×2 @ 14″ (for securing shelf ends)
- 5 – 1×2 @ 17″ (for additional shelf support)
Bottom Trim:
- 1 – 2×3 @ 90″ (front bottom trim piece)
- 2 – 2×3 @ 18-3/4″ (side bottom trim pieces)
Top Surface:
- 2 – 2×10 @ 91″ (these will form the robust top surface of the console)
Doors (per door):
- 2 – 1/4″ thick plywood cut 20″ x 30″ (the base panel for each barn door)
- 4 – 1×3 @ 30″ (vertical trim pieces for the door frame)
- 2 – 1×3 @ 15″ (horizontal trim pieces for the door frame)
- 1 – 1×3 @ 29 1/4″ from corner to corner cut at an angle of 28 degrees (for the signature diagonal brace on the barn door)
How To Build A Sliding Barn Door Entertainment Center: The Process
Step 1) Build The Frame
The frame serves as the foundational skeleton of your entire entertainment center. Its robust construction is crucial for the stability and longevity of the console. Begin by precisely cutting your 2×3 lumber according to the cut list provided. Assemble these pieces to form rectangular frames, ensuring all corners are perfectly square before securing them. Use wood glue on all joining surfaces for added strength, then fasten them with 2 1/2″ screws. While the diagram and finished picture illustrate a singular frame, remember that I built three individual consoles which were later combined, hence the suggestion of multiple frames. Take your time with this step, as a sturdy, square frame will simplify all subsequent assembly.
Step 2) Add The Sides
With the main frame constructed, it’s time to enclose the sides of the console. Take your pre-cut 3/4″ thick PureBond plywood pieces. Apply a continuous bead of high-quality wood glue along the edges of the plywood where it will meet the frame. This glue provides a strong bond, reinforcing the structure. Position the plywood carefully against the frame, aligning the edges. Then, use 2 1/2″ screws, spaced appropriately, to securely fasten the plywood to the frame. Repeat this process for each side panel, ensuring a flush and sturdy attachment. The plywood sides not only provide enclosure but also add significant rigidity to the entire unit.
Step 3) Attach to the Wall for Stability
Although I regrettably missed capturing an image of the frame installed before the face frame, shelves, and cleats were in place, the accompanying diagram provides accurate measurements to guide you. Attaching the console to the wall is a critical step for both safety and integration. This prevents tipping, especially important in active environments like a man cave. Secure the console directly to wall studs using appropriate fasteners for maximum stability. This also creates a seamless built-in look.
For an added touch of texture and visual interest behind the console, I opted to install tongue and groove car-siding, which provides a rustic backdrop visible through the open back. Alternatively, you could paint the wall a contrasting color or apply a fun wallpaper pattern. This detail, though often hidden, adds depth and character to the overall design, especially important for media centers where cables often reside.
Step 4) Add The Face Frame
The face frame defines the front aesthetic of your entertainment center and provides the framework for your sliding doors and open shelving. Carefully measure and cut your 1×4 lumber according to the cut list for the face frame components. Apply wood glue to the joining surfaces and use 1″ finish nails to secure these pieces to the main console frame. Ensure that all pieces are level, plumb, and square, creating clean, uniform openings. This step dramatically transforms the console from a basic box into a structured and visually appealing furniture piece, ready for its shelves and doors.
Step 5) Add Cleats and Shelves
With the face frame in place, it’s time to install the essential shelving and their supporting cleats. The cleats, made from 1×2 lumber, provide robust support for your shelves, preventing sagging and ensuring your media components are held securely. Refer to the diagram for precise measurements and placement of these cleats. Use wood glue and 1″ finish nails to attach the cleats to the inner sides of the console frame. Once the cleats are installed, slide your pre-cut 1×8 and 1×10 shelves into position. While this design features fixed shelves, you could adapt it to include adjustable shelf pins for greater flexibility in organizing your items. These shelves are crucial for organizing games, DVDs, and smaller electronics.
Step 6) Add Top Boards (Temporarily)
Prepare your 2×10 top boards by cutting them to the specified 91″ length. For now, simply place them onto the frame without permanently attaching them. This approach is strategic: it allows for easier painting or staining of the top boards separately, ensuring a more uniform and professional finish without worrying about drips or overspray onto the main console frame. Once both the frame and the top pieces are finished, you will attach them securely in a later step.
Step 7) Stain or Paint Frame and Top
This is where your console truly comes to life with color and character. The choice of finish greatly influences the overall aesthetic, whether you’re aiming for a rustic, modern, or classic farmhouse look.
- Frame and Doors: I chose Sherwin Williams SW Iron Ore for the main frame and barn doors. This deep, rich charcoal color provides a sophisticated, modern farmhouse feel, offering a striking contrast. It’s the same versatile shade that Cassity used in her color-washing paint technique! Apply your chosen paint or stain evenly, following the product instructions for proper application and drying times.
- Top (Pine): For the solid pine top, I opted for a custom Minwax stain mix: a 50/50 blend of Classic Gray and Jacobean. This combination creates a beautiful, complex wood tone that highlights the natural grain of the pine while providing depth. Apply the stain in thin, even coats, wiping off any excess to prevent blotchiness. Allow ample drying time between coats and before proceeding to the next step.
Step 8) Make Doors
The sliding barn doors are the signature feature of this entertainment center, providing both functionality and farmhouse charm. Each door is a small project in itself, but the process is straightforward.
Alternatively, if you prefer a different look, you could make traditional shaker cabinet doors by following this helpful tutorial.
Start by cutting your 1/4″ thick plywood panels to the specified dimensions of 20″ x 30″ (or adjusted to fit your console openings). These will serve as the base for your barn doors. Next, take two of the 30″ 1×3 trim boards and apply wood glue along their backs. Securely attach them to the vertical sides of the plywood panel using a nail gun. Ensure they are flush with the edges for a clean look.
Double-check your measurements for the remaining horizontal trim boards (the 15″ pieces). Cut them to fit precisely between the already attached vertical trim pieces, then attach them with wood glue and the nail gun. This completes the rectangular frame around your plywood panel.
To achieve the distinctive diagonal design often seen on barn doors, you’ll need to cut your final 1×3 board to 29 1/4″ long, with both ends cut at a precise 28-degree angle to ensure it fits perfectly from corner to corner within your door frame. Carefully measure and cut this piece, then attach it securely with wood glue and your nail gun. This diagonal brace adds both structural integrity and a significant stylistic element to your barn doors.
Once both doors are assembled, it’s time for painting or staining. As with the frame, I painted my doors with Sherwin Williams Iron Ore to ensure a consistent, cohesive look. This deep color helps unify the entire piece and emphasizes the farmhouse aesthetic. If you’re using a stain, consider techniques like color washing to add character while still allowing the wood grain to show through.
Step 9) Hang Doors
The proper installation of your sliding barn door hardware is essential for smooth and effortless operation. Each hardware kit comes with specific instructions that detail mounting the track, attaching the hangers to the doors, and making any necessary adjustments for level and clearance. I highly recommend following these manufacturer instructions carefully to ensure the best results. If you’re still deciding on hardware, check out our Remodelaholic picks for budget-friendly sliding door hardware here, which offers various styles to complement your console’s design.
Step 10) Attach Top Boards to the Frame
With the doors hung and the main console structure complete, it’s time for the final structural step: securely attaching the top boards. Carefully place the stained or painted 2×10 top boards onto the console frame, ensuring they are perfectly aligned and flush with all edges. Use screws from underneath the frame, or finish nails from the top (which you would then fill and touch up), to firmly secure the top in place. This step completes the construction, providing a solid, functional surface for your television and other decorative items.
And just like that, you’ve built an entire sliding barn door entertainment center! The construction process may seem extensive, but the result is a custom, high-quality piece of furniture that perfectly suits your home. Now, for the most enjoyable part: accessorizing and bringing your vision to life.
For the open shelving and visible compartments of our man cave console, I thoughtfully selected accessories that complement a masculine, rustic, or farmhouse aesthetic. Chunky woven baskets provide ample, hidden storage for miscellaneous items, keeping the space tidy. Old trunks add a vintage charm and can also serve as discreet storage. Metal containers introduce an industrial touch, perfect for holding smaller gadgets or magazines. These choices not only enhance the console’s appearance but also offer crucial extra storage, blending practicality with a distinctive style.
I am absolutely thrilled with the outcome of my sliding barn door entertainment center. It masterfully combines form and function, providing a stylish solution for our family’s entertainment needs. All the game systems, cable boxes, and tangled wires are now discreetly hidden behind the beautifully crafted barn doors when not in use. When it’s time to play or watch, the doors smoothly glide open, offering easy access to everything. The abundant storage capacity is perfect for organizing our collection of PS4 and Xbox games, along with our DVDs, and I even have a designated basket just for remote controls. This console has brought a new level of organization and aesthetic appeal to our lake house, making life genuinely better for everyone!
Each and every one of you serves as a source of inspiration, and I absolutely adore seeing the incredible work you create. Please feel free to share your projects with me on Instagram, Twitter, or Facebook. And as always, remember to follow Diva Of DIY on Pinterest and sign up for our FREE Newsletter to get the freshest projects delivered straight to your inbox! Happy building! – Leanne
And stay connected with Remodelaholic across all our platforms: subscribe to our channel on YouTube, explore inspiring visuals on Instagram, join our community on Facebook, and discover endless ideas on Pinterest.
More from Remodelaholic:
DIY and budget-friendly sliding barn door hardware
how to build a farmhouse console
how to build a double X console table
how to easily and inexpensively stain wood any color
how to build a split Dutch barn door
Originally published 08.26.2017 // Updated 03.25.2020