
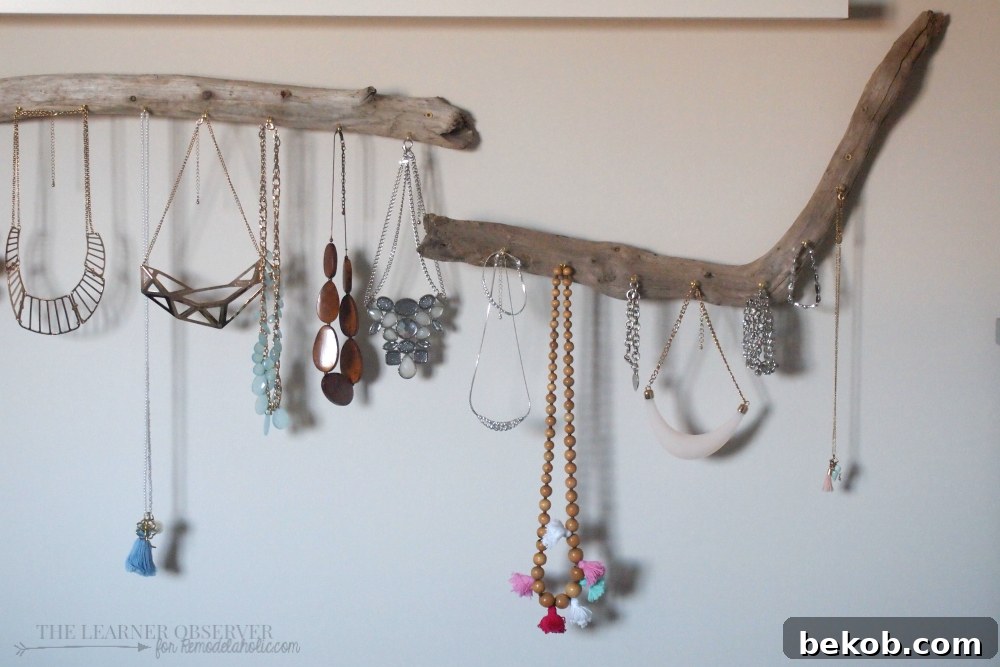
Welcome back, fellow home enthusiasts and DIY dreamers! It’s Thalita here from The Learner Observer, and I’m thrilled to share a project that promises to bring both order and organic beauty into your home. We all know the struggle: a drawer full of tangled necklaces, missing earrings, and bracelets that have lost their sparkle in a forgotten box. Jewelry organization is a common challenge for many of us, but what if we could transform this practical need into a stunning display that doubles as a piece of art? Today, I’m unveiling a super easy, incredibly inexpensive, and wonderfully charming solution: a DIY Driftwood Jewelry Organizer.
This project is not just about decluttering; it’s about celebrating your cherished accessories and making them an intentional part of your room’s aesthetic. Imagine stepping into your bedroom each morning and being greeted by an elegant, natural display of your favorite pieces, perfectly untangled and ready to wear. No more rummaging, no more frustration—just effortless style and accessibility. This organizer taps into the serene beauty of the coast, bringing a touch of the outdoors in, and creating a focal point that is as functional as it is captivating. Let’s dive into creating a unique jewelry storage solution that makes your daily routine a little bit more luxurious and a lot more organized.
DIY Driftwood Jewelry Organizer: Embrace Natural Elegance
The allure of driftwood lies in its unique character. Each piece tells a story, shaped by the ebb and flow of the ocean, weathered by sun and sand. Incorporating these natural elements into your home decor not only adds a rustic, coastal charm but also creates a sense of tranquility and connection to nature. This DIY project harnesses that inherent beauty, transforming simple pieces of driftwood into a functional masterpiece for your jewelry collection.
What makes this project truly special is its accessibility. You don’t need extensive DIY skills or a hefty budget to achieve a high-end look. The materials list is refreshingly short and affordable, making it a perfect weekend project for anyone looking to add a personalized touch to their space. The outcome is a unique, bespoke organizer that reflects your style and keeps your jewelry visible, organized, and beautifully displayed. Get ready to turn beachcombing treasures into a stunning statement piece!
Gathering Your Essential Materials
One of the most appealing aspects of this DIY jewelry organizer is the simplicity of its material list. You’ll be surprised at how few items are needed to create such a impactful piece. Here’s what you’ll need to gather:
- A Couple of Large Pieces of Driftwood: The star of our show! I was fortunate enough to collect mine during a relaxing day at the beach last summer. Look for pieces that are relatively flat on one side for easier mounting against a wall, and varying in length and thickness to create visual interest. The softer nature of driftwood makes it incredibly easy to work with, eliminating the need for power drills for the hooks. If a beach isn’t accessible, consider craft stores or online retailers that sell decorative driftwood, or even repurpose attractive branches from your yard, ensuring they are thoroughly cleaned and dried.
- Three Packs of 1/2 inch Brass Cup Hooks: These small, versatile hooks are perfect for hanging necklaces and bracelets. Brass adds a touch of classic elegance and complements the natural wood tones beautifully. You can typically find these in packs at your local hardware store. The 1/2 inch size is ideal for most jewelry, but you might consider slightly larger hooks if you have particularly bulky pieces or want to hang multiple items per hook.
- Four 2-inch Screws: These will be essential for securely mounting your driftwood pieces to the wall. The 2-inch length provides ample grip into wall studs or anchors.
That’s it! With these basic items, you’re well on your way to crafting a beautiful and functional jewelry organizer.
Step-by-Step Guide: Assembling Your Organizer
The construction of this driftwood jewelry organizer is remarkably straightforward, making it a perfect project for DIY beginners and seasoned crafters alike. Follow these simple steps to bring your vision to life:
1. Preparing Your Driftwood
Before you begin, ensure your driftwood pieces are clean and dry. If you collected them from the beach, a gentle scrub with a brush and soapy water, followed by a thorough rinse and sun-drying, will remove any sand, salt, or unwanted critters. Inspect each piece for any loose splinters or sharp edges, and lightly sand them down if necessary for a smooth finish. This step is crucial for both aesthetics and safety.
2. Attaching the Cup Hooks to the Driftwood
This is where the magic starts! Thanks to the naturally soft texture of most driftwood, attaching the cup hooks is incredibly easy. You don’t even need a drill. Simply apply a bit of pressure and screw each hook into the wood by hand. The threads of the hook will easily bite into the soft wood, securing them firmly in place. It’s a satisfyingly simple process that requires minimal effort.
When positioning your hooks, consider the type of jewelry you intend to hang. I opted for a somewhat even spacing, leaving about 3 inches between each hook. This generous spacing allows necklaces to hang freely without tangling and ensures that each piece stands out, almost like a miniature art display. If you plan to hang numerous bracelets or rings, you might prefer closer spacing. For a more eclectic look, experiment with staggered heights or varied intervals. This project is highly customizable, allowing you to tailor it precisely to your jewelry collection and personal style. Remember, the goal is not just storage but also an aesthetically pleasing presentation of your treasures.
3. Mounting the Driftwood to the Wall
Securing your driftwood organizer to the wall is a crucial step to ensure its stability and longevity. I recommend using the 2-inch screws and aiming for wall studs whenever possible. Studs provide the strongest anchor point, giving you peace of mind that your organizer, and its contents, are securely held. While necklaces aren’t typically heavy, it’s always better to be safe than sorry!
If studs aren’t available where you want to place your organizer, don’t worry! Wall anchors are an excellent alternative. Simply choose anchors appropriate for your wall type (drywall, plaster, etc.) and follow the manufacturer’s instructions for installation. These will provide a reliable hold for your driftwood pieces. Before driving in the screws, consider using a level to ensure your driftwood pieces are mounted straight, creating a clean and professional look.
An important tip I discovered during my own project: you might find it easier to attach the hooks *after* the driftwood is securely mounted to the wall. This allows you to visualize precisely how the wood sits against the wall, especially if your pieces are warped or irregularly shaped. By doing so, you can strategically place the hooks to maximize evenness and ensure your jewelry hangs beautifully, accommodating the natural contours of the wood. This method also helps you avoid any awkward hook placements that might occur if the wood shifts slightly during mounting. Once your driftwood is firmly in place, proceed with screwing in your brass cup hooks as described earlier.
4. Displaying Your Jewelry
Once all your hooks are in place and the driftwood is securely mounted, it’s time for the most rewarding part: hanging your jewelry! Start arranging your necklaces, bracelets, and even lightweight earrings on the hooks. Play around with different configurations to see what looks best. You’ll quickly see how the natural texture and organic shapes of the driftwood not only serve a practical purpose but also add incredible warmth and visual interest to your wall.
In our master bedroom, for instance, this organizer brought a much-needed touch of natural beauty and functionality. I purposefully left some sections of the driftwood without hooks, especially on the far right piece, to avoid a cramped look and allow the wood itself to breathe as a decorative element. This strategic spacing ensures that each piece of jewelry has its moment to shine, preventing tangles and making selection effortless. The organizer becomes a living art installation, constantly changing with your mood and chosen accessories. This intentional design choice contributes to a relaxed, yet elegant, atmosphere in the room, perfectly complementing our full bedroom makeover (which you can explore more here).
Design Considerations and Aesthetic Impact
Beyond its primary function, this driftwood organizer offers significant aesthetic value. The varying shades of brown, grey, and cream found in natural driftwood introduce a subtle color palette and rich texture that can beautifully complement a wide range of interior design styles. Whether your decor leans coastal, bohemian, rustic, or even minimalist, the organic appeal of driftwood provides a grounding element that feels both sophisticated and inviting.
As you can observe from the side view, the driftwood pieces do project slightly from the wall, adding a lovely three-dimensional quality to the display. However, this projection is minimal and completely non-disruptive or dangerous. The necklaces hang freely, well clear of any furniture like a dresser, allowing everything in the space to coexist harmoniously. This subtle depth prevents your jewelry display from looking flat, giving it a gallery-like presence. It also ensures proper air circulation around your items, an often-overlooked benefit for preserving jewelry quality.
Here’s a final close-up to give you a clearer idea of how the brass hooks integrate with the driftwood. You’ll notice the potential for creative hook placement: whether you prefer them perfectly aligned, staggered for a playful vibe, or clustered in certain areas, the possibilities are endless. This adaptability allows you to craft an organizer that truly reflects your personal aesthetic and functional needs. The juxtaposition of the weathered wood with the gleaming brass creates a beautiful contrast, elevating simple hooks into decorative details.
The Transformative Power of Organization
I sincerely hope this DIY driftwood jewelry organizer has sparked your inspiration to tackle your own jewelry clutter. The true beauty of this project lies not just in its aesthetic appeal but in the practical benefits it brings. For years, my cherished necklaces and bracelets languished in a box, a tangled mess rarely seen or worn. They were out of sight, out of mind, and often damaged from being crammed together. This organizer changed everything.
Now, every piece is visible, easily accessible, and beautifully displayed. This simple change has made a profound difference in my daily routine. I’m much more inclined to wear my jewelry, mix and match pieces, and truly enjoy the collection I’ve built. It saves time in the mornings, protects delicate items from damage, and transforms a functional need into an elegant decorative feature. This project is a testament to how small, thoughtful DIYs can significantly enhance both the beauty and efficiency of your home.
Do you have a clever, unique, or exceptionally beautiful way you organize your own jewelry? I would absolutely love to hear about your ideas and solutions! Sharing our tips helps everyone create more functional and beautiful living spaces.
Until next time, my lovely DIY community!
———————————
Explore More Creative Jewelry Organizing Ideas:
Looking for even more ingenious ways to keep your precious accessories organized and beautifully displayed? Dive into these fantastic DIY projects and discover solutions that perfectly match your style and needs. From vintage-inspired storage to sleek, modern stands, there’s an idea here for every jewelry lover.
DIY Miniature Card Catalog Jewelry Box
Transform a small card catalog into a stylish and functional jewelry box. This project adds a touch of vintage charm and offers multiple compartments for different types of jewelry, keeping everything neatly separated and easy to find.
Easy DIY Jewelry Stand Organizer
If you prefer a freestanding solution, this easy DIY jewelry stand is perfect. It offers a convenient way to display your frequently worn pieces on a dresser or vanity, keeping them accessible and tangle-free. A quick and rewarding project for immediate organization!
More Creative Jewelry Organizing Solutions
Still seeking inspiration? This collection of creative jewelry organizing solutions offers a diverse range of ideas beyond traditional jewelry boxes. Explore innovative displays and storage methods to find the perfect match for your collection and home decor.