
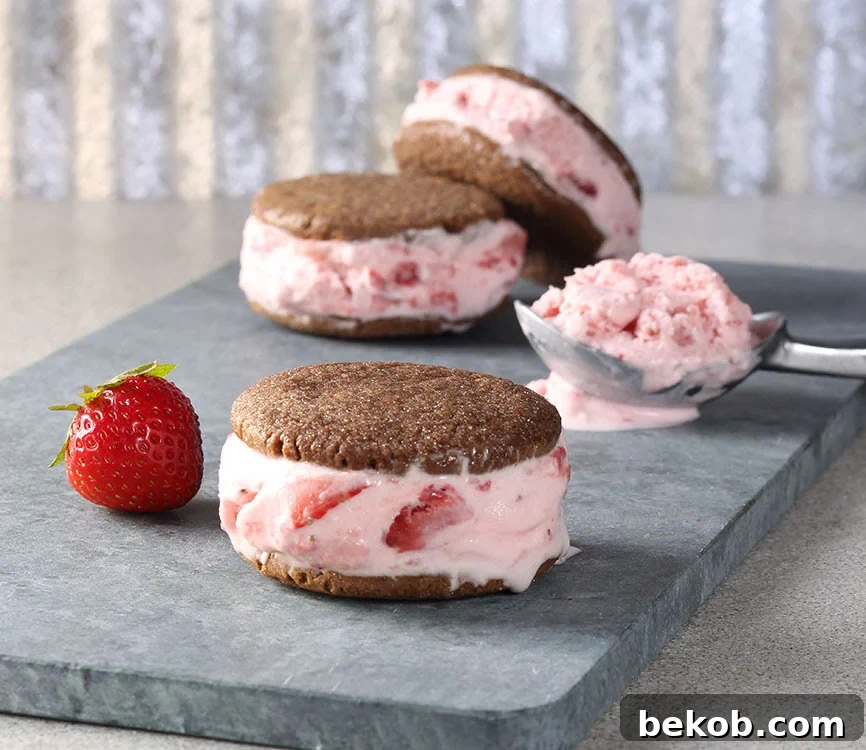
Irresistible Homemade Strawberry Ice Cream Sandwiches: Your Perfect Summer Treat
Embrace the sweet essence of summer with these utterly delicious and refreshing homemade strawberry ice cream sandwiches. If you’re searching for a delightful baking project to share with your kids this season, look no further! This recipe, featuring the vibrant flavor of fresh, ripe strawberries, is destined to become a cherished family favorite, creating lasting memories along with incredible taste.
There’s nothing quite like a cool, creamy treat on a warm day, and when it’s homemade with love, it tastes even better. These ice cream sandwiches combine the lusciousness of fresh strawberry ice cream with rich, dark chocolate cookies, creating a harmonious blend of flavors and textures that will tantalize your taste buds. Get ready to dive into a world of sweet indulgence!
Crafting Your Own Strawberry Ice Cream: A Taste of Summer
Making your own ice cream at home is a wonderfully rewarding experience, especially when you start with the finest ingredients. Our strawberry ice cream recipe uses fresh, seasonal berries, ensuring a bright, natural flavor that store-bought versions simply can’t match. The addition of high-quality vanilla and lemon extracts elevates the fruitiness, creating a truly gourmet dessert.
Homemade Strawberry Ice Cream
Recipe Type: Dessert
Author: Foodieaholic
Ingredients for Strawberry Ice Cream
- 1 pound fresh strawberries, hulled and thoroughly washed
- ¾ cup granulated sugar
- 2 teaspoons Nielsen-Massey Tahitian Pure Vanilla Extract
- ¼ teaspoon Nielsen-Massey Pure Lemon Extract
- ¼ teaspoon fine salt
- 1½ cups heavy whipping cream (ensure it’s well-chilled for best results)
- 1 cup whole milk
Instructions for Strawberry Ice Cream
- Begin by preparing your fresh strawberries. In a large, 4-quart glass measuring cup or a sturdy mixing bowl, combine the hulled and washed strawberries, sugar, both the vanilla and lemon extracts, and the salt. Using a potato masher or a fork, gently but thoroughly smash the berries until they release their juices and form a chunky mixture. This process enhances the strawberry flavor and distributes the sugar evenly. Once mashed, stir in the heavy whipping cream and whole milk until the mixture is well combined. Set this delightful concoction aside.
- Assemble your ice cream maker according to the manufacturer’s directions. It’s crucial that your ice cream maker’s freezing container has been pre-frozen for at least 24 hours, or ideally longer, to ensure optimal ice cream consistency. Turn the ice cream maker on and carefully pour the strawberry ice cream mixture into the pre-frozen container. Allow the machine to churn the mixture until the ice cream visibly thickens and achieves a soft-serve consistency, which typically takes about 20 minutes. The exact time may vary based on your machine and ambient temperature.
- Once churned, transfer the freshly made, soft ice cream into an airtight container. For a perfectly scoopable and firm ice cream, place the container in the freezer for several hours. If you prefer an even firmer texture, ideal for making perfect ice cream sandwiches, freeze it overnight.
- When ready to assemble your sandwiches, you have a couple of options:
- **Classic Scoop Method:** Scoop the desired amount of ice cream directly onto one chocolate cookie (see the recipe below for our irresistible chocolate sandwich cookies). Gently place another cookie on top and press lightly to form the sandwich.
- **Perfect Rounds Method:** For uniformly shaped ice cream rounds, line a 9×13-inch pan with foil, allowing enough overhang on the sides to easily lift the ice cream later. Evenly spread the churned ice cream across the pan using a rubber spatula, ensuring a smooth, level surface. Cover the pan and freeze overnight. The next day, lift the frozen ice cream block using the foil overhang. Use a round cookie cutter of your desired diameter to cut out perfect ice cream discs. Place each disc between two chocolate cookies.
Notes
*Always follow your ice cream maker manufacturer’s directions for freezing the container; 24 hours or longer is ideal for optimal results.
This recipe yields approximately 1.5 quarts of delicious homemade strawberry ice cream.
The Perfect Companion: Rich Chocolate Sandwich Cookies
No ice cream sandwich is complete without the perfect cookie. Our chocolate sandwich cookies are specifically designed to be sturdy enough to hold the creamy ice cream while being delightfully tender and rich in flavor. Featuring Dutch-processed cocoa and a hint of cardamom, these cookies offer a sophisticated depth that complements the sweet, fruity ice cream beautifully. They are easy to make and the aroma of them baking will fill your kitchen with warmth and anticipation.
Decadent Chocolate Sandwich Cookies
Author: Foodieaholic
Ingredients for Chocolate Sandwich Cookies
- 2½ cups unbleached all-purpose flour
- ⅓ cup Dutch-processed cocoa powder (for a deep, rich chocolate color and flavor)
- ½ teaspoon ground cardamom (adds a subtle, aromatic warmth)
- ½ teaspoon fine salt
- ¾ cup (which is equivalent to 1¼ sticks) unsalted butter, softened to room temperature
- 2 cups powdered sugar, sifted if clumpy
- ½ cup firmly packed dark brown sugar
- 1½ tablespoons Nielsen-Massey Madagascar Bourbon Pure Vanilla Extract
- 1 teaspoon Nielsen-Massey Pure Chocolate Extract (enhances the chocolate notes)
- 1 large egg
- ¼ cup unsulphured original molasses
- ¼ cup granulated sugar, for dipping the glass bottom
Instructions for Chocolate Sandwich Cookies
- Preheat your oven to 350°F (175°C). Line two light-colored, heavy baking sheets with parchment paper. This prevents sticking and ensures even baking. Set them aside.
- In a large bowl, whisk together the unbleached all-purpose flour, Dutch-processed cocoa powder, ground cardamom, and salt. Whisk well to ensure all dry ingredients are evenly distributed. Set this dry mixture aside.
- In a separate large mixing bowl, add the softened butter, powdered sugar, dark brown sugar, Nielsen-Massey Madagascar Bourbon Pure Vanilla Extract, and Nielsen-Massey Pure Chocolate Extract. Using an electric mixer on medium speed, beat the ingredients until the mixture is light, fluffy, and creamy, scraping down the sides of the bowl as needed.
- Beat in the egg until fully incorporated into the creamy mixture. Then, add the unsulphured original molasses and continue to beat until everything is smoothly combined, creating a rich, dark dough base.
- Reduce the mixer speed to low. Gradually add the dry ingredients (flour, cocoa, cardamom, salt mixture) to the wet ingredients in three separate batches, beating after each addition until just combined. Be careful not to overmix, as this can lead to tough cookies. Mix until no streaks of flour remain.
- Roll the cookie dough into 1-inch balls. Place these balls onto the prepared parchment-lined baking sheets, spacing them about 2 inches apart to allow for spreading.
- Take the bottom of a drinking glass and dip it into the ¼ cup of granulated sugar. Lightly press each cookie ball flat with the sugar-coated bottom of the glass. The sugar prevents sticking and adds a delicate sparkle and crunch to the cookie’s surface.
- Bake one sheet pan at a time on the center rack of your preheated oven. Bake until the cookies are set and appear done, typically about 8-10 minutes. Baking one sheet at a time helps ensure even heat distribution and consistent results.
- Once baked, remove the cookies from the oven and let them cool on the baking sheet for a few minutes before carefully transferring them to a wire rack to cool completely. Store the cooled cookies in an airtight container at room temperature to maintain their freshness and chewiness.
Notes
This recipe yields approximately 3 dozen delightful chocolate sandwich cookies, perfect for pairing with your homemade strawberry ice cream.
Assembling Your Masterpiece and Creative Variations
With your luscious strawberry ice cream and perfectly baked chocolate cookies ready, the fun of assembly begins! Whether you choose the classic scoop-and-press method or the elegant cookie-cutter approach for perfect ice cream rounds, each sandwich promises a burst of flavor. Once assembled, these treats are best enjoyed immediately for that ultimate fresh experience, but they can also be stored for later enjoyment.
Pro Tips for Success:
- **Ingredient Quality Matters:** Using fresh, ripe strawberries is paramount for the best flavor in your ice cream. Similarly, high-quality extracts like those from Nielsen-Massey truly make a difference in both the ice cream and the cookies.
- **Chilling is Key:** Ensure your ice cream maker bowl is frozen solid for at least 24 hours. For the ice cream mix, chilling it in the refrigerator for an hour or two before churning can also lead to a creamier texture.
- **Don’t Overmix Cookie Dough:** Overmixing flour can develop too much gluten, resulting in tough cookies. Mix until just combined.
- **Even Cookie Thickness:** When pressing the cookie balls, try to make them as uniform in thickness as possible to ensure even baking.
- **Patience with Freezing:** For firm, easy-to-handle ice cream sandwiches, don’t rush the freezing process. Overnight freezing for the ice cream is ideal.
Flavorful Variations to Explore:
- **Different Fruit Ice Cream:** Substitute strawberries with other seasonal fruits like blueberries, raspberries, or peaches for a delightful twist. Adjust sugar content based on fruit sweetness.
- **Extract Adventures:** Experiment with other Nielsen-Massey extracts in your ice cream. Almond extract could add a delicate nutty note, or a touch of peppermint extract for a festive version.
- **Cookie Creativity:** While chocolate is classic, consider other cookie flavors. A simple vanilla sugar cookie or even a delicate lemon cookie could offer an exciting contrast to the strawberry ice cream.
- **Rolling in Sprinkles:** For an extra touch of fun, roll the edges of your assembled ice cream sandwiches in colorful sprinkles, mini chocolate chips, or chopped nuts before the final freeze.
Storage Suggestions:
Once your ice cream sandwiches are assembled, wrap each one individually in plastic wrap or parchment paper, then place them in an airtight freezer-safe container. This will prevent freezer burn and keep them fresh for up to 2-3 weeks. Allow them to sit at room temperature for a minute or two before serving for the best texture.
We extend our heartfelt thanks to Nielsen-Massey for providing this incredibly fun and delicious recipe! Their high-quality pure extracts truly elevate these homemade treats to gourmet status. Don’t forget to explore other fantastic recipes featuring Nielsen-Massey products, such as their delightful Vanilla Sugar-Crusted Scones and these awesome BBQ recipes, all proudly featured right here on FOODIEaholic!
Get ready to create some unforgettable summer moments and indulge in the pure joy of homemade strawberry ice cream sandwiches. Happy baking!