
From Drab to Fab: Our Ultimate Hutch Makeover Journey
We are thrilled to finally share the complete transformation of our beloved hutch! What started as a modest “quick update” project evolved into a comprehensive furniture restoration journey, proving that sometimes the best renovations unfold unexpectedly. This detailed guide offers a candid look at our process, highlighting the challenges we faced, the creative solutions we found, and the invaluable lessons we learned along the way. While we might not provide a step-by-step instruction manual for every single cut, our goal is to inspire you to tackle your own hutch makeover, offering insights and encouragement to try new techniques and adapt them to your unique piece.
Every DIY project is an adventure, and ours began with a piece that held potential but lacked immediate charm. The beauty of repurposing furniture lies in using what you already have, giving it a new lease on life without breaking the bank. So, let’s dive into how we revitalized this hutch, turning it from a dormant fixture into a functional and stylish statement piece.
The Unassuming Beginning: Our Hutch’s Original State
Here’s a glimpse of our hutch in its original, untouched glory, residing in our dining room for far too long. It was a substantial piece, yet it lacked character and functional design elements.
As mentioned previously, the hutch came without proper shelves, which limited its utility and aesthetic appeal. I attempted to style it with some makeshift wood scraps from the garage, but the overall effect was underwhelming. It remained a large, brown, rather imposing presence in the dining room. The need for a change became undeniable, even if it was initially conceived as just a temporary fix – a common starting point for many of our home renovation projects!
Initial Disassembly and a Paint Mishap
Our “quick update” began with disassembling the hutch. Removing the doors was the first step, preparing it for a fresh coat of paint. We aimed for simplicity, intending to brush on a new color directly onto its laminate surface. For this, I purchased an enamel paint, specifically chosen for its supposed durability on such surfaces.
However, the chosen enamel paint proved to be an absolute disaster. Applying it felt like painting with tile grout – thick, uneven, and far from smooth. It was simply awful. After completing only a small section of the base and one door, it became evident that this paint wouldn’t work. This setback led to a significant shift in our plans, transforming a minor touch-up into a much larger furniture transformation project.
This experience highlighted a crucial lesson in DIY: always test your paint, especially on challenging surfaces like laminate. The wrong product can turn a simple task into a frustrating ordeal. We quickly returned the problematic paint and re-evaluated our strategy for achieving a smooth, durable finish.
Elevating the Design: Adding a Custom Drawer Unit
Beyond the paint issues, we had a fundamental design concern with the hutch: its proportions. Being tall (5’10”), I found the original piece a bit “squat-y” and felt it needed a literal lift to better integrate into our space and feel more substantial. This led to an exciting modification: building a three-drawer addition to be placed between the hutch’s base and its upper portion.
My talented husband, Justin, meticulously constructed this new center unit. This addition not only provided extra storage with its drawers but also significantly improved the hutch’s overall stature and visual balance, transforming its silhouette from a simple two-part cabinet into a more refined, three-tiered masterpiece.
This structural change was a game-changer for the hutch renovation, proving that sometimes, the best solution involves more than just a fresh coat of paint. It involved rethinking the entire piece and adding custom elements to achieve the desired functionality and aesthetic.
The Spray Painting Saga: A Test of Patience
After the initial failure with brush-on enamel, we pivoted to spray paint for a smoother, more professional finish, especially crucial for a laminate surface. Ideally, a paint spray gun would be the tool of choice for such a project, but after our compressor was stolen, investing $200 in a new one wasn’t feasible. Fortunately, our amazing neighbor, Santiago, generously lent us his compressor and spray gun, allowing us to proceed with our new plan.
The spray painting process commenced, promising an even coat and quicker application. However, this stage presented its own set of challenges.
We opted not to paint the very bottom of the hutch, as it was replaced by the newly constructed three-drawer unit. Despite using spray paint, achieving proper coverage on the upper hutch proved surprisingly difficult. I went through approximately ten cans of spray paint just for the top section, struggling to get it to cover evenly. It was a baffling experience, but it underscored the importance of proper priming, even when working with what seems like the right paint application method.
Adding to the painting woes, I neglected to sand the doors thoroughly enough, which resulted in some unexpected cracks and imperfections appearing in the finish. Despite attempts to re-sand and repaint, the issue persisted. Eventually, I decided to accept these minor flaws, understanding that sometimes, perfection isn’t the ultimate goal in DIY; a beautiful, functional piece that tells a story is equally valuable. These slight imperfections are barely noticeable in daily use, a testament to embracing the unique character of a handmade item.
DIY Hacks: Window Cleaning and Stenciled Back
The Razor Blade Trick: Cleaning Painted Windows
Here’s a fantastic little tip for anyone tackling a furniture makeover with glass panels: if you accidentally get paint on your windows, don’t despair! A simple razor blade is all you need. With a gentle hand and careful scraping, dried paint comes off like butter, leaving a pristine, streak-free surface. No harsh chemicals required! This trick is a lifesaver for achieving a clean, professional finish on cabinet doors with glass inserts.
A Subtle Statement: Stenciling the Hutch Back
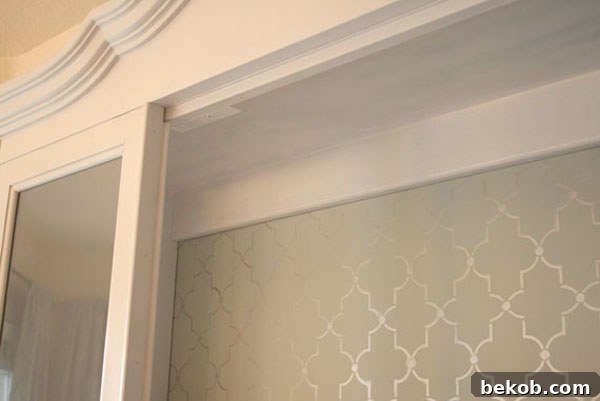
For the back panel of the hutch, I decided to add a touch of subtle elegance with a silver stencil. I used leftover paint from our upstairs bathroom update for the base, ensuring continuity in our home’s color palette. The stencil, sourced from Hobby Lobby, allowed us to introduce pattern and texture without overwhelming the piece. My intention was for the stencil to be a pleasant surprise, a delicate detail that reveals itself upon closer inspection, rather than an obvious focal point. It adds depth and character, especially since it’s often partially obscured by dishes and decor, creating a layered visual interest.
The Finishing Touch: The Indispensable Power of Caulk
No furniture makeover, especially one involving older pieces or custom additions, is truly complete without the magic of caulk. This often-overlooked product is, without exaggeration, a remodeler’s best friend. For proof, one only needs to look at our entire first home renovation, a century-old house with not a single perfectly straight line; caulk was our ultimate savior!
Before painting, the dark, original color of the hutch masked many of its imperfections and gaps. However, once painted a lighter shade, every crack, seam, and uneven joint becomes glaringly obvious, sticking out like a sore thumb. This is where caulk truly shines. A small, properly applied bead of caulk can dramatically transform the appearance of a piece, providing that crucial, professional finishing touch.
It’s always disheartening to see a beautifully painted piece of furniture marred by visible, gaping cracks that could have been easily fixed. Caulk fills these gaps, creating seamless transitions and a polished look that elevates the entire project. It’s an inexpensive step that makes an enormous difference in the perceived quality and craftsmanship of your DIY endeavors. So, when it comes to achieving a truly flawless finish, always remember this golden rule: say no to cracks! A smooth, uniform surface is key to a high-end look.
Observe the remarkable difference once caulk is meticulously applied to fill the unsightly crack at the top of the hutch. This simple step transforms a rough, unfinished edge into a sleek, professional seam, showcasing the true power of this essential finishing material in any furniture restoration project.
The Transformed Hutch: Final Thoughts and Next Steps
This hutch makeover has been a journey of discovery, problem-solving, and ultimately, immense satisfaction. From battling difficult paint to custom-building a height-extending drawer unit, every step contributed to creating a truly unique and functional piece for our home. The hutch now stands as a testament to perseverance and the transformative power of DIY.
While this post has detailed the major steps and lessons learned, the final reveal and complete instructions will be shared very soon! Don’t miss the exciting conclusion to this hutch transformation. We encourage you to think about how you might update a hutch or any piece of furniture in your home. What creative ideas do you have for giving old furniture a new life? Share your thoughts and inspire fellow DIY enthusiasts!
Remodelaholic is a premier resource for home remodeling ideas and DIY projects, founded by Cassity and Justin. With Cassity’s degree in interior design and Justin’s expertise as a landscape architect, they bring a wealth of knowledge to every aspect of home transformation. They are passionate about sharing their experiences, from ambitious DIY tutorials and extensive kitchen renovation ideas to simple bathroom remodels. Having completed three whole-home renovations (explore house 1 and house 2 for more inspiration!), they consistently provide valuable insights and practical tips. We invite you to visit often for fresh home design inspiration, detailed renovation guides, interior styling advice, delicious recipes, and updates on our family life.