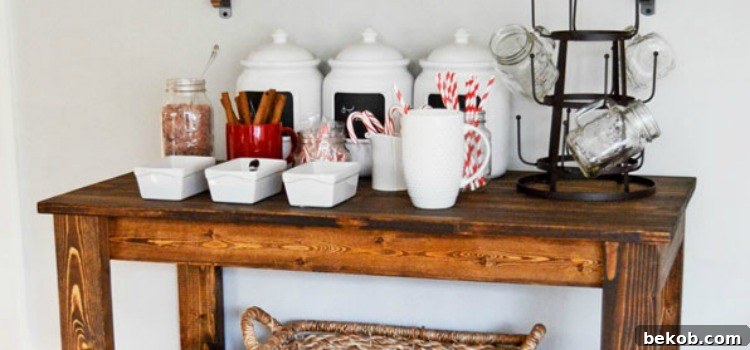

Build Your Own Mobile Wood Bar Cart: The Ultimate DIY Entertaining Solution
Hello, fellow DIY enthusiasts and Remodelaholics! Nina from Everyday Enchanting here, excited to share some essential DIY inspiration, especially as the holidays and entertaining season approach. This year, our home is set to be the central hub for a myriad of celebrations, from hosting Thanksgiving and Christmas for both sides of our bustling family to a special birthday party for my younger son and the ever-popular neighborhood cookie swap. With a new baby on the way in January, staying put was a more practical and safer choice, transforming our home into the ultimate gathering spot for loved ones.
While we meticulously remodeled our kitchen last year, even adding a charming DIY furniture-style kitchen island, I soon realized we still faced a recurring challenge: limited counter space. The coffee maker, an assortment of beverage supplies, and various entertaining essentials often competed for prime real estate, leading to a somewhat cluttered look during our events. This perennial problem sparked an idea, a vision for a dedicated, flexible solution that would elevate our entertaining game while keeping our countertops clear and organized.
The Genius of a DIY Bar Cart: Versatility Unleashed
Enter my brilliant idea: a DIY bar cart! This project has genuinely transformed our entertaining experience. What I adore most about this piece is its incredible versatility and mobility. By simply adding sturdy casters, this cart effortlessly glides from room to room, adapting its function to suit the specific needs of each event. Imagine the possibilities!
- For our Thanksgiving feast, it became a cozy mulled cider bar, offering warmth and fragrant aromas to our guests.
- During the highly anticipated neighborhood cookie swap, it will transform into a whimsical hot chocolate bar, complete with an array of toppings for everyone to enjoy.
- On Christmas morning, it will gracefully host various brunch items and a much-needed coffee station, ensuring everyone starts the day right.
This isn’t just a bar cart; it’s a dynamic serving station, a mobile display, and an indispensable extension of our kitchen. Although I’m still on the hunt for the perfect handle hardware to complete its look, the locking swivel casters ensure it moves with ease and stays put when needed. The beauty of DIY means I can continuously refine and personalize it. Are you ready to create your own functional masterpiece? Here’s a detailed guide on how we built it!
DIY Wood Bar Cart: A Step-by-Step Construction Guide
Materials You’ll Need:
Gathering the right materials is the first crucial step towards a successful DIY project. For this robust and stylish bar cart, you’ll need the following:
- (3) 2 x 4 x 10s: These will form the sturdy frame of your cart.
- (1) 2 x 4 x 8s: For additional frame components.
- (1) 20 x 72″ Stain Grade Panel: This will be cut to create your two functional shelves.
- (1) 20 x 36″ Stain Grade Panel: This will serve as the elegant top surface of your bar cart.
- (4) 2″ Locking Swivel Casters: Essential for making your cart mobile and secure.
- Handle (optional): Choose one that matches your style for easy maneuvering.
- Wood glue: For strong, lasting joints.
- Pocket hole screws: To securely fasten the frame pieces.
- Finish nails: For attaching the shelves discreetly.
- Wood filler (optional): To conceal nail holes for a flawless finish.
- Minwax Dark Walnut stain: Or a stain of your choice to enhance the wood grain.
- Polycrylic or similar clear coat: For durable protection and a beautiful finish.
Precision Cut List:
Accurate cuts are paramount for a professional-looking finish. Here’s how you’ll break down your lumber:
- (6) 2x4s at 31.5″: These will form the longer sides of your box frames.
- (4) 2x4s at 34.5″: These pieces will be your vertical support posts.
- (6) 2x4s at 15.5″: These will create the shorter sides of your box frames.
- (2) 15.5 x 34.5″ Shelves: These will come from your 20×72″ stain grade panel.
Let’s optimize the material usage:
- The first two 2x4x10s will be cut to yield (3) 31.5″ lengths and (1) 15.5″ length from each.
- The third 2x4x10 will provide (3) 34.5″ lengths and (1) 15.5″ length.
- Your 2x4x8 will be cut to (1) 34.5″ length and (3) 15.5″ lengths.
- The 20×72″ Stain Grade Panel will be precisely cut into (2) shelves, each measuring 15.5 x 34.5″.
- The 20 x 36″ Stain Grade Panel will become the top surface of your bar cart, requiring no further cuts to its dimensions.
Step 1: Precision Cutting and Initial Preparation
Begin by making all your cuts according to the specifications provided in the cut list. Accuracy here is key for a stable and aesthetically pleasing cart. Once your lumber is cut, we recommend running the 2x4s through a table saw. This process helps to square up the edges, removing any rounded mill marks and providing a much cleaner, more professional appearance to your frame. Following this, take an orbital sander with 80-grit sandpaper and thoroughly sand down each piece of wood. This initial sanding removes rough spots and prepares the surface for subsequent steps, ensuring better stain absorption and a smoother overall finish.
Step 2: Constructing the Frame Boxes with Pocket Holes
For this crucial step, you will utilize all six of your 31.5″ lengths and some of your 15.5″ pieces. A pocket hole jig is an invaluable tool here, allowing for strong, concealed joints. Drill two pocket holes on each end of the inside face of the 31.5″ pieces. Now, take two of your 31.5″ pieces and two of the 15.5″ lengths. Assemble these into a rectangular box, ensuring the 31.5″ pieces are inset between the 15.5″ pieces, forming a clean joint, as clearly depicted in the accompanying photo.
Before securing, meticulously check that your box is perfectly square. This attention to detail will prevent wobbles and ensure the entire cart stands true. Apply a generous amount of wood glue to the joint surfaces for added strength, then use clamps to hold each angle firmly in place while the glue sets slightly. Once the angles are secure and square, use pocket hole screws to permanently attach the pieces, creating a robust and clean joint. Repeat this entire process twice more, so you have a total of three identical, sturdy frame boxes ready for assembly.
Step 3: Assembling the Cart Structure and Shelves
With your three frame boxes ready, it’s time to build the vertical structure of your bar cart. Take four of your 34.5″ pieces, which will serve as the vertical posts. Attach these vertically to the outside corners of one of your assembled boxes. Again, precision is key: double-check for squareness using a reliable carpenter’s square. Apply wood glue to the contact surfaces for a strong bond, and use clamps to hold the posts in position while you secure them. Drive two screws from the inside of the box into each corner post, ensuring a firm attachment.
Next, position your second frame box. We decided our middle shelf should be perfectly centered between the bottom and top frames, providing balanced storage and visual appeal. Repeat the attachment process, ensuring the middle box is level and securely fastened to the vertical posts. Using spacers during this step can be incredibly helpful for maintaining consistent gaps and ensuring a perfectly level shelf. Finally, add the third and final box at the very top of the structure, ensuring it sits flush with the top ends of the 34.5″ vertical pieces. This creates the robust framework for your bar cart, providing three distinct sections for shelves.
Step 4: Adding Mobility and Initial Finishing
Before applying the final finish, let’s make your cart truly mobile. The 2″ locking swivel casters are essential for both functionality and practicality during the staining process. Go ahead and install these to the bottom corners of your cart frame. Not only do they allow for easy movement, but they also conveniently raise the cart off the ground, making it much easier to stain all surfaces without having to lift or reposition it frequently.
With the casters on, it’s time for a thorough sanding. Start by sanding the entire cart frame again with 80-grit sandpaper. This pass ensures any minor imperfections from assembly are smoothed out and provides a good base. Follow this with a finer 120-grit sandpaper pass. This progressive sanding achieves a wonderfully smooth finish, essential for even stain absorption and a professional feel. After sanding, meticulously clean off all dust. Then, apply a generous, even coat of Minwax Dark Walnut stain. This rich, timeless color is a personal favorite, as it beautifully highlights the wood grain and adds a sophisticated touch, transforming the raw lumber into a piece of elegant furniture.
Step 5: Installing Shelves and Applying Protective Finish
The final step in bringing your DIY bar cart to life is installing the shelves and applying the protective finish. Take your pre-cut stain-grade panels that will serve as the shelves. If you haven’t already, cut them down to the precise 15.5″ x 34.5″ dimensions using your table saw. After cutting, pay special attention to sanding away any saw marks from the edges using 80-grit sandpaper. Follow this with 120-grit sandpaper to achieve a perfectly smooth finish, and gently soften the edges a bit. This extra step in sanding ensures a refined look and feel for your shelves.
With the shelves prepped, it’s time to attach them to the cart frame. Apply a strong wood glue to the top edges of the frame boxes where the shelves will rest. Carefully place each shelf into its designated section. For a secure and discreet attachment, use finish nails to fasten the shelves to the frame. If you prefer a seamless look, you can fill in the small nail holes with wood filler once it’s dry and sand them smooth. After the glue and filler (if used) have completely dried, apply a coat of Minwax Dark Walnut stain to the shelves, matching the frame. Once the stain is dry, protect your entire bar cart, including the shelves, with a durable coat of Polycrylic. This clear protective finish will guard against spills, wear, and tear, ensuring your beautiful new bar cart remains pristine for years of entertaining.
Conclusion: Your New Entertaining Essential
Project Breakdown:
- Time: Approximately 4 hours of active building time.
- Cost: Approximately $75, though this can vary depending on whether you have some wood or supplies already on hand, as we did. This is a significantly more affordable option compared to buying a pre-made cart with similar quality and features.
We hope this detailed guide inspires you to tackle your own DIY bar cart project. It’s a rewarding endeavor that yields a versatile, beautiful, and highly functional piece for any home.
Thistlewood, Inspired by Charm, Funky Junk, Shanty 2 Chic and Songbird Blog