
In the ever-evolving world of home decor and furniture design, trends come and go, but few shifts have been as
dramatic as the transformation of the entertainment center. For decades, the living room centerpiece was a
bulky, deep cabinet designed to house enormous cathode-ray tube televisions. However, the advent of sleek,
thin flat-screen TVs completely revolutionized our viewing habits and, consequently, our furniture needs. These
modern televisions no longer demand cavernous spaces; instead, they can be elegantly mounted on the wall (perhaps
even
framed
to enhance their aesthetic appeal), leaving behind a surplus of once-essential but now obsolete entertainment
units.
This dramatic change has created a unique opportunity for creative DIY enthusiasts. Old-style entertainment
centers, often found gathering dust in attics, discarded on curbs, or waiting for a second life in thrift
stores, are now prime candidates for an imaginative makeover. They represent a fantastic canvas for upcycling
projects, turning what might seem like outdated junk into functional, stylish, and highly personalized pieces
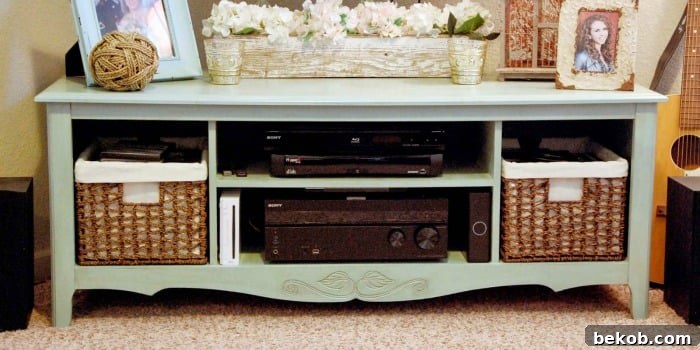
for the contemporary home. Today, we’re thrilled to showcase an inspiring example of such a transformation: an
older entertainment center ingeniously revamped into a chic TV console table. By simply removing the top
section and adjusting its height, this piece becomes the perfect base for your electronics, neatly positioned
beneath a wall-mounted television. This DIY approach not only breathes new life into an old item but also offers
a budget-friendly and sustainable alternative to buying new furniture.
Upcycle Your Old Entertainment Center: A DIY Guide to a Modern TV Console Table
The essence of successful furniture revamping lies in recognizing the hidden potential within existing pieces
and skillfully adapting their features to serve new purposes. This philosophy is at the heart of the upcycling
movement, where creativity transforms the ordinary into the extraordinary. Instead of discarding items, we
reimagine them, extending their lifespan and creating unique, customized solutions for our homes.
Consider the versatility of a simple dresser, for instance. Its sturdy drawers and solid frame make it an
excellent foundation for an entirely different piece of furniture. We’ve seen how a dresser can be cleverly
converted into a remarkably useful and aesthetically pleasing tall mudroom bench, complete with storage for
shoes and accessories – a truly ingenious space-saving solution
(featured here).
Similarly, a taller dresser can shed its original identity to become a charming and functional bookshelf,
offering ample display space for your literary treasures or decorative items
(featured here).
Even more surprisingly, an antique sewing table, with its unique compartments and sturdy frame, can be
reimagined as an elegant drink cooler – a perfect and conversation-starting addition for any gathering or
outdoor entertainment space
(featured here).
And for those with a flair for the truly creative, the ultimate challenge lies in assembling a cohesive piece
from disparate elements. Our personal favorite involves a clever
built-in
closet
created entirely from a collection of salvaged furniture odds and ends, demonstrating that with a little vision
and effort, almost anything can be transformed.
What makes today’s featured project particularly exciting, however, is its remarkable simplicity and broad
applicability. This DIY entertainment center makeover is refreshingly easy and can be successfully applied to
virtually any older style entertainment unit. You don’t need extensive woodworking skills or expensive tools to
achieve a stunning result. It’s a testament to how accessible and rewarding furniture upcycling can be. So,
prepare to be inspired as Kelly from The Moon and Me guides us through all the details of transforming her
once-obsolete entertainment center into a modern, functional, and beautiful TV console.
Want to build a solid wood TV stand from scratch? Get our
farmhouse TV console tutorial
and plans here.
Transforming Obsolete to Outstanding: A Step-by-Step Guide to Turning an Old Entertainment Center into a Modern TV
Console Table
by Kelly of
The Moon and Me
The Moon and Me.
It’s a joyful space where I chronicle my DIY adventures, share decor inspirations, whip up delicious recipes, and
occasionally delve into other delightful randomness that sparks my imagination. If you were to drop by, you’d
likely find me with a dusting of flour on my face and vibrant paint smudges beneath my fingernails – the tell-tale
signs of a day well spent in creative pursuits.
nibble on some homemade Butterscotch Brownies, then
take a
tour of our master bath mini-makeover, and perhaps even
get our hands dirty by
spray painting something fabulous!
console. Believe me, its original form bore little resemblance to its current stylish iteration. Stick around;
we’re about to embark on a fun and rewarding DIY journey together!
The Dilemma: Adapting to Modern Living
freeing up valuable floor space and creating a cleaner, more modern look in our living area.
with our enormous, outdated entertainment center? It was a beast of a unit, designed for a bygone era of television
technology, and frankly, it no longer fit our aesthetic or practical needs. This was a really good question, and one
I imagine many of you might be asking yourselves!
we’d undoubtedly seen floating around on Pinterest. We also found ourselves casually browsing brand new console
tables, hoping to find the perfect piece to sit beneath our newly wall-mounted TV. But, alas, the options were
disappointing – either aesthetically unappealing or prohibitively expensive. We wanted something that fit our style
and budget, and off-the-shelf solutions weren’t cutting it.
proposed a brilliant idea: “Hey, why don’t we just give a makeover to what we’ve already got?” It felt like a stroke
of genius, a simple yet powerful solution to our furniture dilemma. Why buy new when we could transform the old?
partition on its upper left side, complete with a glass door. We had already removed that a couple of years prior
just to accommodate the growing size of our flat screen television. This prior modification gave us a head start,
making the full transformation even more straightforward.
The DIY Process: From Old to New TV Console
Step 1: Strategic Deconstruction and Preservation
dismantling; it was a conscious decision to preserve this piece. Why? Because its edges were already finished,
meaning we wouldn’t have to worry about creating new clean edges or applying edge banding later. This small detail
saved us a significant amount of time and effort in the finishing stages. It’s always a good idea to assess your
furniture piece for existing finished components that can be reused!
Step 2: Reshaping the Structure
vertical sides of the unit, taking them all the way down to the bottom section. The goal here was to create a lower,
more streamlined profile, ideal for a modern TV console. Don’t stress too much about achieving perfectly smooth or
aesthetically pleasing cuts at this stage; the key is to ensure they are relatively even. We used a hand saw for
control, but a circular saw could also work for quicker, straighter cuts if you’re comfortable with it. Remember
to prioritize safety when working with any cutting tools!
reattached to the bottom section, effectively covering any minor imperfections or saw marks. This smart planning
means less stress during the cutting phase and a beautifully finished result. Unless, of course, you got a bit too
enthusiastic and went full “Texas Chainsaw Massacre” on it! In that extreme scenario, you might need a bit more
creative problem-solving than I can offer!
Step 3: Preparing Surfaces and Reassembling for Strength
filled all screw holes with DAP spackle, ensuring a smooth, uniform surface. After the spackle dried, a thorough
sanding prepared the piece for its new look.
here: we carefully measured to ensure the top was perfectly centered, creating a balanced and professional
appearance. Then, we applied a generous amount of Gorilla wood glue, a reliable adhesive for a strong bond. To
ensure maximum adhesion and stability, we used several clamps to hold the pieces tightly together and strategically
placed some heavy objects on top while the glue cured. We allowed it to dry undisturbed for a couple of days, giving
the glue ample time to form a solid, lasting connection. (And no, we didn’t use *these* light items shown in the
photo for weighting; we opted for much heavier objects!)
Step 4: The Art of Finishing – Painting and Waxing
I opted to use a home-mixed chalk paint. The beauty of chalk-type paint is its incredible adhesion, making primer
unnecessary, even on notoriously tricky surfaces like laminate. If you choose a different type of paint, however, a
thorough sanding and proper priming will be absolutely essential to ensure long-lasting results and prevent peeling.
After applying two coats of the chalk paint, the piece looked as though it had always been a stylish, short console,
completely erasing any trace of its former, bulkier self.
it leans a bit more towards green than a true aqua, I found it perfectly complemented the room’s existing decor,
adding a serene yet vibrant touch. Choosing the right color is crucial for integrating your upcycled piece
seamlessly into your home.
and providing a durable, smooth surface. For a touch of depth and a subtle antique effect, I then selectively
applied a little Annie Sloan dark wax, which adds “drama” and character to the console. The combination of clear
and dark waxes created an amazing, professional-looking transformation, elevating the piece from a simple repaint to
a custom-finished furniture item.
Step 5: Adding Functional Style with Baskets
these practically perfect baskets at World Market. They were ideal in size and added a wonderful textural element. I
then took on the task of sewing liners for each basket. A small confession: they didn’t fit *quite* right initially,
and I had to make a discreet slit in the back of each liner. A little frustrating in the moment, but hey, they look
absolutely beautiful from the front, and that’s what truly matters for the overall aesthetic!
creating a cohesive and tidy appearance, but they also provide essential practical functionality. They are perfect
for discreetly storing CDs, DVDs, remote controls, and other media accessories, preventing them from leaning or
toppling on the uneven seagrass weave of the baskets themselves. It’s an ideal solution for keeping clutter out of
sight while maintaining easy access.
The Rewarding Outcome
actually sparked a larger room makeover. In the end, it was a truly good decision, leading to a more functional,
modern, and aesthetically pleasing living space. Thanks, love, for the initial impetus!
for the liners. Fortunately, I already had essential supplies like spackle, wood glue, wax, and plaster of Paris
(for mixing the chalk paint). When you consider that most new consoles we surveyed started at around $300, this DIY
project resulted in a remarkable saving of $260 or more! It’s a fantastic example of how upcycling can furnish your
home with style without breaking the bank.
In terms of time, while I can’t give an exact minute-by-minute breakdown, the hands-on work only took a few
hours. The majority of the project time was spent waiting – waiting for the glue to thoroughly dry, and then
waiting for each coat of paint to cure before applying the next. This makes it a perfect quick weekend project,
spread across a couple of days to allow for proper drying times. Interestingly, the most time-consuming part for
me wasn’t the construction or painting; it was finding the perfect baskets that fit just right!
Reflecting on the process, I can’t think of anything I would have done differently. Well, perhaps one thing: I
might have outsourced the waxing and buffing! My arm was quite tired by the end of it, but the stunning,
protected finish was well worth the effort.
a furniture makeover truly lies in its ability to completely disguise the past. Do you have an old entertainment
center gathering dust, just waiting for a new purpose? We are absolutely thrilled with our revamped console; it has
exceeded all our expectations. We hope this tutorial inspires you to look at your old furniture with fresh, creative
eyes and embark on your own rewarding upcycling adventure!
I had so much fun!
——————————————
Thank you so much for visiting and sharing your incredible transformation, Kelly! Your ingenuity has certainly
convinced us – we’ll never look at an outdated entertainment center the same way again, seeing only endless
potential.
To all our fellow Remodelaholics, be sure to head over to
The Moon and Me
to discover more of Kelly’s fantastic DIY projects and creative inspiration. You won’t want to miss her awesome
brightly colored folding chairs
and her charming
master bath mini-makeover. Happy DIYing!