
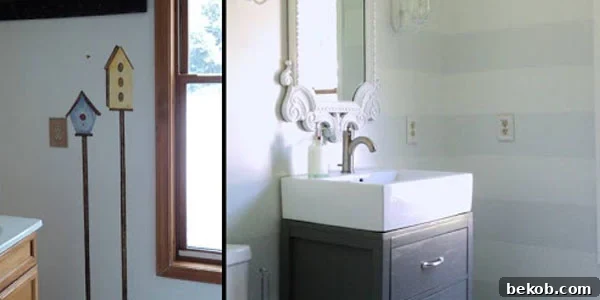
Transforming Your Half Bath: A Stylish Striped Wall DIY Update
Submitted By His and Hers
There’s something incredibly satisfying about transforming a small, functional space into a true highlight of your home. Our half bath, often overlooked, presented just such an opportunity. This isn’t just a story about a bathroom renovation; it’s a journey of creativity, resourcefulness, and a little bit of elbow grease, all contributing to a charming and uniquely personalized space. Join us as we dive into the details of our latest half bath update, from eye-catching striped walls to bespoke lighting and vanity solutions, proving that even the smallest rooms can make the biggest statements.
Our journey with this half bath has been ongoing. You might recall our previous adventures, particularly one memorable day in May when we were wrapping ourselves in painter’s tape, meticulously planning out stripes for these very walls. That initial step laid the groundwork for the fresh, modern aesthetic we aimed for. While the foundational stripes were established, this latest update brings us significantly closer to our vision of a fully refreshed and functional powder room. It’s been a collaborative effort, especially with Rick’s diligent work coaxing stubborn under-sink pipes into submission – a true unsung hero of home renovation!
The Vision: Crafting Dynamic Striped Walls
Striped walls are more than just a decorative choice; they’re a design statement, especially potent in a compact space like a half bath. Our initial foray into creating these stripes was detailed in an earlier post, but the impact they’ve made on the room’s character is undeniable. Choosing stripes for a small bathroom allows for a dramatic visual effect without overwhelming the area. Vertical stripes, in particular, can cleverly draw the eye upward, creating an illusion of greater ceiling height and making the room feel more expansive and airy.
The process of achieving crisp, clean lines requires patience and precision. We started by carefully measuring and marking out our desired stripe widths, ensuring consistency across all walls. High-quality painter’s tape is paramount here; it’s the secret weapon against bleed-through and the key to those perfectly defined edges. After applying a base coat, the tape was strategically placed, followed by the contrasting stripe color. The reveal, peeling off the tape to uncover sharp, distinct lines, is always the most rewarding part of any striped wall project. For our half bath, the chosen color palette complements the overall serene and modern theme, providing a subtle yet sophisticated backdrop for the other DIY elements.
This attention to detail in the wall treatment sets the tone for the entire room, demonstrating that even a modest half bath can embody thoughtful design. It’s a testament to how a simple pattern, executed with care, can dramatically alter the perception and ambiance of a space, making it feel intentionally designed rather than merely functional.
A fresh perspective on our charming striped half bath.
Details of the custom vanity against the elegant striped backdrop.
The Heart of the Half Bath: A Custom-Built Vanity
One of the true showstoppers in our updated half bath is the custom-built vanity, a testament to Rick’s dedication and skill. Crafting a vanity from scratch offers unparalleled advantages, especially in a compact or unusually shaped bathroom. It allowed us to perfectly optimize the space, ensuring every inch was utilized efficiently and aesthetically. Unlike off-the-shelf options, a custom vanity ensures a perfect fit, addressing unique dimensions and incorporating specific storage needs, which is crucial for maximizing functionality in a small area.
Rick poured his “blood, sweat, and tears” into this piece, and the result is a sturdy, beautiful, and highly functional unit. The process involved meticulous planning, from selecting durable materials that could withstand the bathroom environment to precise joinery and finishing. Building a vanity gave us complete control over the design, allowing us to choose a style and finish that seamlessly integrates with the striped walls and overall aesthetic of the room. It’s not just a place to wash hands; it’s a focal point, a piece of handmade furniture that adds warmth and character that store-bought items simply cannot replicate.
For anyone considering a similar DIY vanity project, careful consideration of plumbing access, material durability, and a solid design plan are key. The satisfaction of using something crafted with your own hands, perfectly tailored to your space, makes every challenge worthwhile. This vanity is more than just a fixture; it’s a personal statement and a central element that elevates the entire half bath.
Rick’s custom-built vanity: a masterpiece of craftsmanship and functionality.
Illuminating Ideas: Upcycled Applesauce Jar Lights
Innovation often springs from necessity, and our half bath lighting is a shining example of budget-friendly brilliance. Instead of splurging on expensive fixtures, we decided to get creative, transforming humble applesauce jars into charming, functional lights for an astonishing total of just $4! This project not only saved us a significant amount of money but also added an unparalleled touch of rustic charm and individuality to the space.
The concept was simple yet effective: procure two clean applesauce jars, acquire basic lighting kits (often available at hardware stores or online for a few dollars each), and with a bit of wiring and careful assembly, mount them above the vanity. The transparency of the jars allows for a soft, diffused light, perfect for a cozy half bath ambiance. This upcycling project underscores the power of looking beyond a product’s intended use and seeing its potential for new life. It’s an eco-conscious approach to home decor that proves beautiful design doesn’t have to come with a hefty price tag.
This DIY lighting solution perfectly complements the handmade vanity and the overall bespoke feel of the room. It’s a talking point for guests and a source of pride for us, demonstrating that creativity and resourcefulness can yield stunning results, even when you’re working with a minimal budget. We’ll be sharing a more detailed step-by-step guide on how we achieved these unique lights in an upcoming post, so stay tuned for your chance to replicate this clever design!
Our $4 applesauce jar lights — proving creativity knows no budget!
Reflecting Style: The Yard Sale Mirror Makeover
Every bathroom needs a mirror, but finding one that perfectly fits your aesthetic and budget can be a challenge. Our solution came from an unexpected source: a ridiculously cheap yard sale. We stumbled upon two identical mirrors for a mere $25 – an absolute steal, especially when considering the typical cost of quality mirrors today. Most mirrors in that price range are often plastic and intended for temporary dorm room setups, not a stylish home bathroom. This find was a true gem, validating our belief that patience and a keen eye can lead to incredible decor treasures.
The mirrors, while structurally sound, were a dusty gold, a color that didn’t quite align with our fresh, modern half bath vision. This was nothing a little spray paint couldn’t fix! The transformation process was straightforward: a thorough cleaning of the frames, followed by a light sanding to ensure proper paint adhesion, and finally, several thin, even coats of our chosen spray paint. The color selected instantly modernized the frames, turning them from dated finds into elegant accents that complement the room’s new palette.
This project is a fantastic example of how a simple spray paint makeover can breathe new life into an otherwise overlooked item. It’s an inexpensive way to achieve a high-end look and customize pieces to perfectly match your interior design scheme. Always keep an eye out for potential at yard sales, flea markets, and second-hand stores; you never know what treasures await a little love and a can of paint!
Our yard sale mirror, beautifully reimagined with spray paint.
The mirror in its original dusty gold glory, pre-makeover.
The Finishing Touches and Embracing Imperfections
With the major elements in place – the distinctive striped walls, the bespoke vanity, the innovative upcycled lighting, and the stylishly revamped mirror – our little half bath has truly come into its own. It’s a space that now feels complete, mature, and infused with personality. However, as with any home renovation project, there are always those final details that make all the difference, those small tasks that transform a great space into a perfect one.
Currently, our to-do list includes installing a new ceiling light fixture to complement the vanity lights, finishing the trim painting for a polished look, and ingeniously covering up the washer and dryer that share this compact space. We also plan to update the beige sockets and switches to crisp white, ensuring every element aligns with the room’s fresh aesthetic. While looking at these progress photos, I’m reminded that I still need to remove that extra toilet paper roll holder from the back of the toilet. These are the kinds of “imperfections” that homeowners learn to embrace, understanding that a lived-in home is a continually evolving masterpiece.
Embracing these minor remaining tasks as part of the ongoing journey of homeownership allows us to appreciate the significant progress made. It’s about celebrating the transformation achieved and acknowledging that some projects are a marathon, not a sprint. This half bath is a perfect illustration of how dedication to DIY and a willingness to tackle projects big and small can lead to a space that is both functional and full of character. We believe that a home is never truly “finished,” but rather constantly being refined and loved into its best self.
Our half bath, now grown up and brimming with DIY charm.
The Enduring Appeal of DIY Home Renovation
Our half bath update is a vibrant example of the power and pleasure of DIY home renovation. Beyond the obvious cost savings, embarking on these projects offers a unique sense of accomplishment and allows for unparalleled personalization. Every brushstroke, every cut of wood, and every upcycled item tells a story, making your home truly yours. It’s an invitation to inject your personality into every corner, transforming generic spaces into reflections of your unique style and ingenuity.
Whether you’re tackling a major renovation or a series of small updates, the journey of DIY is incredibly rewarding. It fosters problem-solving skills, encourages creativity, and provides lasting satisfaction. We hope our half bath transformation inspires you to look at your own spaces with fresh eyes, identify areas ripe for improvement, and perhaps even roll up your sleeves to create something beautiful and functional with your own hands. Remember, every major transformation begins with a single step, or in our case, a roll of painter’s tape!
As promised, we’ll be diving deeper into the specifics of Rick’s custom vanity build and our unique DIY lights in upcoming posts, offering more insights and practical tips. For now, I’m off to brainstorm a new Fourth of July outfit, having officially nixed the painter’s tape ensemble idea for the holiday!