
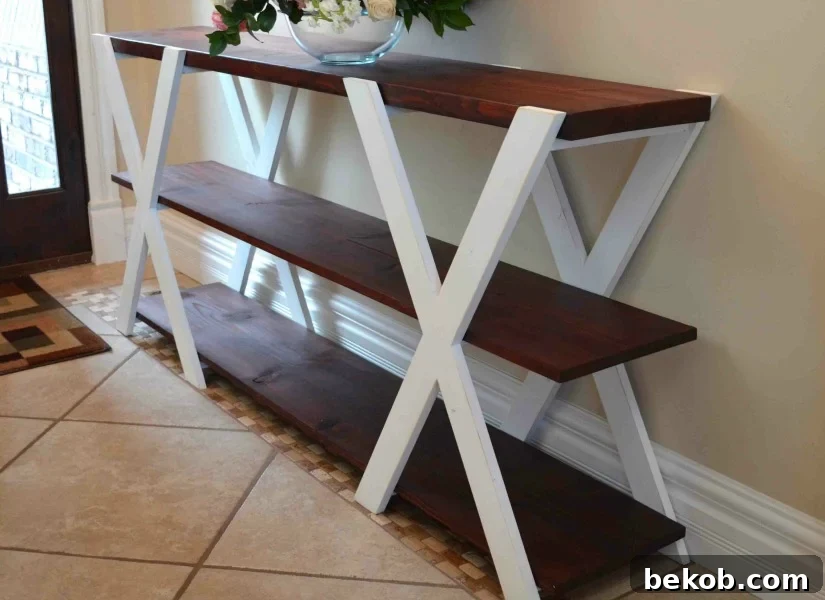
Unlock your inner craftsman and elevate your home decor with a stunning DIY farmhouse console table. Our comprehensive beginner woodworking plans empower you to build this stylish piece for under $50, making it an incredibly affordable and rewarding project. Featuring a timeless double X-leg design, this console table offers both aesthetic appeal and practical versatility. Its length is fully adjustable, allowing you to perfectly tailor it to your specific space, whether it’s gracing your entryway, enhancing your living room, or serving as a functional piece in any other area of your home. Embrace the satisfaction of creating beautiful, custom furniture with your own hands!
If you’re looking for alternative storage solutions, consider building this farmhouse TV console with closed storage. Once your console table is complete, dive into our expert tips for decorating a console table to unleash its full potential, and explore even more farmhouse decorating ideas to complement your new creation.
Hello, it’s Amy from Hertoolbelt, and I’m thrilled to share another exciting build plan with you: a double X farmhouse console table. The iconic farmhouse X design has become a beloved staple in home decor, appearing everywhere from elegant TV console stands to practical side tables and even charming Dutch barn door baby gates. This distinctive style is not only visually appealing but also surprisingly easy to incorporate into your own DIY furniture projects, allowing you to infuse your space with rustic charm and character.
My inspiration for this adjustable-length console table stemmed from a truly beautiful Birch Lane Console Table (though it’s no longer available). I was particularly drawn to its sleek lines and the striking X-leg silhouette, which perfectly embodies the modern farmhouse aesthetic. While the original piece was lovely, I envisioned a version that offered greater flexibility and a more robust presence, tailored for the hands-on DIY enthusiast.
Customizing Your Farmhouse Console: Design Enhancements
While the Birch Lane table provided fantastic inspiration, I made several key modifications to enhance both the style and functionality of this DIY version. These thoughtful adjustments ensure a more substantial look, greater customization, and ease of construction:
- I opted for thicker legs to give the console a bolder, more substantial “chunky” aesthetic, which aligns perfectly with the robust character of farmhouse furniture.
- The length is completely adjustable – a standout feature that sets this plan apart. You simply cut your boards to your desired length! For my own entryway, a 66-inch table proved ideal, offering ample surface area without overwhelming the space.
- The depth has been reduced, making this a narrower table perfect for entry halls or hallways where space is often at a premium. This design choice also simplifies construction, as it utilizes readily available 2×12 lumber for the shelves, streamlining the building process.
How to Build Your Own DIY Double X Console Table
by Amy of Hertoolbelt
This post contains affiliate links, meaning if you make a purchase through them, we may earn a small commission at no extra cost to you. See our full disclosure policy here.
Embarking on a woodworking project can be incredibly rewarding, especially when it results in a beautiful and functional piece like this double X console table. Before you begin, gather all your materials and tools to ensure a smooth and efficient building process. With precise measurements and clear instructions, you’ll be amazed at what you can create.
Materials Required for Your Farmhouse Console
One of the most appealing aspects of this project is its affordability. The approximate lumber cost comes in at an incredible $47, making it a budget-friendly option for anyone looking to add high-quality furniture to their home without breaking the bank. Here’s what you’ll need:
- Detailed farmhouse console woodworking plans (essential for step-by-step guidance)
- 1 – 2″ x 12″ x 8′ board (actual dimensions 1 1/2″ x 11 1/4″)
- 2 – 1″ x 12″ x 6′ boards (actual dimensions 3/4″ x 11 1/4″)
- 4 – 1″ x 3″ x 8′ boards (actual dimensions 3/4″ x 2 1/2″)
- 2 – 1″ x 2″ x 8′ boards (actual dimensions 3/4″ x 1 1/2″)
- 1 1/4″ pocket hole screws (essential for strong, concealed joinery)
- Wood glue (for added strength and stability)
- Assorted Sandpaper (various grits for smooth finishing)
- Wood filler (to conceal imperfections and pocket holes)
- Your choice of paint, primer, stain, and/or top coat for the desired finish.
Essential Tools for Your DIY Woodworking Project
This project is designed with the beginner in mind, meaning the tools required are generally accessible and relatively easy to use. Safety should always be your top priority when operating power tools; ensure you understand how to use each tool correctly and wear appropriate personal protective equipment.
- Measuring tape (for precise cuts and assembly)
- Miter saw (or a miter box for manual angled cuts)
- Kreg Jig pocket hole jig (or a similar pocket hole system for strong, invisible joints)
- Drill/driver (for drilling pocket holes and driving screws)
- Wood clamps (invaluable for holding pieces securely while gluing and screwing, truly like having an extra set of hands!)
For larger projects, we highly recommend building on our spacious DIY table saw workbench. Its integrated Rockler T-track system makes woodworking a breeze! Get the plans here.
Skill Level: Perfect for Beginner Woodworkers
This console table plan is specifically designed to be an excellent project for beginners venturing into woodworking. It utilizes straightforward cuts and the relatively simple technique of pocket hole joinery, making it accessible even if you have limited experience. Beyond general safety practices, accurate measuring, and understanding basic wood finishing, there are a couple of key skills woodworkers will benefit from knowing:
- How to make accurate angled cuts using a miter saw (or a hand-powered miter box for those without power tools). Mastering this ensures your X-legs fit together perfectly.
- How to drill pocket holes and attach pieces with pocket hole screws using a Kreg Jig pocket hole jig (or a comparable system). Pocket holes create strong, concealed joints that are ideal for furniture building.
Learning these skills with a project like this provides a solid foundation for more complex builds in the future, boosting your confidence and expanding your DIY capabilities.
Ready to start building? Purchase your Double X Farmhouse Console Table Plans now!
Understanding the Dimensions: What Size is the Console Table?
The standard dimensions for this robust solid wood farmhouse console table are a comfortable 30 inches in height, a slender 12 3/4 inches in depth, and a generous 66 inches in length. This size is ideal for most entryways or behind sofas, offering a perfect balance of display space and understated presence. However, the true beauty of this design lies in its incredible flexibility, allowing you to adapt it to fit virtually any space.
Customization at Its Best: Is the Console Table Length Adjustable?
Absolutely, and this is arguably one of the most compelling features of this easy DIY farmhouse entry table! The design allows for the shelves and top to be effortlessly adjusted to almost any length you desire. You can create a compact console as short as 48 inches (the practical minimum for stability) or extend it dramatically to utilize a full 12-foot 2×12 board – or even a 16-foot board for truly expansive spaces! This unparalleled adjustability means your console table will be a perfect fit, regardless of the unique dimensions of your home.
For those ambitious builders aiming for an extra-long console, perhaps anything over 8 feet, I highly recommend incorporating an additional X-leg section or two for enhanced support and stability. This will ensure your table remains sturdy and level over its extended length. Conversely, if you only need a simple, easy side table, a single X-leg base can be surprisingly sturdy with a shorter tabletop. In this scenario, you might even skip the middle shelf for a minimalist look, though installing the support beam for added stability is still a good idea.
Portability and Versatility: Is the Table Easy to Move?
While this console table is built to be a sturdy, semi-permanent fixture, its design allows for a degree of portability. The shelves can be left unattached to the X-leg bases, enabling you to disassemble the table into several manageable pieces for easier transport. This feature makes it a fantastic option as a temporary gift table for a party or wedding reception. Imagine it paired with our elegant portable wood wedding arch – a perfect duo for any special event!
If your intention is to frequently move this DIY wood console table for events or different room layouts, you might consider an innovative modification: using flush mount brackets on the X-leg cross pieces. This would allow the table to be quickly assembled and disassembled, taking up significantly less storage space when not in use. While I haven’t personally tried this modification, it’s a creative idea – and that’s truly the best part of DIY: experimenting and customizing to fit your needs!
Bringing Your Vision to Life: How to Finish Your Double X Wood Farmhouse Console Table
The finishing stage is where your console table truly comes to life, reflecting your personal style and the overall aesthetic of your home. After constructing the table, the first crucial step is to meticulously fill all pocket holes with wood filler. Allow ample time for the filler to dry completely according to the product instructions. Once dry, sand the entire piece – the legs, shelves, and any other surfaces – until they are perfectly smooth to the touch. Start with a medium grit sandpaper (around 80-100 grit) to remove any major imperfections or excess glue, then progressively move to finer grits, finishing with 120-150 grit sandpaper for a silky-smooth surface ready for finishing. This diligent sanding ensures a professional, high-quality result.
Now, let’s explore some popular finishing options to achieve your desired farmhouse look:
For a sophisticated darker modern farmhouse console table: To achieve a look reminiscent of the inspiration image, consider spray painting the X-leg base a rich black or an elegant oil-rubbed bronze. This creates a faux metal base effect, similar to this reclaimed wood coffee table, providing a striking contrast to the wood. Subsequently, apply your chosen stain to the shelves and tabletop. For a truly unique and custom appearance, experiment with layering an aged gray stain over another stain (such as shown in this DIY modern farmhouse console table project). This layering technique adds depth and character, giving your table a bespoke feel.
For a charming white and wood two-tone farmhouse look: This classic combination offers a bright and inviting aesthetic. Begin by priming the X-legs thoroughly; primer creates an ideal base for paint adhesion and ensures a smooth, even finish. Once the primer is dry, paint the legs a crisp white. For the top and shelves, apply a pre-stain wood conditioner. This step is crucial for porous woods as it helps the stain absorb evenly, preventing blotchiness. After conditioning, apply a beautiful wood stain, such as Rustoleum Carrington, to achieve a warm, natural wood tone. To protect the stained wood from daily wear and tear and ensure its longevity, always apply a durable top coat, like polyurethane. This protective layer guards against scratches, spills, and general use, preserving your hard work.
Once all layers of your chosen finish have completely dried and cured, carefully slide the top and shelves into their designated places. With this final step, your custom farmhouse console table is complete – a testament to your DIY prowess and a beautiful addition to your home!
Ready to bring this design to your home? Get the woodworking plans to build this farmhouse console table and start your project today!
Styling Your New Farmhouse Console Table
Once your beautiful double X console table is built and finished, the fun of decorating begins! In an entryway, it’s perfect for holding keys, mail, and a decorative bowl or vase with fresh flowers to welcome guests. In a living room, it can serve as a display area for cherished photos, books, or a curated collection of decor items. Consider adding a lamp for ambient lighting, a mirror above it to reflect light and make the space feel larger, or even baskets on the bottom shelf for practical storage. The versatility of its design means it can adapt to various decorating styles, from minimalist to bohemian, while always maintaining its rustic farmhouse charm.
For more inspiring build plans and DIY furniture ideas, be sure to check out Hertoolbelt:
Grand Island Console Table // Scroll Console Table // Narrow Sofa Table
Discover More DIY Console Tables to Build:
If you’ve enjoyed building this project, or are simply seeking more creative console table ideas, explore these additional plans:
- Build a charming farmhouse TV console table
- Construct a super easy X sofa table for a quick update
- Craft a unique one-sheet plywood modern console table with a waterfall edge
- Assemble a simple no-nails console table, perfect for small spaces
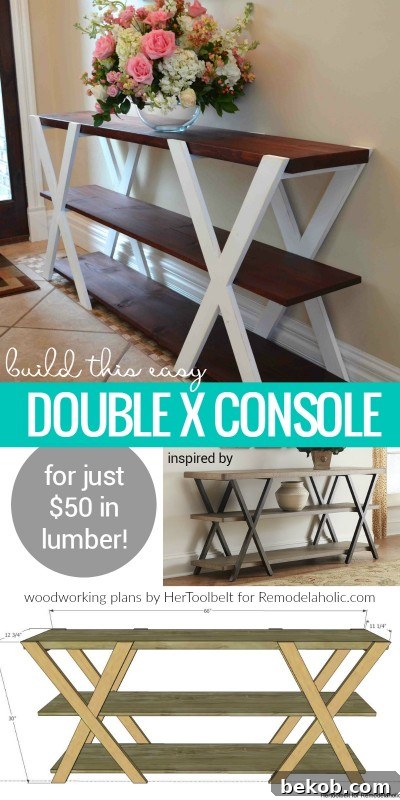
This comprehensive guide was first published on July 23, 2016, and last updated on April 3, 2020, to ensure you have the most relevant and up-to-date information for your project.