
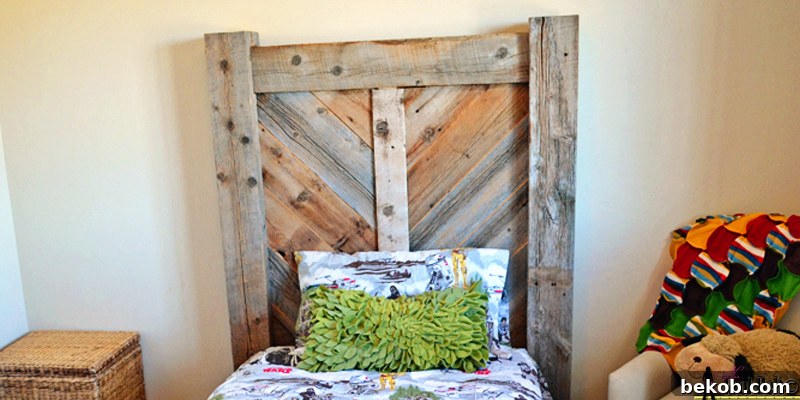
Crafting a Timeless Piece: Build Your Own Rustic Chevron Headboard with Reclaimed Barn Wood
We are thrilled to welcome back Amy from Her Tool Belt, not just as a returning guest for our special Headboard Week series, but as a valued new member of our contributor team! Amy is truly a master craftswoman, renowned for her exceptional woodworking skills and clear, concise building plans. You might remember her fantastic media center plans, which were incredibly popular among our readers. Now, she’s back with another ingenious project that promises to transform your bedroom: a stunning rustic barn wood headboard, designed with a beautiful chevron pattern. This project is a testament to her creativity and expertise, offering a blend of rustic charm and modern design that will elevate any sleeping space.
As we celebrate Headboard Week, don’t forget to explore all the inspiring DIY headboard ideas shared by our talented community. You can link up your own incredible creations at the party accessible at the end of this post, or directly through this link. We love seeing your unique interpretations and craftsmanship!
Howdy, I’m Amy from Her Tool Belt, and I’m absolutely delighted to share with you the detailed tutorial for my Rustic Chevron Headboard. This project holds a special place in my heart, born from a unique opportunity I had last summer: salvaging a treasure trove of authentic barn wood from an old hay barn on my grandpa’s farm. There’s something incredibly satisfying about transforming weathered, forgotten wood into a beautiful, functional piece of furniture. This headboard is my latest creation using that reclaimed lumber, following the twin bed I previously built for my son. I meticulously designed this headboard with a chevron pattern, hoping to showcase and celebrate the natural character, deep textures, and rich history embedded within each piece of weathered wood. The outcome exceeded my expectations, and I’m thrilled with how it turned out, adding a touch of rustic elegance and warmth to the room.
The Allure of Reclaimed Barn Wood: Sustainable Style for Your Home
Sourcing and Selection: Finding Your Perfect Planks
One of the most appealing aspects of working with reclaimed wood is its inherent value – often, it’s either free or incredibly cheap. Beyond the cost savings, reclaimed barn wood brings an unparalleled level of character and history to any project, telling a unique story through its weathered surfaces and natural imperfections. Each knot, grain pattern, and faded paint mark contributes to its distinctive charm, creating a piece that feels both rustic and profoundly authentic. To source your reclaimed lumber, you can look for local farms that are dismantling old structures, specialty salvage yards, or even online marketplaces. When selecting your wood, prioritize pieces that appear structurally sound and relatively free from significant rot or damage.
Preparing Reclaimed Lumber: Cleaning and Inspection
Before you begin cutting and assembling, proper preparation of your reclaimed barn wood is crucial. Over the decades, barn wood accumulates a significant amount of dirt, grime, dust, and possibly other organic matter. To ensure a clean and safe working surface, meticulously wash each piece with warm water, a mild dish soap, and a sturdy bristle brush. Scrub vigorously to remove all surface contaminants, paying close attention to crevices and rough areas. After cleaning, allow the wood to dry completely, ideally for several days, to prevent warping and ensure optimal adhesion for any future finishes.
Beyond cleaning, a thorough inspection is paramount, especially when bringing old wood into your home:
- Aromatic Assessment: Does the wood emit a strong, unpleasant odor? If so, it might have absorbed manure, chemicals, or other substances over time that could persist indoors. It’s often safer to use pieces that were higher up in the barn structure, as they tend to be less exposed to ground-level contaminants and moisture. If the smell is pungent and doesn’t dissipate after cleaning and drying, it’s best to avoid using it for indoor furniture.
- Pest Patrol: Carefully check for any signs of insect infestation, such as small holes, sawdust trails (frass), or visible bugs. If you discover pests, research appropriate treatment methods for your specific case. This might involve heat treatment, freezing, or chemical solutions, depending on the type of infestation and local recommendations. Never bring infested wood into your home without proper remediation, as it could spread to other wooden items.
- Hidden Hazards: Barn wood often contains hidden nails, screws, or other metal fragments. Use a metal detector to scan each piece thoroughly before cutting to prevent damage to your saw blades and ensure your safety.
Understanding Lumber Dimensions: Rough Cut vs. Standard
When working with salvaged barn wood, it’s essential to understand the difference between rough-cut lumber dimensions and the nominal dimensions used for standard lumber yard purchases. Quite often, old barns were constructed using rough-cut lumber, meaning a “2×4” board actually measures a full 2 inches by 4 inches. In contrast, a modern “2×4” board purchased from a lumber yard is typically milled down to 1 1/2 inches by 3 1/2 inches, despite still being referred to as a 2×4. This plan is specifically designed using the exact, rough-cut lumber dimensions, reflecting the authentic nature of the barn wood. If you choose to build this headboard using standard, dimensioned lumber from a hardware store, you will need to adjust the dimensions accordingly to accommodate the smaller actual sizes. For a version of this chevron bed plan specifically adapted for standard lumber sizes, you can find the guide here.
Essential Tools for This Woodworking Project
To successfully build this rustic chevron headboard, having the right tools is paramount. Here’s a list of essential equipment that will make your building process smoother, safer, and more precise:
- Chainsaw: Ideal for initially breaking down large, unwieldy barn wood planks into more manageable lengths. This is your first step for rough cuts.
- Compound Miter Saw or Table Saw: Crucial for making precise, straight, and angled cuts. A compound miter saw is excellent for crosscuts and those 45-degree angles on the chevron panels, while a table saw is invaluable for ripping boards to width and making consistent dado cuts.
- Band Saw: Highly recommended for making the final, precise cuts on thicker beams, such as the 6×6 posts, allowing for greater control and accuracy on large stock.
- Router with Dado Blade or Router Bit Set: Essential for creating the dado grooves in the posts, rails, and divider. A dado blade on a table saw offers efficiency, while a handheld router with a suitable bit provides flexibility.
- Kreg Jig (Pocket Hole Jig): This tool is indispensable for creating strong, concealed joints, especially when attaching the rails to the posts without visible fasteners.
- Drill/Driver: For pre-drilling holes and driving screws with ease.
- Measuring Tape, Square, and Pencil: Accuracy is key in woodworking. Ensure you have reliable measuring tools.
- Safety Glasses, Hearing Protection, and Dust Mask: Always prioritize personal safety when operating power tools and working with wood, especially reclaimed wood which can release fine dust.
Step-by-Step Guide to Building Your Rustic Twin Headboard
Overall Design and Dimensions
Alrighty, let’s roll up our sleeves and get building! Understanding the overall dimensions and structure is the first step in visualizing your finished headboard. The design incorporates robust posts, sturdy rails, and a central divider, all coming together to frame the eye-catching chevron panels. Refer to the diagram below for a clear visual representation of the headboard’s complete footprint.
Creating Your Custom Cut List
Rustic Chevron Headboard Cut List Considerations
While an explicit, detailed cut list diagram wasn’t provided, the essence of woodworking relies on precise measurements and careful planning. Before making any cuts, it’s highly recommended to create your own comprehensive cut list based on the overall dimensions and individual component sizes detailed in this guide. This list should itemize every piece of wood you need, its exact dimensions, and the specific lumber it will be cut from. To make your rough-cut lumber more manageable and easier to work with, I initially used a chainsaw to trim the boards to approximate sizes, leaving a little extra length to account for any uneven cuts. For the final, precise cuts, always switch to a compound miter saw or a table saw to achieve clean, square ends. For the robust 6″ x 6″ beams, I found a band saw offered the best control for making those final, accurate cuts.
Crafting the Sturdy Posts
Begin by cutting two main posts, each measuring 6″ x 6″ x 60″. Carefully examine both sides of these substantial pieces and select the best-looking face to be visible from the front of your headboard. On the inside face of each post (the side that will face the bed), you’ll need to route out two distinct pockets. These pockets, measuring 1″ deep, 2″ wide, and 6″ tall, are designed to snugly receive the headboard rails. Reference the diagram for their exact placement. Next, using either a table saw equipped with a dado blade or a router, create a dado groove running down the precise center of the post, as illustrated in the diagram. This groove is where your diagonal chevron panels will slide. When preparing the second tall post, remember to create a mirror image of the first to ensure proper alignment and symmetry for your headboard.
The strategic incorporation of dado slots in the design of this headboard serves a dual purpose: it creates a much cleaner, more professional aesthetic by allowing the diagonal boards to seamlessly slide into place, and it offers greater forgiveness for any slight imperfections in the diagonal cuts, making the assembly process significantly easier.
Constructing the Headboard Rails
Next, prepare the two headboard rails by cutting two boards to 2″ x 6″ x 37″ each. On one long end of each of these boards, you will cut a 1″ x 1″ dado groove along the center. These dado grooves are critical for securely interlocking with other components of the headboard, ensuring a robust and stable structure. These pieces will form the horizontal top and bottom supports for your chevron panels.
Preparing the Center Dividers
Now, focus on the headboard’s central divider. Cut one board measuring 2″ x 4″ x 44″. Along both of its long ends, create a 1″ x 1″ dado groove. These dadoes will mirror those on the rails, providing a channel for the diagonal panels. Additionally, you’ll need to cut “tongues” on each end of this divider board. These tongues are meticulously shaped to fit snugly into the dadoes you previously routed into the headboard rails. Refer to the provided diagram for the precise cuts needed to form these tongues. It’s crucial that these tongues fit tightly into the rail grooves to ensure structural integrity; trim them as necessary for a perfect, secure fit. This piece will serve as the headboard’s central vertical divider, defining the two distinct chevron patterns.
These precisely cut tongues are designed to engage with the dadoes in the rails, creating a robust and clean joinery system. Ensure the fit is tight to prevent any movement.
Designing and Cutting the Chevron Panels
For the diagonal panels that form the captivating chevron pattern, I haven’t provided exact dimensions. This is intentional, as I believe the best approach is to cut these pieces to fit during a partial assembly stage. This method allows for greater flexibility and ensures a perfect fit, especially when working with unique reclaimed wood that may have slight variations. While the plan suggests using 1″ x 6″ wide boards, feel free to experiment with different widths or even varying widths within the same headboard to create a more dynamic and personalized look. The beauty of barn wood is its adaptability to diverse designs.
To cut the diagonal panels, you’ll need to perform a partial assembly of the main frame. Start by placing the bottom rail into its corresponding pockets in the posts, and then position the center divider. Now, begin with the diagonal panels. On each lower outside corner, start with a 45-degree triangle piece. Once that’s in place, measure the length of the diagonal side of that triangle – this measurement will be the length of the shorter side of your next diagonal piece. Continue this pattern, cutting the ends of each panel at a consistent 45-degree angle. As the boards progress past the inside corners (where they meet the center divider), the pieces will generally repeat the same length with 45-degree ends, creating a symmetrical pattern until you reach the top. For the very top boards, it’s a good practice to leave them slightly long during dry-fitting. Once everything else is in place, use a straight edge to mark precisely where they need to be trimmed at the top to fit perfectly within the frame. Carefully trim any pieces as necessary to achieve a seamless, tight fit. After all panels are cut and dry-fitted, disassemble all the pieces for final preparation.
Reinforcing with Pocket Holes
To ensure exceptional structural integrity and a clean finish without visible fasteners, we’ll incorporate Kreg jig pocket holes. These discreet holes are strategically placed to hold the headboard components firmly together. Add two pocket holes to the bottom face of the lower rail, at each end. Additionally, place three pocket holes on the rear face of both the top and bottom rails, also at each end. These hidden pocket holes will provide strong, secure joints that are virtually invisible once the headboard is assembled.
Final Assembly and Installation
Assembling the headboard is often easiest by working flat. Lay one of the tall posts on its side. Carefully insert the top and bottom rails into their respective routed pockets in the post. Secure these rails into place using 2 1/2″ long screws driven through the previously drilled pocket holes. Next, systematically stack the diagonal panels in their determined order, starting from one side. Install the center divider, ensuring its tongues engage with the rail dados. Then, continue stacking the diagonal panels for the other side of the chevron pattern. Finally, bring in the second tall post and align it with the remaining ends of the rails. Using 2 1/2″ long screws, securely fasten the rails into this second post. It’s important to note that the diagonal panels themselves are not screwed down; they are designed to float freely within the dado grooves, which allows for natural wood movement and makes for a cleaner finish.
Once the main structure is assembled, carefully tip the headboard upright. To securely fasten your beautiful new headboard to the wall, use one or two ‘L’ brackets. Attach the ‘L’ brackets to the wall, preferably by screwing them directly into a wall stud for maximum stability. Then, secure the other side of each ‘L’ bracket to the back of the headboard. This will prevent any wobbling and ensure your headboard is a stable and prominent feature in your bedroom.
Your Masterpiece Revealed: Enjoying Your Rustic Headboard
Alright, your rustic chevron headboard is officially done! Take a moment to step back and admire your handiwork. The unique character of the reclaimed barn wood, combined with the striking chevron pattern, creates a truly one-of-a-kind piece that brings warmth, history, and a touch of modern farmhouse charm to any bedroom. This isn’t just a headboard; it’s a statement piece, a conversation starter, and a testament to your craftsmanship.
You might choose to leave the barn wood in its natural, weathered state to fully embrace its authentic rustic appeal. Alternatively, you could apply a clear matte sealant or a wax finish to protect the wood and enhance its natural beauty while maintaining its rugged charm. The beauty of this project lies in its customizability, allowing you to tailor it to your personal aesthetic. Congratulations on completing a project that not only adds functionality but also significant decorative value to your home!
Discover More DIY Headboard Inspiration
A huge thank you to Amy for sharing this incredible rustic headboard tutorial! We absolutely adore the rich character and history that the weathered wood brings to this piece, and the chevron pattern is an absolute stroke of genius – perfectly highlighting the unique textures and tones of the reclaimed lumber. It’s truly a standout project!
If you’ve been following along with Headboard Week and are looking for more brilliant ideas, don’t miss any of our inspiring posts! You can explore all the headboard projects by visiting our dedicated tag page here. Discover creative solutions like this incredibly easy and stylish upcycled door headboard, which proves that amazing transformations can be achieved with a little creativity and resourcefulness. Make sure to check back tomorrow for even more exciting tutorials and fresh inspiration, including how to build a fabulous feature wall headboard:
Don’t miss a single inspiring project during Headboard Week! Stay connected and get all our latest updates by following us on Facebook here, or subscribe to our RSS feed here. Join our community of DIY enthusiasts and get ready to transform your home!