
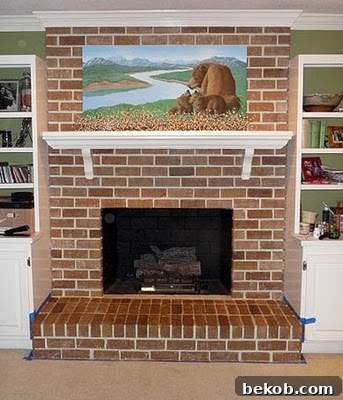
Faux Painted Brick Over White Fireplace: A DIY Transformation Guide
Contributed by Pretty Handy Girl
Welcome to the first installment of our comprehensive five-part series dedicated to revitalizing our living room. This series chronicles our journey to create a more inviting and personalized space, starting with a dramatic focal point transformation.
Here’s a glimpse into the exciting projects we’ll cover:
- Faux painting brick over a previously painted white brick fireplace (you’re here!)
- Lightening up a room in 5 steps
- Painting decorative graphics on a wall
- Preparing to Install Antique Heart Pine Floors (and living to tell about it!)
- Installing Heart Pine Floors and the Final Reveal
The trend of painting fireplace brick white has been immensely popular, particularly for covering up unattractive or outdated brick colors. Many homeowners opt for a crisp white finish to modernize their living spaces. Our fireplace, initially an eyesore, likely received its coat of white paint for precisely this reason.
The “Before” Look: A Monotone Wall
Before Shot: Our previously all-white fireplace
While white can evoke a sense of spaciousness and cleanliness, our living room suffered from an overabundance of it. The fireplace, mantel, and the built-in bookshelves flanking it were all stark white, creating an overwhelming, monotonous wall. I briefly considered painting the mantel to break up the uniformity, but my heart was set on something more impactful. I yearned for the warmth, character, and visual contrast that traditional brick could offer, something that would truly make the white elements pop rather than blend.
My quest for a solution led me to discover the art of faux brick painting. I stumbled upon several inspiring websites, such as this one and this one, showcasing incredible transformations. A wave of confidence washed over me: “If others can achieve this, there’s a 95% chance I can too!”
The Realistic Faux Brick Revelation
Admittedly, there was an element of uncertainty at the outset, but the final result left me absolutely astonished by its realism and the sheer ease of the process. The ultimate validation came when I completely fooled our home’s builder – a man who has lived on our street for over three decades – into believing I had painstakingly stripped the paint off the original bricks! That, my friends, was sweet success. This project is surprisingly straightforward and manageable, taking several hours in total, but can easily be broken down into smaller, more digestible sections.
Materials You’ll Need for Your Faux Brick Fireplace Makeover
Before you embark on this rewarding DIY journey, gather the following essential materials:
- TSP (Tri-Sodium Phosphate) Cleaner: Crucial for deep cleaning your brick surface.
- Stiff Scrub Brush: For effective application of the TSP cleaner.
- Drop Cloths: To protect your flooring from paint drips and spills.
- Newspapers: Excellent for taping off and protecting adjacent surfaces.
- Painter’s Tape: For clean lines and masking off areas you don’t want painted.
- Paint Roller and Tray: For applying the brick base coat efficiently.
- Stiff 2″ Paint Brush: Ideal for painting mortar lines and precise touch-ups.
- Car Wash Sponge or Large 6″ x 3″ Sized Sponge: Your primary tool for creating the brick texture.
- Spray Bottle with Water: To keep paint wet for blending or to slightly dampen bricks if needed.
- 7 Paper Plates: For holding various paint tints.
- Rags: For quick clean-ups and wiping excess paint.
- Acrylic Paint (specific colors listed below): The magic behind your faux brick.
Preparation: The Foundation of a Flawless Finish
The first and most critical step is thorough cleaning. Purchase TSP (tri-sodium phosphate) cleaner from your local hardware store and meticulously follow the manufacturer’s instructions. A word of caution: you might be surprised by how much you like the original brick color once it’s clean and dry! If, however, the existing color still doesn’t spark joy, then you are ready to proceed with your faux painting adventure.
After cleaning, I dedicated time to creating a test board. This crucial step involved experimenting with various color combinations to find the perfect warm brown brick hue. I also meticulously tweaked my mortar color until it achieved the ideal shade before daring to apply it to the actual fireplace.
Testing colors on a sample board ensures you get the look you desire.
Once my colors were finalized, I carefully prepared the surrounding area. I used painter’s tape to secure newspapers over the mantel and built-in bookcases, ensuring they were fully protected. A large drop cloth then covered the floor, creating a safe zone for painting.
Mixing and Applying the Mortar Color
Next, I mixed a small container of my chosen mortar color. For this, I repurposed some leftover latex satin taupe paint from our previous home and carefully added small amounts of black and dark brown until I achieved the perfect warm gray cement-like hue that perfectly mimicked authentic mortar.
My custom-mixed warm gray mortar color.
Using a 2-inch paintbrush, I meticulously painted all the mortar areas between the bricks. This step requires a steady hand and patience, as it defines the shape and separation of each individual brick.
The painstaking process of painting the mortar lines.
Crafting the Bricks: Base Coat and Tints
As the mortar color dried, I prepared the base color for the bricks, mixing a bucket of paint and pouring it into a paint tray.
The chosen base color for the bricks.
Next, I arranged my seven paper plates. One plate received a generous amount of a deep chocolate “oops” paint (Valspar Latex Eggshell Chestnut), which served as a primary dark tint. Onto the remaining plates, I poured a half-dollar sized amount of various other acrylic brick tint colors, dedicating one color per plate.
A selection of acrylic tints to create varied brick shades.
Working in small sections, approximately 3 feet by 3 feet, I used a paint roller to apply the base color onto the bricks. Don’t fret if the paint doesn’t perfectly soak into every single groove; some of the underlying white peeking through actually enhances the rustic, aged appearance of the bricks. This imperfection contributes to the authenticity of the faux finish.
While the base color was still wet – this is crucial for seamless blending – I loaded my sponge with the Chestnut color first. Then, I lightly dipped the sponge into one or two of the other brick tint colors. The key here is to sponge one brick at a time, applying the same color tints sporadically across the wall. The art lies in keeping the brick colors varied and random; this natural inconsistency is what makes them look genuinely realistic. Each brick should have its own unique character, just like real masonry.
Layering the base coat and subtle tints with a sponge.
When the sponge needed reloading, I always started with the chestnut color, then added one or two new color tints, varying my choices to maintain diversity. You’ll need to refill the paper plates with fresh paint as you go to ensure a consistent supply of colors. The trick is to keep moving, allowing the paints to blend slightly on the brick surface. If your base color starts to dry too quickly, a light mist from your spray bottle filled with water can help keep it workable, extending your blending time.
The beauty of this technique is its forgiving nature. If you’re not entirely satisfied with a particular brick’s color, you can simply go back over it with a different tint, layering until you achieve the desired effect. Notice how I deliberately dispersed the darker brown bricks randomly throughout the pattern. This non-uniform distribution is absolutely essential for achieving an authentic, realistic brick appearance. True brickwork rarely features perfectly consistent colors, and mimicking this irregularity is key to fooling the eye.
Making progress: Half the fireplace completed, showing the variegated brick tones.
Navigating the Hearth Area
The hearth presented a slight challenge due to its mortar lines being nearly flush with the bricks. For this section, I had to apply significantly gentler pressure with the sponge to avoid painting over the mortar. Keeping a wet rag close by was invaluable for immediately wiping up any stray brick paint that ventured into the mortar lines, ensuring crisp divisions.
Detailing the hearth requires a delicate touch.
The Rustic Detail: Why Imperfection is Perfect
Close-up of the bricks.
Notice how the white specks showing through really make the bricks
look like they are re-claimed and rustic.
The Transformed Fireplace: After Shots
After Picture: A stunning, warm, and inviting focal point.
Daylight picture after being decorated for the holidays, truly showcasing the new warmth.
I genuinely can’t overstate the immense difference this faux brick painting project made in our living room. It instantly infused the space with warmth and character, transforming it from sterile to soulful. Instead of dominating the room with its stark white presence, the fireplace now beautifully recedes into the overall design, creating a harmonious and welcoming ambiance. Let’s take one more look at the incredible before and after:
A dramatic transformation that speaks for itself.
Important Tips and Final Thoughts
A note on durability: The combination of latex and acrylic paint has held up remarkably well, even after numerous fires fueled by our gas logs. For those planning to paint the bricks inside the actual firebox (the area where the fire burns), it is absolutely essential to use specialized, heat-tolerant paint designed for high temperatures. Standard acrylic or latex paints will not withstand the extreme heat and could flake or release noxious fumes.
Time commitment: Many wonder about the time investment required for such a project. Including all the preparatory work—cleaning, meticulous taping, and careful color mixing—the entire process took approximately five hours. This is a very reasonable timeframe for such a impactful home improvement, especially if you, like me, are a night owl who enjoys watching DIY network shows while painting!
Post-project care: After completing the painting, exercise caution and avoid placing anything heavy on the hearth for at least a few weeks. This allows the paint ample time to fully harden and cure, ensuring its long-term durability and preventing any premature damage to your beautiful new finish.
In conclusion, faux painting your white brick fireplace is a highly rewarding DIY project that offers a stunning visual return for a relatively small investment of time and effort. It’s an excellent way to introduce warmth, texture, and a touch of rustic elegance to your living space, creating a truly inviting and personalized home. Embrace the power of paint and transform your fireplace into a realistic, charming focal point that will undoubtedly impress everyone who sees it!