
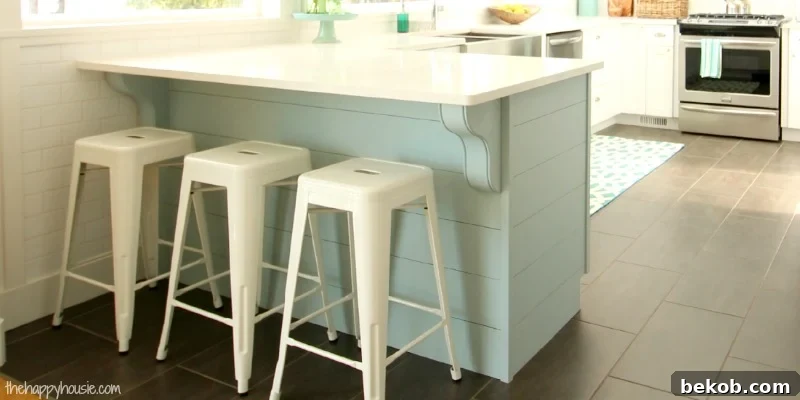
Kitchen islands and peninsulas serve as dynamic focal points in any culinary space, effortlessly blending functionality with aesthetic appeal. They are more than just practical additions; they are canvases for personal expression, offering endless possibilities for customization and style enhancement. Whether you’re considering a brand-new freestanding island or aiming to inject character into a builder-basic peninsula, the journey to a personalized kitchen is surprisingly accessible for DIY enthusiasts. Today, we’re thrilled to share an inspiring transformation from Krista of The Happy Housie, who masterfully elevated her kitchen peninsula with charming planking and elegant corbels, creating a cohesive and inviting coastal ambiance.
Krista’s project showcases how seemingly simple updates can yield incredibly impactful results. The addition of planks instantly introduces a coveted shiplap-style texture, imbuing the space with a casual, welcoming feel often associated with farmhouse or coastal aesthetics. Furthermore, the strategically placed corbels not only provide essential support for the countertop, preventing the dreaded “floating countertop” look, but also add a layer of sophisticated architectural detail. This blend of texture and structure breathes new life into the peninsula, transforming it from plain to picturesque. Dive deeper into Krista’s step-by-step tutorial below to unlock the secrets behind her beautiful kitchen remodel. As you gather inspiration, don’t miss these other fantastic kitchen island updates that prove creativity knows no bounds:
Discover how to integrate elegant beadboard panels and decorative corbels for a refined kitchen island aesthetic.
Achieve a stylish, inexpensive board and batten look for your kitchen island with this budget-friendly DIY guide.
Incorporate rustic charm by using reclaimed fence boards to create a unique planked kitchen island.
Embark on a unique DIY project to construct a modern and durable concrete kitchen island.
Elevate Your Kitchen: A DIY Guide to Updating a Plain Island or Peninsula with Planks and Corbels
By Krista, The Creative Mind Behind The Happy Housie
Greetings, Fellow Home Enthusiasts!
I’m Krista, the voice and vision behind The Happy Housie, and I am absolutely delighted to share a significant upgrade we implemented in our kitchen during its recent renovation. This project involved transforming our peninsula by adding exquisite planking and stylish corbels, an update that profoundly impacted the overall aesthetic.
My blog, The Happy Housie, is named to reflect my passion for all things home-related – a self-proclaimed “housie” who finds immense joy in DIY projects, creative crafts, meticulous organizing, thoughtful sewing, and upcycling forgotten treasures from thrift stores. Our home, perfectly situated on a beautiful lake, makes summer our most cherished season, closely followed by the crisp, clear days of autumn. I recently showcased our Fall Home Tour, alongside the full reveal of our coastal-style white shaker kitchen and its comprehensive source guide. This kitchen renovation felt like an endless endeavor, so I’m incredibly relieved and excited to finally call it complete. Among all the delightful finishing details, the planking and corbels we added to the peninsula stand out as a personal favorite, and it’s this transformative project I’m eager to share with you today.
The sheer impact of this simple, budget-friendly detail on our kitchen’s overall appearance still amazes me. It truly transcended our kitchen from a plain, builder-basic space to one that feels custom-designed and utterly fabulous. My long-standing dream was always a pristine white kitchen. I adore the timeless simplicity of white shaker cabinetry paired with classic white subway tile, and I knew white countertops would complete this vision. However, once all these elements were in place, the kitchen felt unexpectedly “too white,” almost sterile, and somewhat uninspiring. It lacked the warmth and character I craved.
Here’s a glimpse of the peninsula’s initial state:
Bringing Texture and Color: The Planked Peninsula Transformation
As a firm believer in enriching spaces with abundant color and texture, I knew a transformation was essential to evolve our kitchen from its stark builder-basic origins into a customized haven. We decided to infuse a splash of my favorite watery aqua blue, not only into the DIY hook fan we had crafted but also onto the peninsula. The first step in this revitalization was to introduce some planking.
MDF planks are a personal favorite; I had previously used them to create a stunning feature wall in our boys’ bedroom, and the result was always a wonderful casual, beachy vibe. This material is excellent for adding significant texture to any bland surface, whether it’s a wall or, in this case, a peninsula. To clad our peninsula, we purchased a single 4×8 sheet of 1/4″ MDF and had it precisely cut into 6-inch strips at the hardware store. This single sheet proved perfectly sufficient to cover both the entire back and side of the peninsula – a truly cost-effective solution! The MDF cost approximately $20 Canadian, likely even less in the US, making this a highly accessible DIY upgrade.
The Planking Process: Step-by-Step
We initiated the planking process at the very base of the peninsula. Ensuring the first plank was perfectly straight and level is crucial, as it sets the foundation for all subsequent planks. We then securely nailed it directly into the back of the cabinet structure using an air compressor nail gun for efficiency and strength. For those without a nail gun, construction adhesive paired with a traditional hammer and nails would also work effectively. We deliberately chose not to use adhesive for the planks, anticipating the possibility of wanting to change the look in the future; glue would make removal a considerably messier and more challenging task, and I admit, I can be a bit indecisive when it comes to decor!
A fortunate detail, visible in the “before” images of the peninsula, was the existing sheet of plywood attached to its back. This provided an ideal substrate, allowing the nails to bite firmly into the plywood, ensuring each plank was securely and tightly fastened. This solid backing is key to a professional-looking and durable finish.
To guarantee uniform spacing between the planks, a simple yet effective trick we employed was to place pennies between each strip as we nailed them up. Some DIYers prefer using dimes for a slightly tighter gap, but the principle remains the same. These small, consistent gaps are what truly create that desirable textural depth, mimicking the classic shiplap effect and adding character to the surface.
You’ll be surprised at how quickly the entire planking process comes together once you get into a rhythm!
Beyond the back of the peninsula, we extended the planking to the side of the cabinet as well. The pre-cut MDF strips were easily adapted to the shorter lengths needed for the side using our miter saw. Once all the individual planks were installed, we meticulously capped the corner where the two planked surfaces met with a piece of corner trim. This detail is crucial for a clean, finished appearance, neatly concealing the raw edges of the planks and providing a polished transition.
For the remaining edges, we aimed for a balanced and refined look. To complement the corner trim, we added a matching flat piece of trim to both the edge closest to the main cabinets and the edge nearest the far end of the peninsula. This thoughtful detail frames the planked section beautifully, giving it a custom, built-in feel and enhancing the overall architectural integrity of the design.
Perhaps the most time-consuming yet crucial part of this project was the paint preparation. After all the planks and trim were securely in place, it was essential to meticulously fill every nail hole with wood putty, ensuring a perfectly smooth surface. Once dry, thorough sanding was required to eliminate any imperfections and create an ideal canvas for painting. MDF, being a porous material, greatly benefits from a solid foundation, so we treated it to one coat of high-quality primer, followed by two even coats of our chosen color: Benjamin Moore’s exquisite Wedgewood Gray. This serene hue beautifully complements the coastal white kitchen theme, adding that much-needed pop of color and personality.
Adding Architectural Grace: Installing Decorative Corbels
While the planked peninsula already looked fantastic, we envisioned an even grander, more substantial presence. To achieve this, we decided to introduce additional interest and a touch of drama with a pair of gorgeous corbels. We sourced these from Osborne Wood Products, opting for their “Boston Bar with Beaded Edge” design in a paint-grade soft maple. These particular corbels offered the perfect balance of classic elegance and clean lines, ideal for our coastal aesthetic. (For ambitious DIYers, you could also embark on a project to craft your own vintage-inspired curvy corbels from scratch!)
The installation of these corbels presented a slight challenge, primarily due to the existing countertop. The corbels came equipped with hardware designed for a slide-and-lock mechanism, requiring the bracket to slide over a screw and then drop into place. Had we meticulously planned this step ahead of time, we would have installed the corbels before the quartz countertops were put in. However, with the heavy quartz firmly in position, the original installation method was no longer viable.
This situation called for a creative solution. We pivoted our approach and decided to pre-drill directly through the slimmest part of each corbel using a drill press. Following this, we slightly enlarged the holes to allow for countersinking our screws. This method ensures that the screw heads would sit flush with or slightly below the surface of the corbel, providing a clean, finished look without compromising stability.
After carefully pre-drilling the corbels, we determined their exact desired placement beneath the countertop. To mark the precise screw locations on the planked peninsula, we partially inserted the screws into the pre-drilled holes in the corbels. Then, pressing the corbels firmly against the peninsula, the screw tips left subtle indentations on the planks, acting as our invaluable guide. This marking technique is critical for accurate alignment and ensures that the corbels are installed exactly where intended.
Using these marks, we then pre-drilled through the MDF planking and into the sturdy plywood backing of the peninsula. This step is incredibly important to prevent splitting the MDF, which can easily happen if screws are driven directly without a pilot hole. Taking the time for this careful pre-drilling ensures the integrity of your planking and a smooth installation process for the corbels.
To ensure the corbels were absolutely rock-solid and firmly attached, we applied a generous amount of strong adhesive to both the back and top surfaces of the corbels. This adhesive provides an additional layer of security, bonding the corbels not only to the planked peninsula but also to the underside of the countertop, maximizing their stability and load-bearing capacity.
With the adhesive applied and the pilot holes ready, we carefully positioned the corbels back into their intended places and secured them by driving the screws directly into the peninsula. The countersunk screws meant that after a touch of wood putty and paint, they would be virtually invisible, leaving a seamless and professional finish.
And just like that, the corbels were perfectly installed!
After the final touches of painting and finishing, the transformation was truly breathtaking.
What a remarkable difference these simple, yet impactful, upgrades have made!
Project Overview: Time & Budget Breakdown
This rewarding DIY project proved to be quite manageable, both in terms of time and cost. The planking phase was remarkably quick, taking approximately an hour. Installing the corbels added another hour to the timeline, and the subsequent crucial steps of filling nail holes, sanding for a smooth finish, and applying two coats of the beautiful aqua blue paint required a couple of additional hours. This entire transformation was an accessible endeavor for anyone with basic DIY skills. While we utilized a nail gun for speed and convenience, the project could easily be completed with traditional tools like a hammer and nails, or even construction adhesive for the planks. The stunning corbels were sourced from Osborne Wood Products, and the vibrant paint color that brought so much character to the peninsula is Wedgewood Gray by Benjamin Moore.
Thank you once again for hosting me on Remodelaholic today! I sincerely hope you’ll pop over to The Happy Housie for a visit. Come by and explore the rest of our recently completed Kitchen Renovation Reveal to see all the details of this extensive project and find more inspiration for your own home transformations.
Thank you for sharing such a wonderful and inspiring transformation with us, Krista! Your kitchen is truly lovely and a testament to the power of thoughtful DIY.
Remodelaholics — don’t hesitate to visit The Happy Housie and embark on the captivating home tour. You’ll discover even more captivating images of Krista’s exquisite kitchen, and witness the beautiful Wedgewood Gray paint gracing her innovative DIY range hood, which, fittingly, features a set of matching corbels that perfectly tie the entire kitchen together!