Read the sequence from the top before cutting, painting, or moving pieces.
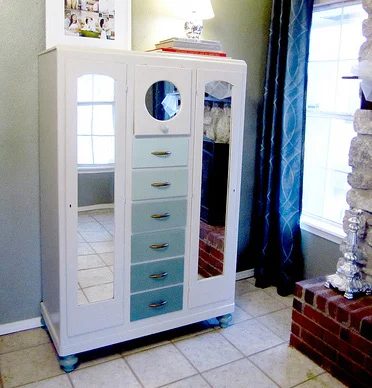
Ombre Armoire Makeover: Before and After contributed by A Little Paint I don’t know why everyone complains or could ever get burned out. All kids need are candy, movies and puppies. Bam, entertained. I was babysitting ALL weekend, but still managed to get my own stuff done. I wasn’t about to let the weekend disappear without accomplishing something. On Thursday, I saw an interesting piece on craigslist. HOWEVER, I work during the day AND don’t have a car big enough to pick up big furniture pieces on a whim so I had my servant mom go pick it up for me. She is the best So for the rest of that day I was so anxious ready to get home to meet this monster. And if you don’t like painted furniture, don’t read any further. This guy needed some attention. I thought it was a wonderfully unique piece, but it had A LOT of cat scratch fever. You just can’t see it in this photo. I always forget to take the “Before” Yeah, I really suck at before pictures, it looked in focus on my camera screen! This is the armoire after sanding and putting pretty little feet on it. It needed the height. It was suffering from a little man complex. In case you couldn’t tell, I have this solid process that I turn to when painting a piece. Its call CHAY-OS. Works like a charm. Sometimes, when other items just happen to be in close vicinity, I gets painted with the same color on my paint brush at the time…. Notice the white bowl? Happens more than you think, more than I think for that matter. When I went to the store, I couldn’t find anyone working the paint mixer, so I left empty handed. I really didn’t want to paint it bright white, but after going through dried up paint bucket after paint bucket, I thought I would have to postpone this project. Fortunately I found some paint left over from the previous owners. It was label back door, and since I’ve already painted the back door turquoise, I don’t need the color for touch ups. It ended up being the most solid solution ever. It was exterior semi gloss, and I loved the finish on it. I didn’t need to put any kind of protective coat on it. Totally saved me a step. I could even use this baby outside! Kidding, there are absolutely no plans to do that. Anyways, I had to mix in some white paint to lighten the color up. It was well fitted! Other than the main color, I really wanted to do something special with the paint job. There wasn’t too much detail in the wood to highlight, so I opted to paint the 6 drawers to look like a gradient. So much storage, its solid. I would like to paint the insides and maybe add some fabric to the back of the doors. Just need to go shopping now!