Materials and the sequence of the job sit together on this page.
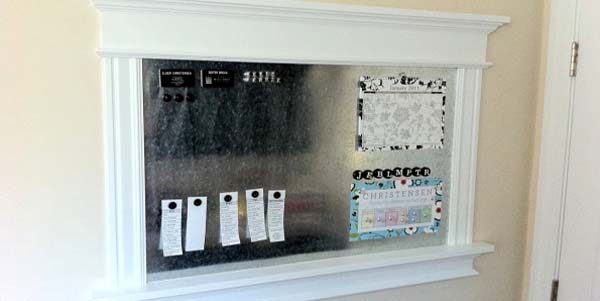
Build A Magnetic Board; Step by Step Instructions contributed by Jared @ Surviving Fatherhood 101 From time to time my dear wife drops not so subtle hints about some project she would like me to undertake. After listening (or not listening) for months about how she could use a place to hang a calendar, family job list for the children, and other odds and ends, I finally suggested a magnet board. Unfortunately, after looking at the available options, there was nothing that didn’t exude “corporate office.” So I decided to design and build one myself, which in the end was much more satisfying and cheaper. I decided to build this as a permanent fixture on our mudroom wall. The design could also be modified so that the magnet board could be hung, but we needed something that could withstand seven kids. You will need the following from your local hardware store:- Magnet board = 24″ x 36″ sheet of steel or tin (usually about 1/16″ thick)
- Header board = 1 x 6 (3/4″ x 5 1/2″) board cut to 41 1/2″ long
- Bottom board = 1 x 4 (3/4″ x 3 1/2″) board cut to 41 1/2″ long
- Top & bottom ledges = Two, 1 x 3 (3/4″ x 2 1/2″) board cut to 45 1/2″ long
- Side boards = Two pieces of 3 1/2″ window/door casing cut to 23″ long
- Crown molding = Small crown molding, 8′ length (may need more for mistakes)
- Bead molding = 1/2″ bead molding, 8′ length
- Construction adhesive
- finish nails (a pneumatic nail gun is recommended, but not essential)
- Sandpaper
- Painter’s tape (the blue or green stuff)
- Caulk
- Primer
- Paint
4. Attach the header board to the wall with nails and adhesive. This should line up with your side pieces. 5. Nail the top ledge into the header board. Nail the bottom ledge into the bottom of the casing and wall. Note that the ledges are longer than the header and bottom boards to account for the crown molding which will be added later. The ledges overhang the header and bottom boards by 2″ on each side. 6. Attach the bottom board to the wall. The bottom ledge can now be nailed into the bottom board to more firmly secure these pieces together, just as the top ledge was fixed to the header board. 7. Cut, fit, and nail crown molding to both the header and bottom boards. If you have never cut crown molding before, you will want to practice as it can be frustrating at first. 8. Cut, fit, and nail bead molding to the bottom edge of the header and bottom boards. 9. Fill nail holes and caulk any unsightly gaps between the wall and the boards. If there are any gaps between the sheet metal and the bottom ledge, these can also be caulked. 10. Sand, prime, and paint! Our magnet board was built in two days- one day for the actual construction and filling nail holes, and one day for sanding, priming, and painting. Now I can take a break… until the next project.