
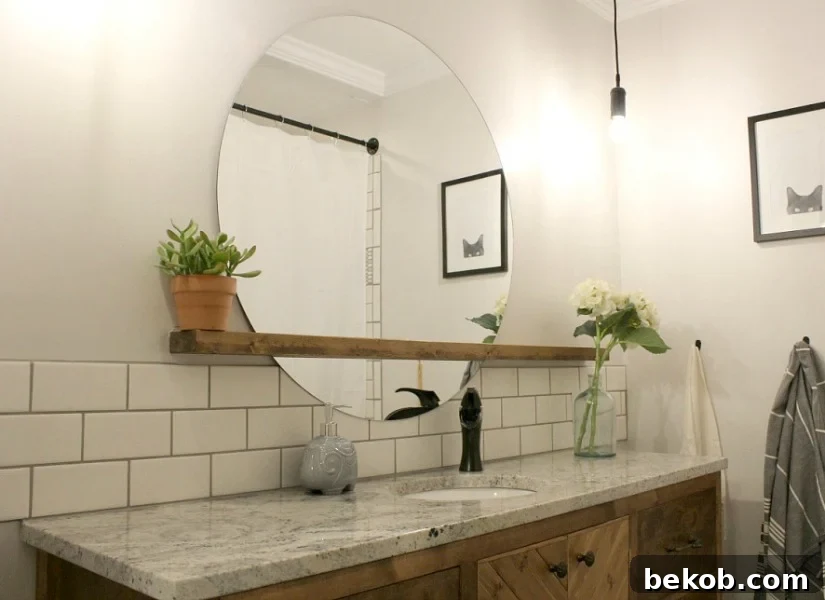
In the world of DIY, sometimes an unexpected turn, an “oops” moment, can lead to a creation far more brilliant and innovative than the original plan. Today, we’re thrilled to share such a story from Shara, the talented DIYer behind Woodshop Diaries. What started as a minor mishap with a mirror frame transformed into a stunning, modern “sunrise” floating mirror and shelf – a true centerpiece for her master bathroom remodel. This project is a testament to creativity, resourcefulness, and the beauty of embracing happy accidents in home improvement.
Before we dive into Shara’s incredible tutorial for this DIY floating mirror and shelf, let’s explore some other fantastic ways to give your bathroom mirror a significant facelift. A mirror isn’t just a functional item; it’s a design element that can dramatically influence the look and feel of your bathroom. If Shara’s “sunrise” design has sparked your inspiration, consider these alternative approaches to elevating your bathroom’s style:
Transform Your Bathroom: Beyond the Basic Mirror
Embrace Unconventional Shapes and Styles
Gone are the days when a simple rectangular mirror was your only option. Swapping out a standard builder-grade mirror for one with a unique shape or an interesting frame can instantly infuse personality into your space. For instance, in our family bathroom renovation, we opted for a non-traditional mirror that became an instant focal point. This simple change can make a huge impact, turning a utilitarian item into a piece of art.
Frame It Up: Instant Elegance
For those looking for a quick and easy update, adding a custom frame to your existing standard mirror is an almost-instant style upgrade. This DIY project can be surprisingly simple, utilizing trim pieces, reclaimed wood, or even decorative molding to create a custom look that perfectly matches your bathroom’s aesthetic. It’s an effective way to hide unsightly edges and add a touch of sophistication without replacing the entire mirror.
Innovative Sliding Mirror Solutions
If you have a window positioned awkwardly above your sink or are looking for a unique design element, consider hanging your mirror on a sliding barn-style rail. This creative solution not only adds an intriguing architectural detail but also offers practicality, allowing you to slide the mirror to accommodate natural light or reveal a hidden storage area. It’s an imaginative approach that transforms a challenge into a charming feature, perfect for a master bathroom or even a stylish powder room.
Now, let’s turn our attention back to Shara’s remarkable floating mirror and shelf project. This design stands out for its modern aesthetic, clever construction, and the inspiring story behind its creation. Shara, an expert DIYer, demonstrates how simple materials and a creative approach can yield stunning results that look professionally designed. We encourage you to leave her some love in the comments and explore the wealth of building projects available on her site, Woodshop Diaries.
How to Build a Modern Floating Mirror + Shelf for Your Bathroom
by Shara from Woodshop Diaries
Hello everyone! I’m Shara, and I’m absolutely thrilled to share this project with the Remodelaholic community. By day, I channel my problem-solving skills as an engineer, but every other waking moment is dedicated to my passion for DIY. My blog, Woodshop Diaries, started as a way to document my myriad projects – from crafting custom furniture to engaging in intricate decor, and even undertaking full room remodels, all for the sheer joy of it.
My DIY journey began somewhat unglamorously by repurposing an old window into a chalkboard. While that initial project involved a few tears of frustration, it ignited a lifelong passion. I quickly moved from refinishing and repurposing furniture to creating intricate wood signs, and then naturally transitioned into building furniture and transforming our outdated house. This “building and remodeling” phase has become my happy place, and I suspect I’ll be here indefinitely. The blog serves not only as a record of my projects but also as a nostalgic archive of our home’s “before” pictures. We recently celebrated our two-year “Homeiversary”, and the changes we’ve made are truly astounding. Among the most significant transformations is our master bathroom remodel, which proudly features one of my absolute favorite DIY creations: the Floating Mirror Shelf.
This particular project was born out of an “accidental” moment. During our bathroom remodel, my initial intention was to craft a round wood frame for our mirror. However, when I cut the frame, I made it too thin. Instead of abandoning the idea or spending more money and time to redo it, I decided to pivot. With a simple scrap 2×4 and a dash of ingenuity, I experimented with a new approach. The result? This gorgeous floating mirror shelf, which cost a mere $45 and, to my delight, looks even better than my original, more complex plan!
DIY Floating Mirror Shelf: Step-by-Step Guide
This post contains affiliate links for your convenience; please see our full disclosure policy here for more details.
Materials You’ll Need:
- Round Mirror: My mirror is 36″ in diameter. You can find these at local glass shops or home improvement stores.
- 2×4 Lumber: The length will be determined by your mirror size and wall studs (approx. 6-8 feet).
- Kreg Jig: Essential for strong, hidden joinery.
- 2 1/2″ Pocket Hole Screws: For securing the shelf to your wall studs.
- Drill: With appropriate bits for drilling pilot holes and driving screws.
- Table Saw (or Router): For cutting the precise slot for your mirror. A router with a straight bit can also achieve this.
- Level: Crucial for ensuring your shelf is perfectly horizontal.
- Stud Finder: To accurately locate wall studs.
- Measuring Tape and Pencil: For precise measurements and markings.
- Safety Glasses: Always protect your eyes when working with power tools.
Step 1: Select Your Mirror and Determine Placement
Begin by acquiring your desired round mirror. I sourced my 36-inch diameter mirror from a local glass shop, which often provides better pricing and custom options than large retail stores. Once you have your mirror, hold it against the wall where you intend to install it. Visually determine how much of the mirror you want to extend below the future shelf. At that specific point, measure the width across the mirror. This measurement is crucial. For my 36-inch mirror, the width at my desired shelf line was approximately 28 inches, leaving about 5-6 inches of the mirror extending below the shelf. Remember this width measurement.
Step 2: Locate and Mark Wall Studs
Stability is paramount for this project. Use a reliable stud finder to locate the vertical wooden studs within your wall where the mirror and shelf will be mounted. Mark these locations clearly with a pencil. Aim to identify at least three studs to ensure your shelf is securely anchored and can support the mirror’s weight.
Step 3: Determine and Cut Your Shelf Length
Next, decide on the precise center point for your mirror on the wall. From this center, draw a line outwards on each side, equal to half the width you measured in Step 1. This marks the exact horizontal span where the mirror will sit on the shelf. Now, measure the required length for your 2×4 shelf. This length must be sufficient to span and connect to at least three studs, none of which should intersect the lines you just drew for the mirror’s location. My shelf ultimately measured about 54 inches long. Once you have your measurement, cut your 2×4 board to this exact length using a miter saw or circular saw.
Step 4: Precisely Mark Your Shelf Board
With your shelf cut to length, hold it firmly against the wall, perfectly aligned with your desired installation height. Carefully transfer all the stud locations you marked on the wall directly onto the top edge of your shelf board. Additionally, mark the center of the mirror on the shelf. Then, using the width measurement from Step 1, draw two lines on the shelf: one 1/2 the width from the center mark to the left, and another 1/2 the width from the center mark to the right. For my 28-inch width, I measured 14 inches from each side of the center. These lines define the exact area where the mirror will be slotted into the board.
These markings are critical for ensuring your mirror sits perfectly within the shelf and that your mounting screws avoid any conflict with the glass itself.
Step 5: Cut the Mirror Slot into the Shelf
This is where the magic happens! I used a table saw to create the precise slot for the mirror, though a router with a straight bit could also work effectively. Set the rip fence on your table saw to 3 inches from the blade. Carefully cut along the marked lines where the mirror will sit. **Crucially, do not cut across the entire board.** You only want the slit to extend within the designated mirror area. Since typical mirrors are 1/8 inch thick, you’ll need to make multiple passes. After the first cut, adjust your rip fence slightly closer to the blade (approximately 1/16 inch) and run the board through again. Repeat until the slot is just wide enough for your mirror to slide in snugly. Always wear safety glasses and use push sticks when operating a table saw.
Step 6: Drill Pocket Holes for Wall Mounting
Now that your mirror slot is cut, grab your Kreg Jig. At each stud location you marked on the board – *excluding* the studs that fall within the mirror slit – drill 1 1/2-inch pocket holes. It’s vital to ensure these pocket holes are drilled with the correct orientation, facing towards the back of the board, which will ultimately sit flush against the wall. **Absolutely do not drill pocket holes at any stud location where the mirror slit is cut**, as you cannot and should not attempt to drive a screw through the mirror itself!
Step 7: Finish and Attach the Shelf to the Wall
Before mounting, I highly recommend finishing your shelf. This could involve staining, painting, or applying a protective sealant. Finishing it now, while it’s off the wall, is significantly easier and yields a more professional result. Learn from my mistake – I was in such a hurry to see the final product that I mounted it unfinished and later had to take it down to stain it properly! Once your shelf is finished (or if you’re like me and prefer to do it later), carefully align the board with the stud marks on the wall. Using your drill and 2 1/2-inch pocket hole screws, drive the screws into the studs through the pre-drilled pocket holes. Continuously use your level during this step to ensure the shelf is perfectly straight and level before fully tightening all screws.
Step 8: Carefully Place the Mirror into the Slot
This step is surprisingly simple, yet requires careful handling. Gently slip your round mirror into the prepared slot on the shelf. Exercise extreme caution to avoid breaking or chipping the mirror. Once in place, ensure it sits securely and isn’t leaning forward. My mirror fit perfectly and remained upright without additional support. However, if your mirror shows any tendency to lean, you can add a small, discreet clip at the top of the mirror, attaching it to the wall, for extra security and peace of mind.
Step 9: Admire Your New “Sunrise” Floating Mirror (and maybe take a selfie!)
This final step is entirely optional, but highly encouraged! Take a moment to appreciate your beautiful, custom-built floating mirror. It’s a modern, elegant, and functional addition that truly transforms your bathroom vanity area. The “sunrise” effect, with the mirror emerging from the shelf, creates a unique focal point that guests are sure to admire. Revel in the satisfaction of a successful DIY project!
A huge thank you to Shara for sharing this brilliant, innovative project! Her ability to turn a minor setback into a stunning design solution is truly inspiring. The floating “sunrise” mirror shelf is not just functional; it’s a piece of art that elevates any bathroom space with its modern charm and unique aesthetic. We encourage you to visit Woodshop Diaries for more fantastic DIY building projects and inspiration.
Elevate Your Bathroom: More Creative DIY Projects
Looking for more ways to enhance your bathroom? Here are some additional clever DIY projects that will add both style and functionality to your space, helping you maximize every inch and personalize your sanctuary.
Smart Storage: Hidden Hair Tool Organizer
Tired of cluttered countertops? Convert that fake vanity drawer front into ingenious hidden storage for hair tools. This brilliant hack keeps your curling irons, straighteners, and blow dryers neatly tucked away yet easily accessible, maintaining a clean and organized vanity area.
Budget-Friendly Makeover: Painted Countertops
Give your bathroom an entirely new look without the expense of replacing your vanity. Learn how to paint a cultured marble integrated sink and countertop for a fresh, updated appearance. This technique is surprisingly durable and can dramatically change the perception of your bathroom’s age and style.
Industrial Chic: DIY Dyed Concrete Countertops
For a truly bespoke and modern feel, consider making your own dyed concrete countertops. This advanced DIY project creates a unique, durable, and industrial-chic surface that will be a conversation starter in any master bathroom renovation. The customization options for color and finish are endless.
Rustic Charm: Reclaimed Wood and Pipe Shelves
Add character and practical storage with easy-to-install pipe and reclaimed wood shelves. This industrial-farmhouse style is perfect for holding towels, toiletries, or decorative items, bringing warmth and a touch of rustic appeal to your bathroom design.
“/>
Creative Repurpose: Bathroom Storage from an Old Mirror
Don’t toss that old mirror! Instead, learn how to build a bathroom storage cabinet from an old mirror. This upcycling project is a fantastic way to add hidden storage and a unique, vintage touch to your bathroom, perfect for organizing medicines or cosmetics.
“/>