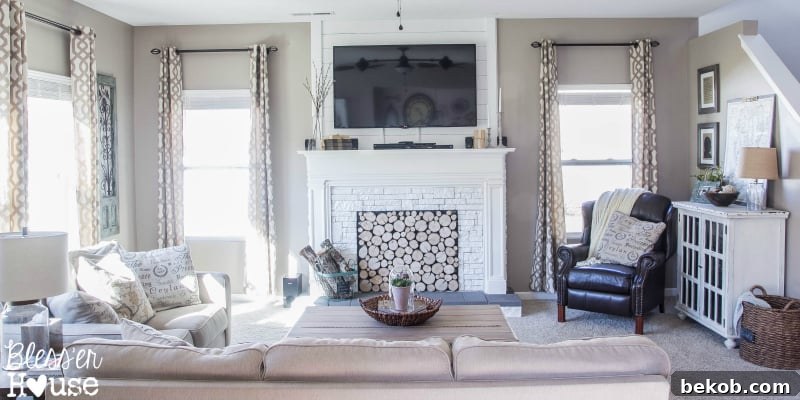
Transform your living space with a stunning DIY faux fireplace, achieved for less than $600! This comprehensive guide will walk you through every step of creating a captivating focal point in your home.
Beyond this incredible fireplace project, you can also discover how to elevate a basic kitchen island, customize a walk-in bedroom closet, and modernize traditional doorways with our expert tutorials.
How to Build a DIY Faux Fireplace: A Step-by-Step Guide
by Lauren of Bless’er House
Hello, I’m Lauren from Bless’er House, and I’m thrilled to share one of my absolute favorite home transformation projects with you! My blog is dedicated to chronicling my journey of turning a standard builder-grade house into a charming, cozy, and eclectic cottage, all while adhering to a strict budget. If you’re curious to see the full scope of my budget-friendly transformations, you can take an entire before and after home tour on my blog.
The idea of adding a faux fireplace sparked from a desire to introduce architectural character and a sense of warmth to our living room without the complexities and costs associated with a traditional fireplace. This project has truly been one of my most rewarding endeavors! The journey began with finding a truly unique reclaimed mantel from an architectural salvage warehouse. I diligently searched Craigslist for a month or two, and my patience paid off with a beautiful, character-rich piece. My advice? If you’re willing to put in the time, there are countless hidden gems waiting to be discovered. Once we had our mantel, we meticulously stripped off all the old paint, revealing its natural beauty and providing a clean canvas to work with. (A crucial tip: if you embark on paint stripping, always follow the product directions carefully and wear a mask to protect against potential lead paint.)
Tip: If you’re unable to find a salvaged mantel or prefer to build from scratch, explore this detailed DIY Mantel tutorial or browse these gorgeous faux fireplace designs for inspiration and structural ideas.
Part One: Carpentry – Building the Faux Fireplace Structure
Creating a faux fireplace from the ground up requires careful planning and precise execution, particularly in the carpentry phase. This section outlines the materials needed and guides you through constructing the sturdy base and surround for your new fireplace.
Materials You’ll Need:
- Reclaimed or ready-made mantel front (ours was a $100 Craigslist find)
- Paint stripper (we used Citristrip for effective removal)
- Chemical-resistant gloves for safety
- Scraper for paint removal
- Bucket for mixing or disposal
- Basic paint brush for stripper application
- 3 sheets of plywood for various structural components
- 9 2×4 boards for framing the hearth and supports
- Carpentry nails for general construction
- Finishing nails for a cleaner look
- Drywall screws for secure panel attachment
- Tape measure for accurate dimensions
- Pencil for marking cuts and lines
- Circular saw for straight, efficient cuts
- Jigsaw for intricate or curved cuts, especially for the firebox door
- Piano hinge (if adding the optional firebox door)
- Hammer for nailing
- Power drill for screws and pre-drilling
- Hack saw (if cutting metal, like a piano hinge)
DIY Faux Fireplace, Step 1: Initial Planning and Centering. Begin by finding the precise center of your chosen wall. This initial measurement is crucial for ensuring your faux fireplace is perfectly symmetrical and balanced within the room. Once centered, carefully determine the overall dimensions of your fireplace, basing them on the size of your mantel. This early planning phase ensures all subsequent cuts and constructions align harmoniously with your salvaged centerpiece.
DIY Faux Fireplace, Step 2: Constructing the Hearth Base Frame. The hearth provides a substantial base for your faux fireplace, adding to its realistic appearance and stability. To build this frame, cut two 2x4s to a length 8 inches longer than your mantel’s total width. These will form the front and back of your hearth. Connect these longer pieces with five 24-inch sections of 2x4s, serving as internal supports.
Using carpentry nails, first secure the two long sides to the end pieces (labeled as ‘1’ in typical diagrams), ensuring a strong initial connection. Next, attach the very center piece (labeled ‘2’), which helps distribute weight evenly. Finally, integrate the remaining two middle pieces (labeled ‘3’), spacing them equally for maximum structural integrity. This methodical approach ensures your hearth frame is robust and level.
DIY Faux Fireplace, Step 3: Anchoring the Hearth Frame. Once your hearth frame is fully assembled and secure, carefully position it to align with the center mark you established on the wall. To permanently anchor this base, nail the back of the frame directly into the wall studs. This ensures the entire faux fireplace structure remains stable and won’t shift over time. While we considered cutting into the carpet to anchor it to the floor, we found that with the substantial weight of the completed fireplace, it was unnecessary. Our hearth is incredibly solid and isn’t moving! Should we ever decide to replace our carpet with wood flooring, we’ll simply use a box cutter to neatly remove the carpet around the hearth and conceal the edges with quarter round trim.
DIY Faux Fireplace, Step 4: Attaching the Hearth Top. Measure the exact length and width of the top of your now-anchored hearth frame base. Using one of your plywood sheets, precisely cut a piece that matches these dimensions. This plywood will serve as the smooth, flat top of your hearth. Carefully lay the cut plywood onto the frame, ensuring it aligns perfectly with all edges. Achieving a perfect fit at this stage will contribute significantly to the overall professional appearance of your finished fireplace.
DIY Faux Fireplace, Step 5: Securing the Hearth Top. With the plywood perfectly aligned on your hearth frame, use finishing nails to securely attach it. Drive nails strategically along the edges and across the internal supports of the frame. Finishing nails provide a strong hold while leaving minimal visible holes, which will be easily concealed later with filler and paint, ensuring a smooth and finished surface for your hearth.
DIY Faux Fireplace, Step 6: Preparing the Mantel with Anchors. To seamlessly integrate your mantel into the faux fireplace structure, you’ll need to add internal anchors. Nail 2×4 pieces inside the back frame of your mantel. The positioning of these anchors is crucial: ensure there’s a distance equivalent to two plywood widths between the outer edge of the mantel top and the 2×4 anchor. This space is essential for later matching the molding of the mantel, as detailed in Step 13. Similarly, for the mantel legs, the distance between the outer edge of each leg and its corresponding 2×4 anchor should be one plywood width. These precisely placed anchors will provide a solid connection point for the surrounding structure.
DIY Faux Fireplace, Step 7: Wall Cleats for Mantel Support. To complete the anchoring system for your mantel, replicate the 2×4 placement from Step 6 directly onto the wall. These wall cleats should be nailed securely into the wall studs, aligning perfectly with the anchors on the back of your mantel. This creates a robust interlocking system that will firmly hold the mantel in place, ensuring stability and safety for your entire faux fireplace structure.
DIY Faux Fireplace, Step 8: Adding Surround Anchors to the Mantel. Next, focus on preparing the mantel to receive the “surround” – the interior paneling of the fireplace opening. Attach plywood strips to the back of the mantel, creating a frame that will serve as strong anchors for the surround piece. These strips will ensure the interior panel is securely fastened, giving your faux firebox a clean, finished edge and robust support.
DIY Faux Fireplace, Step 9: Creating the Firebox Surround. Measure the exact dimensions of the opening created by the plywood anchors you just installed on the back of the mantel. From a plywood sheet, cut a piece that precisely fits these dimensions. This piece will form the main interior panel, or surround, of your faux firebox. Accuracy here is key to a snug and professional fit.
DIY Faux Fireplace, Step 10: Fastening the Plywood Surround. With your plywood surround cut to size, position it carefully over the mantel opening. Use drywall screws to firmly fasten this plywood panel to the anchor strips you installed in Step 8. This creates a solid, enclosed firebox area, ready for further customization and finishing touches. The use of drywall screws ensures a strong and lasting attachment.
Optional Firebox Door: Adding Hidden Storage and Functionality
Here’s where our faux fireplace truly stands out, offering more than just aesthetic appeal. We envisioned the space behind the firebox as a functional area, leading us to incorporate a clever access door. This allows us to conveniently access wall outlets behind the fireplace, providing a perfect, concealed spot for running cords for media devices. This integrated storage solution keeps unsightly wires out of view, maintaining a clean and organized look. If this enhanced functionality isn’t a priority for your project, feel free to skip Optional Steps 1-6 and proceed directly to DIY Faux Fireplace, Step 11.
Optional Firebox Door, Step 1: Measuring for the Door. To create a perfectly fitting firebox door, carefully measure the dimensions of the opening within the surround. It’s essential to leave a small gap, approximately 1-2 inches, at the bottom. This deliberate space will serve as a threshold, providing crucial support for the door and preventing the surround from bowing or warping over time. Accuracy in these measurements is vital for a smooth operation and durable finish.
Hint: For precise and clean cuts when creating the door, switch to a thin, fine-toothed blade on your circular saw. This will ensure sharp edges and a professional finish.
Optional Firebox Door, Step 2: Precision Cutting the Door. With your measurements complete and the correct blade in place, carefully cut out the firebox door from the plywood surround. For the corners, where precision is paramount, switch to a jigsaw. This specialized tool allows you to make exact, clean cuts, ensuring the door fits seamlessly into the opening with minimal gaps and a professional appearance.
Optional Firebox Door, Step 3: Installing the Piano Hinge. A piano hinge is ideal for this application due to its continuous support, which helps prevent sagging. Use a hack saw to cut the piano hinge to the exact length of your firebox door opening. Once cut, screw one side of the hinge securely into the edge of the fireplace surround. Ensure the hinge is straight and flush for optimal door movement.
Optional Firebox Door, Step 4: Creating the Door Frame. To further reinforce the surround and ensure the door operates smoothly without bowing or causing any movement, construct a simple door frame on the back of the mantel surround. This internal frame acts as a stable casing for the door, providing additional structural integrity and a clean closure.
Optional Firebox Door, Step 5: Attaching the Door. Carefully align your cut firebox door with the piano hinge already attached to the surround. Screw the remaining side of the piano hinge to the edge of the door. During this step, we found it necessary to shave off a tiny bit of the door’s edge to ensure a perfect, snug fit. This small adjustment allowed the door to open and close seamlessly, like a glove.
Optional Firebox Door, Step 6: Securing the Door Threshold. To fully support your new firebox door and maintain the integrity of the opening, nail a 2×4 anchor to the top of the hearth where the door’s threshold will attach. This anchor will provide a solid base for the bottom edge of the door, preventing any sag or misalignment. (Apologies, I somehow missed photographing this crucial step, but its importance cannot be overstated!)
Continuing the DIY Faux Fireplace Tutorial: Completing the Structure!
DIY Faux Fireplace, Step 11: Final Mantel Anchoring. Now it’s time to fully anchor the mantel to the wall structure. Nail plywood strips to the 2×4 anchors previously attached to both the wall (from Step 7) and the back of the mantel (from Step 6). These strips effectively bridge the gap, creating a robust, unified structure. If you opted for the functional firebox door, also remember to securely nail the threshold beneath the door to the anchor installed in Optional Step 6. This multi-point anchoring system ensures your mantel is incredibly sturdy and immovable.
After the two plywood side pieces were securely in place, this is what the top of our structure looked like. Notice the electrical outlet below? Thanks to our innovative firebox door, it remains perfectly accessible and usable!
DIY Faux Fireplace, Step 12: Enclosing the Top. To fully enclose the top section of your faux fireplace, add a custom-cut plywood piece. This panel should be securely attached to the 2x4s on both the mantel and the wall, as well as to the plywood side pieces you’ve already installed. This creates a completely enclosed and incredibly stable structure, ensuring that your fireplace is robust and will stand firm for years to come.
DIY Faux Fireplace, Step 13: Mimicking Mantel Molding. To enhance the realistic appearance and seamless integration of our faux fireplace, we added one more plywood piece to the very top. This extra layer was carefully chosen to mimic the existing molding and profile of the salvaged mantel top. Robert meticulously secured it with finishing nails, ensuring a refined and cohesive look. This small detail significantly elevates the overall aesthetic, making the transition from the mantel to the new structure virtually undetectable.
And just like that, the basic structure of our beautiful faux fireplace was complete! What a transformation!
Part Two: Crafting the Faux Chimney Plank Wall
To further enhance the illusion of a grand fireplace and create a striking vertical element, we decided to build a faux chimney plank wall directly above the mantel. This not only adds significant architectural interest but also provides a stylish backdrop for a television, seamlessly integrating modern technology into a classic aesthetic. This section details the steps to achieve this feature.
Materials for the Plank Wall:
- 9 1×6 boards, cut to the width of your mantel (ours were 70″ wide)
- 2 1×4 boards, cut to the height from your mantel to the ceiling (ours were 50″ high)
- Level for ensuring straight lines and planks
- Pencil for marking
- Popsicle sticks (or similar spacers) for consistent gaps
- Finishing nails for secure attachment
- Hammer
- 2 strips of quarter-round finishing trim (50″ each) for a polished edge
- Drill and hole saw drill bit (optional, for discreet cord management)
Plank Wall, Step 1: Defining the Wall Dimensions. The first step is to determine the desired width of your plank wall. We chose a width generous enough to accommodate our large TV, which Robert absolutely loves! Using a reliable level, draw precise pencil lines from the top of your mantel straight up to the ceiling for both the left and right edges of where your plank wall will be. These lines will serve as your guides for a perfectly straight installation.
Plank Wall, Step 2: Marking Stud Locations. Before attaching any planks, it’s crucial to identify and mark the vertical studs within your wall. Use your level once more to draw clear pencil lines indicating each stud’s location. Nailing your planks into these studs will ensure a secure and durable installation, preventing any sagging or detachment over time.
Plank Wall, Step 3: Attaching the Bottom Plank. Begin your plank installation by securing the very first (bottom) 1×6 board. Use finishing nails to attach it to the wall, making sure that both ends of the plank align perfectly with your vertical pencil lines (from Step 1). Crucially, ensure the board itself is perfectly level before driving the nails into the marked wall studs. This foundational plank sets the standard for all subsequent boards, so take your time to get it right.
Plank Wall, Step 4: Installing Subsequent Planks with Spacers. Continue attaching the remaining 1×6 boards, working your way up towards the ceiling. For consistent spacing between each plank, utilize small spacers – we found popsicle sticks worked perfectly, but coins or other small, uniform objects can also do the trick. Ensure that both ends of each plank consistently align with your initial pencil marks and with the board directly below it. This attention to detail will create a beautifully uniform and professional-looking plank wall. (On a lighter note, while some DIYers might use coins, we’re not *that* frugal – I just happened to have a convenient supply of popsicle sticks that day!)
Plank Wall, Step 5: Customizing the Final Plank. As you approach the ceiling, you’ll likely find that the last plank requires a custom cut. Carefully measure the remaining height needed for the final 1×6 board to fit snugly between the previous plank and the ceiling. For our project, we had to trim about an inch off the top of our last plank to achieve a perfect fit. Use your circular saw for a clean, straight cut.
Plank Wall, Step 6: Finishing the Edges. Once all the horizontal planks are securely in place, it’s time to give your plank wall a clean, finished appearance. Nail a 1×4 board vertically over each end of the installed planks. These 1x4s will conceal the raw edges of the planks and provide a crisp border. For an even more polished look, we later added a small quarter-round molding piece along the outside edge of each 1×4, completely hiding the plank ends and seamlessly integrating the wall into the room.
Plank Wall, Step 7: Optional Cord Management. For those planning to mount a TV or other electronics above the mantel, discreet cord management is key to a clean aesthetic. To achieve this, use a drill fitted with a hole saw drill bit to create a strategically placed opening at the back of the mantel top. This allows you to run all TV cords straight down, out of sight, and through the hidden firebox access, ensuring your media setup remains tidy and streamlined.
With the carpentry and plank wall complete, our faux fireplace structure was fully built and ready for its aesthetic transformation with paint and stone!
Part Three: Adding Paint and Stone for a Realistic Finish
This is where the magic truly happens, transforming the raw wooden structure into a beautiful, convincing faux fireplace. The combination of paint and stone adds depth, texture, and a sense of permanence, creating a stunning focal point in your living room.
Materials for Paint and Stone:
- AirStone (available at Lowe’s, a cost-effective and easy-to-work-with option)
- Hack saw (for cutting AirStone without power tools)
- AirStone adhesive (specifically designed for AirStone application)
- Putty knife for applying adhesive
- Popsicle sticks (or other spacers) for consistent stone gaps
- Concrete patio stones (for the hearth, offering a realistic, durable surface)
- Rags for wiping and dabbing
- Paint brush
- Paint bucket for mixing
- White paint (we used Valspar, color-matched to Sherwin Williams Pure White in a semi-gloss finish)
- Gray paint sample-sized pot (we used Valspar Rugged Suede for the hearth stones)
- Black chalkboard paint or other flat black paint (for the firebox interior)
Paint and Stone, Step 1: Initial Painting. Begin by applying two thorough coats of your chosen white paint (or any other color you prefer for the main structure) to all areas of the faux fireplace that will *not* be covered by stone. This includes the mantel itself, the plank wall above, and any visible wooden edges. Ensure even coverage for a smooth, professional base. Subsequently, paint the interior of the firebox area with two coats of black paint. If you created a firebox door, paint both its interior and exterior surfaces with black. This dark color creates the illusion of depth and a realistic firebox interior.
Paint and Stone, Step 2: Preparing AirStone. AirStone is an excellent choice for a DIY fireplace due to its lightweight nature and ease of installation. It’s incredibly cost-effective, typically around $50 for 8 square feet of coverage, and remarkably, no power tools are required for cutting! A simple hacksaw is all you need to cut these stones to your desired size and shape.
Before applying any adhesive, dry-fit all the AirStone pieces for the hearth. This crucial step allows you to plan your layout, make any necessary cuts, and ensure a perfect fit without the pressure of drying adhesive.
Hint: As you’re dry-fitting and cutting the AirStone, number the ends of the blocks. This simple trick will save you time and confusion later, allowing you to easily reassemble them in the correct order when it’s time to apply adhesive.
For the hearth AirStone, I opted to whitewash it in the garage to avoid any drips or spills on our carpet, ensuring a clean workspace. To create the whitewash, I mixed equal parts of our white paint with water in a separate bucket. This 1:1 ratio creates a translucent finish that allows some of the natural stone color to peek through.
Using a paint brush, I then generously applied the whitewash mixture onto each AirStone piece.
After letting the whitewash soak into the porous surface of the AirStone for about a minute, I gently dabbed off any excess with a clean rag. This technique removes some of the paint, allowing the subtle gray tones of the stone to show through, creating a soft, aged effect.
Once the whitewash had fully soaked in and dried, the AirStone achieved a beautiful, subtly aged look. There was just enough of the original gray color peeking through the white to create a wonderfully natural and textured finish.
Paint and Stone, Step 4: Installing AirStone on the Hearth. With your AirStone prepared and (optionally) whitewashed, it’s time for installation. Carefully reassemble the dry-fitted stones around the hearth. Apply AirStone adhesive generously to the back of each stone using a putty knife, much like frosting a cake. Then, firmly press each stone onto the hearth frame, ensuring a strong bond.
Then, meticulously fit them onto the bottom surround, following your dry-fit plan. The adhesive ensures a secure and lasting installation, bringing the hearth to life with realistic stone texture.
Paint and Stone, Step 5: Creating the Concrete Hearth. To achieve the authentic look of a solid concrete hearth, we utilized readily available concrete patio stones. These stones are not only affordable but also incredibly durable. Securely attach them to the top of your hearth structure using the AirStone adhesive, ensuring they are tightly butted against each other and well-bonded to the plywood base. This creates a robust and visually convincing hearth surface.
Paint and Stone, Step 6: Continuing AirStone Installation. Now, extend the AirStone application by carefully working your way up and around the firebox opening (or the firebox door, if you included one). To ensure consistent spacing and compensate for any slight irregularities in the stones, use popsicle sticks or other small spacers between each piece. This attention to detail creates uniform grout lines and a professional brick-like appearance.
As we reached the top of the firebox surround, we encountered a small gap. Since AirStone is notoriously difficult to cut lengthwise into very thin strips, we ingeniously added a small strip of molding to fill this space. This molding piece, which we later painted white, perfectly bridged the gap. The flexibility provided by our popsicle stick spacers allowed us just enough wiggle room to integrate this trim piece seamlessly. We also extended the AirStone application to the sides of the fireplace, completing the illusion of a robust, built-in structure.
Paint and Stone, Step 7: Finishing the Stone and Hearth. Using the same whitewash mixture (1 part white paint, 1 part water) as on the hearth, apply it to all the newly installed AirStone around the firebox and sides. Allow it to soak in for about a minute, then dab off the excess with a rag to achieve that beautiful, subtle, aged effect. For the concrete patio stones on the hearth, apply two coats of your chosen gray paint (we used Valspar Rugged Suede) for a durable and realistic concrete finish.
Paint the patio stones on the hearth with 2 coats.
At this juncture, I had a realization: while the whitewash provided a lovely, subtle effect, I ultimately preferred a cleaner, fully white look for the AirStone. I decided to paint all the AirStone pieces solid white. My advice here is to always start with a lighter, more translucent finish like whitewash. It’s much easier to transition from whitewash to full paint than it is to reverse a heavy paint job to achieve a more natural, subtle effect. Once you commit to solid paint, there’s truly no turning back, so consider your options carefully!
Part Four: Creating the Faux Stacked Log Front
To complete the illusion of a functional fireplace, adding a faux stacked log front to the firebox opening is a charming and essential detail. This feature brings a rustic, cozy feel without any of the maintenance or fire hazards of real logs.
Materials for the Faux Log Front:
- Log, ideally sourced from a local tree, sliced into 2-inch thick pieces
- Gorilla Glue (or another robust, long-lasting adhesive)
Faux Log Front, Step 1: Preparing Log Slices. The key to a convincing stacked log look is to use actual log slices that provide natural texture and varying shapes. We had a log conveniently sliced into 2-inch thick pieces using a band saw. This depth creates a more dimensional and believable log stack compared to thinner cuts. If you don’t have access to a band saw, many local lumber yards or even some hardware stores can cut logs for you.
Faux Log Front, Step 2: Arranging and Securing the Logs. If you opted for the firebox door, detach it from the fireplace by removing the piano hinge, and lay it flat on a stable surface. This provides an optimal working area. Arranging the log pieces was surprisingly enjoyable, like solving a giant puzzle! It took me about an hour to get the arrangement just right, ensuring the entire surface was covered. It’s important *not* to glue the pieces down as you initially position them; you’ll need the flexibility to rearrange them to fill the space effectively. For our door, I deliberately left about an inch of space on the left side to accommodate the hinge and ensure the door could open smoothly.
If you didn’t include the optional firebox door, you’ll be gluing the logs directly onto the firebox surround. In this scenario, I recommend purchasing a quick-drying, no-run wood glue. Before applying glue, lay out all your log pieces in a shape identical to your firebox opening on a separate, flat surface. Experiment with different arrangements, moving pieces around until you achieve a visually appealing and full coverage. Once satisfied, apply the glue according to the package directions, pressing each piece firmly into place.
For our firebox door, once the log arrangement was perfected, I used Gorilla Glue to adhere all the pieces. I allowed ample time for the glue to thoroughly dry and cure, ensuring a permanent and secure bond before reattaching the door.
After painstakingly screwing the firebox door back onto our faux fireplace, we quickly realized that the combined weight of the plywood and log slices made the door quite heavy. Constantly opening and closing it to access our electronics inside the firebox proved impractical. For now, we’ve decided to display our electronics on the mantel, but we still appreciate having discreet access to the wall outlet behind the fireplace for seamless cord management. Despite this minor adjustment, the overall impact is phenomenal, and our living room officially boasts a stunning, cozy fireplace! We absolutely adore it!
———————————-
Now that you’ve seen the incredible transformation of this budget-friendly faux fireplace (isn’t it absolutely stunning?!), we encourage you to explore more creative ideas from Lauren. Head over to Bless’er House to delve into more of her inspiring projects. We highly recommend checking out her tutorial for a faux reclaimed wood tabletop and her ingenious faux planked bookcase. And for those looking to light up their homes on a dime, don’t miss her budget industrial light fixtures – they’re fantastic! You’ll also find immense value in her 8 smart strategies for decorating your home when you’re on a tight budget.
PS: Don’t miss out on any of our amazing holiday guests and their fantastic projects! Subscribe to follow us by RSS or email.
You can also connect with us on social media for daily inspiration: Facebook | Instagram | Google+ | Twitter | Pinterest
Inspired to share your own DIY success? Submit your best home project here for a chance to be featured on Remodelaholic!
Ignite Your Inspiration with More Fireplace Fixes:
Delve into an array of fireplace inspiration with our curated collection of 25 gorgeous fireplace makeovers, offering a wealth of ideas to transform your own hearth.
Find countless everyday ideas for decorating your mantel, suitable for any season or celebration:
Captivating Christmas Mantel Ideas
Heartfelt Thanksgiving Mantel Designs
Spooktacular Halloween Mantel Creations
Refreshing Spring Mantel Inspirations
Clever Back-to-School Mantel Themes
Originally published: December 27, 2014 // Last updated: September 4, 2020