The steps below follow the order of the work for this furniture project.
Submitted by My Sisters Suitcase
The challenge for American Crafter Round One this week was “Hardware Store Gems”… so naturally, I started by going to Lowe’s to see what I could find. My option was to completely re-do the dresser in my master bedroom. This thing has got to be at least 20 years old… it is a hand-me-down from my mom. Here’s a look at what I’ve been staring at for the past 8 years when I wake up every morning:
Pretty sad, huh?
Here is what I came across in the sheet metal aisle…
It’s a 24×36″ decorative aluminum sheet {in Union Jack pattern.} It was love at first sight. With a name like “Union Jack” how could I notbuy it? It was calling my name… even at $27 a sheet.
OK, before I go any further, can I show you what I did? I can’t wait any longer! I promise I will get to all the other stuff in a minute.
Pin It
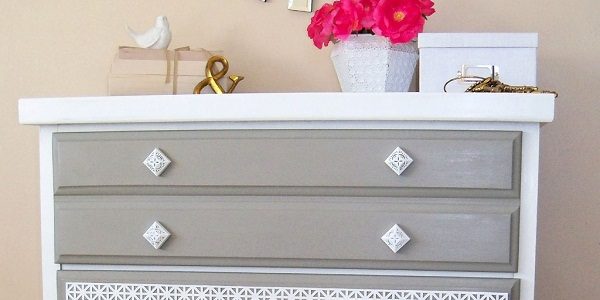
Can I just tell you how much I LOVE walking in my room now? Let’s just have a little reminder of what it looked like before I started this makeover…
Yikes!!!! {If you are here for the first time, please don’t let this picture scare you!} You can read more about it here. But seriously, this dresser makeover has completelytransformed my bedroom. (Well, at least one side of it!) It makes me smile every time I look at it.
OK, now on to the good stuff.
I started this project with the biggest Handmade splurge I’ve made in the past 6 months… Annie Sloan chalk paint. About a month ago I was driving through Utah and stopped to buy 2 quarts {Pure White and French Linen} and some Clear Wax. Over $100 later, I was wondering if this stuff is all it’s cracked up to be. I’ll tell you more about the painting process and my thoughts about it next week, but I did take some advice from one of my go-to bloggers, Emily at Decor Chick. You can read about her thoughts & tips on AS chalk paint here.
Today, I will be showing you how I created the drawer fronts and updated the hardware for my new dresser!
1. The first thing I needed was a pair of tin snips to cut my aluminum sheet. I went with the Wiss multi-purpose pair ($13) and they worked wonderfully. I measured my drawers, then made sure to cut the metal on the line of the pattern {creating a clean, uniform edge for each piece.}
2. Next, I painted each piece with Pure White chalk paint and a foam roller. 2 coats was well fitted. I also sprayed it with a clear polyeruthane to protect it from chipping.
3. I just wanted to see how they looked on the drawers… loving that Union Jack design!
4. Here is what my dresser looked like on Day 2. All painted and waxed, ready to be gussied up
5. Now I faced the question I’d been dreading… how am I going to attach these babies to the drawers? My first option was Gorilla Glue. Then I read the back and realized that it “foams up” to 3 times the size after application. {Not gonna work with all those pretty holes in my pattern.} After taking a closer look, I saw the well fitted circle spot that repeated throughout the design. It was the exact size of the Medium Zots {also known as glue dots} that I’ve used on other projects.
6. So I went for it! I attached the Zots around the edge of the sheet, about every other “spot” and a few extras on the corner sections. It worked great! They are attached well, and I just added a few dots of Krazy Glue on the corners to make sure they are really secure.
7. Before I attached the adhesive, I cut holes in the metal {using my tin snips again} to match up with the existing holes for the hardware. Then I attached the Zots and adhered the sheet to the drawer face.
8. Adding the new drawer pulls made me sigh…. ahhhhh. Aren’t they striking?
9. Another shot of the new drawers
10. I was struggling to find knobs for the top drawer. I wanted something unique to set it apart, but not totally different from the geometric pattern on the other drawers. I found these beauties at JoAnns (70% off too!) They were a little “tribal” for what I was going for, but the shape was well fitted.
11. I gave them a few quick coats of white paint and voila…
12. Turning them on the diamond slant completed the look.
So that’s it! Thanks for sticking it out through this post Let’s take one more look at the before and after: