
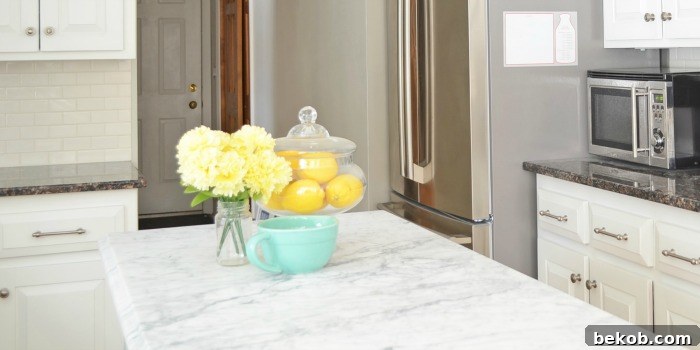
Transform Your Kitchen: Achieving a Dream White Kitchen with a DIY Marble Island on a Budget
Have you ever envisioned walking into a bright, airy kitchen, bathed in the timeless elegance of white, accentuated by the luxurious veins of marble? For many homeowners, the white kitchen with a stunning marble island represents the pinnacle of contemporary design and classic charm. This coveted combination is more than just a trend; it’s a testament to sophisticated taste and functional beauty. While such a dream might seem out of reach, especially when budget constraints come into play, the incredible journey we’re about to share proves that a little ingenuity, a lot of elbow grease, and smart choices can turn aspiration into reality.
Today, we’re thrilled to feature a spectacular kitchen transformation that embodies this very dream. Our guest blogger demonstrates how they achieved their breathtaking white kitchen, complete with a magnificent DIY marble island that truly serves as the heart of the home. Get ready to be inspired by this stunning space, a true example of how personal vision and practical execution can create something truly enchanting.
Beyond the beautiful “after” shots, we’ll delve into all the intricate details of this ambitious DIY project, including valuable insights, before-and-after comparisons, and practical tips you can apply to your own home. But first, let’s explore some other inspiring white kitchen and island designs from our collection, showcasing the versatility and enduring appeal of this design choice.
Gallery of Inspiring White Kitchens and Islands
White kitchens offer a canvas for various styles, from rustic farmhouse to sleek modern, and the addition of an island often elevates both functionality and aesthetic appeal. These curated examples highlight different approaches to achieving a bright, inviting, and highly practical kitchen space.
Now, let’s dive into the fascinating details of how Nina from Everyday Enchanting brought her white kitchen vision to life, culminating in that show-stopping DIY marble island. Her story is a testament to perseverance, smart design, and the immense satisfaction of a job well done.
White Kitchen Overhaul and DIY Marble Island: A Journey of Transformation
by Nina of Everyday Enchanting
Hello everyone! I’m Nina from Everyday Enchanting, a place where I share my passions for decorating, entertaining, and the ongoing renovation of our builder-grade home. I am absolutely thrilled to be a guest poster for Remodelaholic today! I’ve been a loyal fan for years, and the blog’s name truly resonates with me—I’m thoroughly addicted to remodeling, a sentiment I’m sure many of you share! Since moving into our current house, we’ve tackled several significant projects, including a complete overhaul of our pantry. However, today I want to share what has undoubtedly been our most ambitious undertaking yet: a complete DIY kitchen renovation.
Our remodeling journey began unexpectedly. When we decided to put our previous house on the market, the paint had barely dried in what was almost my dream kitchen. We had spent considerable time deliberating whether to sell or stay, and “staying” had initially won out, just long enough for us to embark on a major kitchen renovation. We were so close to perfection – crisp white cabinets, a classic farmhouse sink, brand-new appliances, sparkling granite countertops, and an elegant wall of glass-front cabinets. Then, as often happens, our plans shifted. The town we desired to move to was experiencing a booming spring real estate market, and we were irresistibly drawn in. To cut a long story short, our old house sold much faster than we anticipated, with our first offer arriving just two days after it officially hit the market!
After losing out in a few fierce bidding wars, we realized we needed to adjust our expectations and aim for a less-updated home if we wanted to find a place quickly. Fortunately, everything worked out in the end. We discovered a beautiful house with fantastic “bones” – a solid foundation and great potential, even if it needed a considerable amount of tender loving care. We transitioned from this lovely kitchen:
To this one, which was a blank canvas awaiting transformation:
While I was a little sad to leave my nearly-dream kitchen behind, I knew that for those with a keen eye for potential, this new space held immense promise. The original kitchen suffered from a lack of natural light, and its dark finishes only exacerbated the issue, making it feel somewhat gloomy. However, the existing cabinets were surprisingly well-built, and while the granite countertops weren’t my first choice, they were, after all, granite – a durable and functional surface. The appliances were a bit dated but perfectly serviceable. This meant we could keep them, significantly helping our tight budget. We lived with this kitchen for over a year, meticulously researching the most effective ways to achieve a major update on a very small budget. Our primary challenge became how to transform the existing elements into a style that truly reflected our personal aesthetic, without the luxury of starting from scratch.
The Cabinet Transformation: A Labor of Love
The biggest undertaking was undoubtedly the cabinet transformation. We knew painting them white would instantly brighten the room and provide that coveted crisp, clean look. This wasn’t a quick weekend project; it was a testament to patience and persistence.
Last fall, we finally committed to beginning the project. The journey of transforming the kitchen truly began with the cabinets. We invested in adding elegant crown molding to the top of the existing cabinets, instantly giving them a more custom and finished look. Inside, we built sturdy plywood shelves to maximize storage and improve functionality. The real work, however, was in the preparation and painting. We meticulously sanded, filled in the wood grain for a smooth finish, primed, and then painted every surface—interiors, exteriors, doors, and drawers. This process was extensive, spanning weekends from October 1st all the way to Valentine’s Day. It required dedication, attention to detail, and a lot of patience, but seeing the dark, outdated cabinets transform into bright, inviting white ones was incredibly rewarding.
Upgrading the Backsplash, Sink, and Range Hood
With the cabinets revitalized, our attention turned to other key areas. The old travertine backsplash, while not terrible, didn’t quite fit the fresh, bright aesthetic we were going for.
We replaced it with classic subway tile, which offers a clean, versatile backdrop, and added an arabesque pattern accent for a touch of unique charm and visual interest. This combination added texture and subtle elegance, tying the whole space together.
The old kitchen sink was also swapped out for the popular Ikea Domsjo sink, a fantastic choice for anyone looking to achieve the farmhouse sink aesthetic on a budget. This sink instantly became a focal point, adding both charm and practical depth.
Next, we upgraded our range vent to an inexpensive, sleek stainless steel option. My husband, Mack, then took on the challenge of building a custom range hood around it. This wasn’t just about aesthetics; Mack ingeniously designed it to include hidden storage, making it both beautiful and incredibly functional – a perfect example of smart DIY solutions.
It even has hidden storage, a brilliant feature for keeping kitchen essentials out of sight!
Finally, the uninspiring builder’s grade light fixture was replaced with a gorgeous industrial-inspired piece, complete with a custom finish. This new lighting not only enhanced the aesthetic but also provided much-needed illumination, transforming the ambiance of the entire space.
The Showstopper: Our DIY Marble Kitchen Island
We poured countless hours of hard work into this kitchen, and the results speak for themselves. Every detail, from the painted cabinets to the new backsplash, contributed to creating a truly stunning space. However, the undisputed showstopper and centerpiece of this kitchen was surprisingly the quickest and easiest part to complete: our magnificent DIY marble island.
This part of the kitchen almost didn’t happen, born out of necessity rather than initial design. Midway through our renovation, during the coldest week of the year, we unexpectedly had to replace our entire heating system (cue major panic!). One of the new vents ended up being smack dab in the middle of the kitchen floor. A lone vent in the middle of the room was far from ideal, so we began planning for an island to elegantly cover it up, while still allowing the heat to circulate effectively. Our budget for this impromptu addition was extremely tight, given the significant cost of the new heating system.
Mack, ever resourceful, scored big on Craigslist! He found the perfect marble slab for the island top for an incredible price of only $200! This amazing find set the stage for our DIY marble island project. For the base, we found inspiration in Ana White’s wonderful book, The Handbuilt Home. We adapted her kitchen island plans to perfectly accommodate our unique marble top. To add a touch of timeless elegance, we ordered the beautiful Grand Harvest Island Legs from Osborne Wood Products, which provided the classic, sturdy foundation we envisioned.
For the most part, we followed Ana White’s plans, utilizing her materials list to maximize lumber yields and minimize waste. Our trusty Kreg Jig proved invaluable, allowing us to drill precise pocket holes in all the 2x6s and 2x4s, ensuring strong, hidden joints. If you’re new to woodworking, a Kreg Jig is a game-changer for creating robust and professional-looking furniture.
Assembly was surprisingly straightforward. Thanks to good planning and the efficiency of pocket-hole joinery, building the entire island base took just a single afternoon!
Instead of the suggested slats for the bottom shelf, we opted for a solid piece of pine butcher block from Lowe’s, which we carefully notched out at the corners to perfectly fit around the elegant island legs. This choice added both durability and a beautiful, natural wood element to the design.
Once assembled, we stood back and admired our work. The structure was complete, and the vision was quickly coming to life!
The Art of the Finish: Layering Stains and Whitewash
The next day, I began the crucial finishing process for the island base. First, I applied a coat of Minwax Pre-Stain Wood Conditioner to ensure even absorption of the stain. Then, I used Minwax Waterbased Wood Stain in a White Base tinted to Slate. I was surprised by how dark the gray stain appeared, but it laid the foundation for the aged, distressed look we were aiming for.
Next, I started the whitewashing process using a spare can of Benjamin Moore Simply White in an eggshell finish. With a very dry brush, I carefully began to lightly apply white paint all over the island, ensuring not to go too heavy. The key was to build up thin, uneven layers, knowing that I would later sand it back to reveal the underlying tones. This technique creates a beautiful, aged effect that perfectly complements the overall white kitchen aesthetic.
After applying a full coat of whitewash, we gently sanded most of it off. There was no exact science to this step; our goal was to achieve a naturally aged look without too much of the original blond wood peeking through. Initially, we felt it looked a bit too white and busy with the exposed wood. So, we grabbed a can of Rustoleum in Driftwood, which we already had on hand, and applied a light coat over the entire island. This proved to be the perfect touch! The driftwood tone blended everything together beautifully, making the white appear more neutral, creating a soft, inviting finish that was exactly what we wanted for our DIY marble island.
Finally, with the base perfectly finished, we attached the exquisite marble top using silicone caulking for a secure and seamless bond. Seeing the entire island come together was an incredibly exciting moment! This was also the very last part of the kitchen renovation that needed to be completed, so the feeling when the marble was set into place was one of immense relief… and profound exhaustion. After months of hard work, our dream white kitchen with its elegant DIY marble island was finally complete!
The Finished White Kitchen: A Dream Realized
DIY Marble Island: Time and Cost Breakdown
Despite its grand appearance, the island was surprisingly efficient to construct.
Time: The island took approximately 6 hours total to build and finish. Not bad for such a statement piece that fundamentally changed the kitchen’s look and feel!
Cost:
Marble Top (found on Craigslist): $200
Maple Grand Harvest Legs: $248
Wood for Base Structure: $98
Stain & Finishing Supplies: $33
Total Island Cost: $579
Overall, our entire kitchen renovation demanded a significant amount of time, effort, and dedication. However, the satisfaction of doing it ourselves, along with the thousands of dollars we saved on labor costs, was immeasurable. This substantial saving allowed us to allocate our budget towards other crucial elements, such as the new appliances and, of course, our stunning DIY marble island. We are incredibly happy with the final result – even happier than we were in our previous home. This time, we plan to enjoy our beautifully transformed kitchen for many years to come! It stands as a proud testament to what can be achieved with vision, hard work, and a commitment to DIY.
——————————–
What a truly inspiring transformation, Nina! Your dedication and ingenuity have created a kitchen that is not only beautiful but also deeply personal and functional. Thank you so much for sharing your incredible journey and valuable insights with the Remodelaholic community!
Remodelaholics, if you’re as enchanted by Nina’s work as we are, be sure to head over to Everyday Enchanting to discover more of her inspiring home projects. You’ll find detailed guides on everything from remodeling and reorganizing her pantry to building stylish cafe shelves. Her blog is a treasure trove of DIY ideas and home decor inspiration that proves quality design can be achieved on any budget.
Achieve the Marble Look for Less!
Dreaming of marble countertops but worried about the cost or upkeep? We have a fantastic alternative for you!
Learn how to DIY a faux marble counter using just paint and clever techniques!