
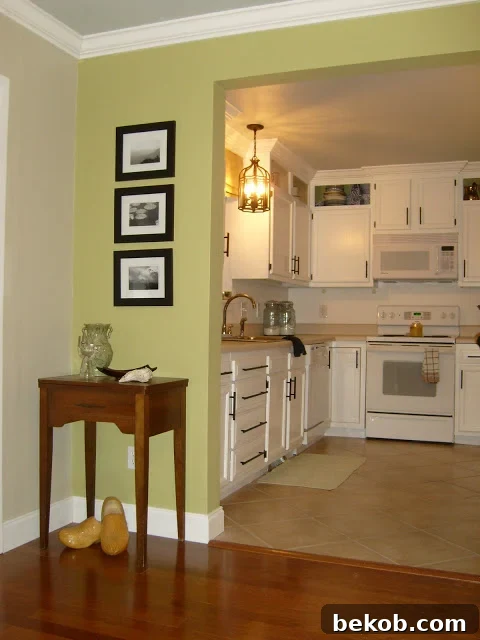
Kitchen Remodel: A Budget-Friendly Transformation
Welcome to the reveal of our kitchen remodel! It might not be straight out of a magazine, but it’s a huge improvement and perfectly fits our budget. We’re excited to share the entire process, from the initial planning stages to the final touches.
Before the Transformation
Here’s a glimpse of what our kitchen looked like before we started. It was definitely in need of some love and a serious upgrade.

The Remodeling Journey
The path to our new kitchen wasn’t always smooth, but it was incredibly rewarding. Here’s a breakdown of the key stages:
- Planning: Every great remodel starts with a solid plan. We meticulously mapped out our vision, considered our budget, and identified key areas for improvement.
- Demolition: Getting our hands dirty and stripping everything back to its foundations.
- Construction: Slowly rebuilding and constructing the kitchen of our dreams.
- Finishing Touches: These final additions brought the entire project together.
DIY Labor and Community Support
We’re so grateful for the help we received during the remodeling process. A special thanks goes out to the local missionaries who dedicated so much of their time and effort! Their assistance was invaluable, especially when it came to removing the old flooring. Removing the old flooring layers and hammering thousands of staples was a really tough process, and their support really helped. We are so thankful for their service and willingness to help.
The floor, clear and ready for the new tile.
We had to work around the living room during the project, but this made us more excited to get the project done!
Installing the cement board was a tedious but necessary step. Securing it with screws every few inches was time-consuming, and we encountered some frustrating moments with screw heads snapping off!
Even our furry friend, Buddy, got involved! He seemed to appreciate the cool tile, making himself comfortable on it for hours after we laid it down. Every step of the process was a labor of love, and we had fun working through it all.
I love getting the chance to work on the house. This means I am also the documenter, but this also means I never am in the pictures unless I take them myself. This one if funny because if you notice the bottom of my shirt is soaked. The tile saw soaked me and I was freezing the entire time I was laying the tile.
Cabinet Transformation
Transforming the cabinets was a major part of the remodel. We wanted to update their look while staying within our budget. First was staining, but that did not go according to plan.
This is Justin prepping the doors for paint. It turned out great!
I got the idea for painting the doors from This Old House. You put small screws in the top of the upper cabinet doors and in the bottom of the lower cabinet doors then you attach wire to the screws and you can hang them so they don’t get knocked and you can paint both sides at once.
Justin rigged a rope with a hook that got more elaborate as the day went on with more and more tarps to catch the over spray from the painter.
Don’t focus on the mess inside my cabinets. About a week before this project, I took down my extra, sort of ghetto looking, pantry shelves from the laundry room and shoved everything haphazardly back into my cabinets and anywhere else they could fit, ah, the joys of food storage. So normally they do not look this bad, but yet again this is just another example of what I can deal with in order to get a project done!
Details and Finishing Touches
It’s the little things that truly bring a space to life. We added personal touches and carefully selected accessories to complete the look. I may add another post later when I have more time and more finishing touches ready to photograph in the house.
The Completed Kitchen
And here it is – our brand-new kitchen! We’re thrilled with the results and how it has transformed our home. The space feels brighter, more functional, and much more inviting. The renovations we made were a great decision, and it feels like we can breathe easier in our new kitchen.
Budget Breakdown: How We Saved Money
We were committed to staying within our budget throughout the entire remodeling process. Here’s a breakdown of our expenses and some tips for saving money on your own kitchen remodel:
- Flooring:
- Tile: $1.56 a box (plus 2 free boxes!)
- Cement board: $100 (including screws)
- Grout and thin-set: $50.00
- Cabinets:
- Reused master bath cabinet: Free
- Cut several cabinets in half: Free
- Boxes above cabinets (recycled wood): Free
- Paint (Ace Hardware water-based enamel): $60.00
- Hinges and handles (clearance): Approx. $100.00
- Lighting:
- Above sink (Habitat for Humanity): $10.00
- Above table (Lowe’s Clearance): $8.00 a piece
- Countertops:
- Prefab: Approx. $200.00
- Paint on walls: Back-splash left over from other projects
- Green wall color: mis mixed $5.00 gallon
- Valance: Made from $5.00 fabric
- Faucet: Lowe’s approx $80.00
- Sink: Habitat for Humanity $75.00
Grand Total: Approximately $715.00 (excluding the microwave, which was around $150.00 or less)
Tips for a Budget-Friendly Kitchen Remodel
- DIY as much as possible: Labor costs can quickly add up, so tackle as many tasks as you can yourself.
- Shop for deals and discounts: Clearance sections, discount stores, and online marketplaces can be great sources for affordable materials.
- Repurpose and reuse: Get creative with existing materials and furniture to save money and add character to your kitchen.
- Prioritize essential upgrades: Focus on the most important improvements that will have the biggest impact on functionality and aesthetics.
- Plan carefully and stick to your budget: Avoid impulse purchases and unexpected expenses by creating a detailed budget and sticking to it.
We hope you’ve enjoyed this glimpse into our kitchen remodel journey! We’re so happy with the results and hope our experience inspires you to transform your own space, no matter your budget. Happy remodeling!