
Transforming Vintage Charm: A DIY Guide to Repurposing Antique Sewing Machine Drawers
There’s an undeniable allure to discovering forgotten treasures and breathing new life into them. This captivating spirit of creative reuse is beautifully exemplified by Kelli from Random Thoughts of a Supermom. Kelli embarked on a delightful journey to transform two antique sewing table drawers, turning them from overlooked relics into stunning decorative pieces for her home. Her project is a brilliant testament to the power of imagination and a little elbow grease, proving that with a clear vision, anything can be upcycled into a cherished item that adds unique character to any space.
Upcycling isn’t merely a fleeting trend; it’s a deeply rewarding and sustainable approach to personalizing your living environment. By giving old items a second chance at purpose, you’re not only creating bespoke decor but also actively contributing to environmental conservation by reducing landfill waste. Kelli’s detailed project offers a fantastic blueprint for anyone eager to tap into their inner DIY enthusiast and craft something truly special. Let’s delve into the step-by-step process and invaluable insights gleaned from her inspiring makeover.
The Thrill of the Hunt: Sourcing Your Vintage Treasures
A few months before embarking on this particular project, Kelli ventured into a resale store that was in the process of going out of business. These types of liquidation sales are often veritable goldmines for unique finds, offering a prime opportunity to discover items rich in history and character at incredibly affordable prices. You might recall some of Kelli’s previous successful scores from such venues, like the remarkably affordable $5 school desk or the charming fork & spoon set. It was during one of these fortuitous treasure hunts that she stumbled upon the two antique sewing machine drawers that would become the stars of this transformation.
For many, purchasing a lone drawer might seem like an unconventional choice, but Kelli possessed the discerning eye of an experienced upcycler. She looked beyond their initial, slightly worn appearance and was immediately captivated by their intricate details, the unique craftsmanship, and the undeniable quirkiness that only genuine vintage items possess. This ability to see potential in overlooked objects is a crucial skill when seeking out repurposing projects. It’s about recognizing the inherent beauty and future utility in something others might discard. Whether you frequent local thrift stores, bustling antique shops, estate sales, or even browse online marketplaces, keep an open mind for items like these drawers. They are frequently inexpensive and hold immense potential for transformation into something truly spectacular and meaningful for your home.
Unveiling Potential: Initial Assessment and Repair Work
Upon bringing her new finds home, Kelli began the crucial first step of any successful restoration or upcycling project: a thorough assessment. The drawers, while undeniably rich in character and history, naturally showed the customary signs of their age and previous use. This is almost always the case with vintage pieces, where decades of life leave their unique marks. It’s essential to meticulously inspect every detail, not only to admire the original craftsmanship but also to identify any structural weaknesses or areas that require repair before proceeding with aesthetic changes. Addressing these issues first ensures the integrity and longevity of your repurposed item.
Embracing Imperfection: The Enduring Appeal of Antique Details
“This is what I started with. Check out all those great details!” Kelli shared, highlighting the intrinsic beauty embedded within the original drawers. Antique sewing machine drawers are particularly renowned for their delicate carvings, elegant dovetail joints, and often charmingly ornate handles or embellishments. These specific details are precisely what imbue them with their unique character and tell a silent story of their past life. Rather than striving to erase every single imperfection, the objective in such projects is typically to restore functionality and stability while thoughtfully preserving the authentic vintage appeal. Even minor chips, faded areas, or subtle wear can contribute significantly to the charm of a distressed finish, adding layers of narrative and authenticity to the piece.
The Repair Process: A Little Glue Goes a Long Way (But Not Too Much!)
Kelli’s initial inspection revealed that some of the beautiful decorative elements on the drawers were loose, and a few had even completely broken off. This is a very common challenge encountered with older wooden items, especially those that have seen years of use. Her chosen solution was straightforward yet highly effective: Gorilla Glue. This robust adhesive is renowned for its strength and versatility, making it an excellent choice for repairs on a variety of materials including wood, ceramics, metal, and more, thus becoming an indispensable tool for many DIY enthusiasts.
To reattach the detached pieces securely, Kelli carefully applied a thin layer of Gorilla Glue to both the broken fragment and the corresponding spot on the drawer where it was meant to be. The emphasis here on a “thin layer” is paramount. Gorilla Glue is unique in that it expands as it cures, a property that makes it excellent for filling small gaps but can also lead to an unsightly excess of foam if too much product is applied. Kelli experienced this firsthand, observing, “Apparently my layer wasn’t quite thin enough, because this is what it looked like when I came back to check and see if it was dry. No big deal though.”
However, encountering excess foam is not a catastrophic setback in a DIY project. As Kelli skillfully demonstrated, it can be easily managed and corrected. She simply used a screwdriver to gently scrape away the cured, extra foamy material and then sanded the area smooth to prepare it for painting. This step perfectly illustrates an important aspect of successful DIY endeavors: flexibility, problem-solving, and a willingness to learn from experience. While the instruction to use a thin layer of Gorilla Glue is indeed paramount for achieving a clean, inconspicuous finish, minor missteps can almost always be rectified with a little patience. Always ensure the repaired surface is clean, completely dry, and free of any dust or debris before applying any adhesive for optimal bonding and a durable repair. For extremely delicate repairs or specific materials, alternative adhesives such as wood glue or specialized super glue might also be viable options, depending on the requirements of your project.
A Fresh Coat: The Art of Layered Painting and Distressing
With all structural repairs diligently completed and the drawers now sound, they were perfectly prepared for their aesthetic transformation. Painting is arguably the most dramatic and impactful step in any upcycling project, as it allows you to completely redefine an item’s visual appeal and overall feel. Kelli wisely opted for a layered painting approach, a technique highly favored for its ability to create remarkable depth and achieve a popular distressed, vintage finish.
Choosing Your Color Palette: Bahama Sea and Beyond
Kelli began the painting process by applying a vibrant coat of Krylon Bahama Sea spray paint to the drawer. The selection of this initial color is critically important. “Bahama Sea” instantly conjures images of tranquil ocean waters, imbuing the piece with a serene sense of calm and a delightful touch of coastal charm. This bright blue served as an excellent base, providing a cheerful and unexpected undertone that would subtly peek through the subsequent layers. When selecting your base color, carefully consider the overall aesthetic you wish to achieve. Do you envision a bold, striking contrast, a soft, subtle hint of color, or a more harmonious monochromatic effect? Spray paint offers an incredibly smooth and even finish and is remarkably quick to apply, making it an ideal choice for projects featuring intricate details, such as these antique drawers.
The White Wash Effect: Achieving Depth and Dimension
Following the initial blue layer, Kelli then coated the entire drawer with a fresh layer of white spray paint. This layering technique is a cornerstone in the world of shabby chic and distressed furniture makeovers. Applying a lighter color, such as white, over a darker, more vibrant base creates a beautiful visual contrast, which becomes particularly striking once the distressing process begins. The white paint effectively softens the initial intensity of the Bahama Sea blue, lending the piece a more muted, aged, and subtly elegant appearance. This thoughtful method adds significant visual interest and a sense of depth that a single, flat coat of paint simply cannot achieve. Furthermore, this layered base provides the perfect, textured canvas for the next exciting stage of the makeover: purposeful distressing.
Essential Spray Painting Tips for DIY Projects
To ensure the best possible results when working with spray paint, always prioritize safety and preparation. Conduct your painting in a thoroughly well-ventilated area, ideally outdoors on a calm, windless day, or in a garage with open doors and proper airflow. Before applying any paint, prepare your surface meticulously by cleaning it thoroughly to remove any dirt or grease, and lightly sanding it if necessary (even after repairs) to create a mechanical bond for the paint. Apply several thin, even coats rather than attempting to apply one thick coat, as this prevents drips, runs, and ensures a consistently smooth finish. Always allow adequate drying time between coats, meticulously checking the manufacturer’s instructions for specific recoat times. While Kelli’s method worked beautifully for her desired distressed look, utilizing a primer beforehand can significantly enhance paint adhesion and ensure true color rendition, particularly when painting over darker or previously stained surfaces.
The Distressed Look: Sanding for Shabby Chic Appeal
Bringing Out the Beauty: The Magic of Purposeful Sanding
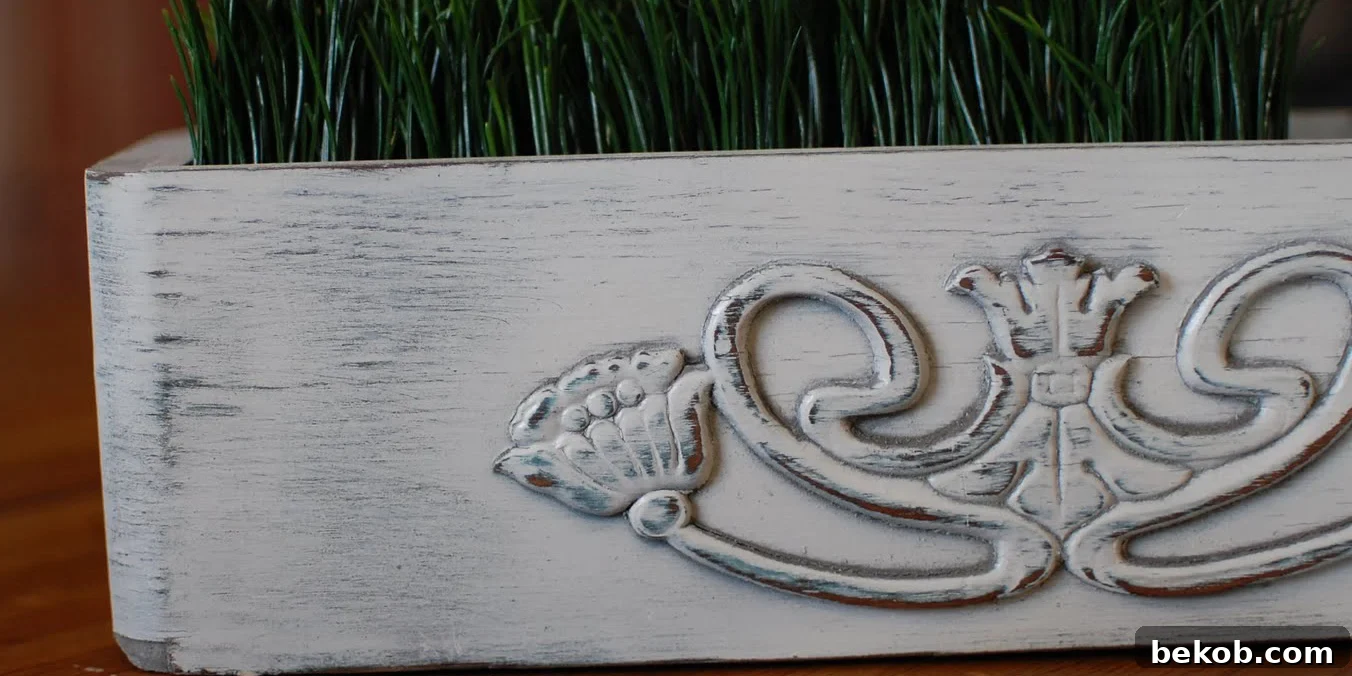
Once the layers of paint had thoroughly dried and cured, Kelli meticulously moved on to the critical step that truly defines the captivating “shabby chic” aesthetic: sanding. This process is far more than mere smoothing; it’s an artistic technique of selective material removal, thoughtfully designed to mimic the natural wear and tear that occurs over many decades of use. By lightly sanding specific areas of the drawer, Kelli was able to strategically expose subtle bits of the vibrant underlying Bahama Sea blue paint, as well as glimpses of the original wood beneath. This deliberate distressing technique masterfully highlights the drawer’s unique contours, intricate details, and carved embellishments, imbuing it with an aged, well-loved character. As Kelli proudly noted, “I love the little piece on the end that the Gorilla Glue helped me save.” The careful repair work, now subtly integrated into the distressed finish, became an integral part of the piece’s charming narrative, rather than an obvious flaw.
Techniques for Achieving a Perfectly Distressed Finish
Achieving the ideal distressed look requires a light, controlled touch and an intuitive understanding of where natural wear would authentically occur on such an item. Focus your sanding efforts primarily on edges, raised decorative areas, and corners – these are the spots that would typically experience the most friction, handling, and rubbing over time. For gentle distressing, opt for a fine-grit sandpaper (typically in the range of 180-220 grit). If you desire a more aggressive removal or a deeper worn effect, you can start with a slightly coarser grit, but always proceed with caution and assess your progress frequently. The ultimate goal is to reveal just enough of the underlying layers to create visual interest and character without making the piece appear damaged or carelessly altered. Kelli particularly loved “the {very subtle} bits of blue that you can see where I sanded off the white paint,” emphasizing that subtlety often yields the most elegant and believable distressed results.
Following the successful distressing, it is highly recommended to apply a protective topcoat. A clear matte or satin sealer, a quality finishing wax, or even a polycrylic can effectively shield your beautifully executed paint job from future wear, dirt accumulation, and moisture, ensuring your artfully repurposed drawer remains a cherished and durable item for many years to come. This crucial finishing step is especially important if the drawer will be placed in a high-traffic area or used to regularly hold or display items.
The Grand Finale: Creative Styling and Display
More Than Just a Drawer: Inspiring Ideas for What to Put Inside
With the painting and meticulous distressing processes triumphantly completed, the final and arguably most enjoyable step is deciding how to style and utilize your beautifully repurposed drawer. Kelli initially pondered, “Now I just have to decide what to put inside the drawer. I think some fake grass would be really cute and add a nice pop of green in the room.” This delightful thought quickly translated into action. She soon found some faux grass and artfully arranged it within the drawer, thereby ingeniously transforming it into a charming miniature planter or an eye-catching display box. “I’m loving it! What do you think?!” she enthusiastically shared, clearly delighted with the vibrant and refreshing outcome.
The creative possibilities for what to put inside your repurposed drawer are virtually limitless, allowing for complete personalization. Consider these diverse and imaginative ideas to inspire your own styling:
- Faux Plants or Succulents: Just as Kelli brilliantly demonstrated, artificial grass, lifelike succulents, or small silk flowers can introduce a vibrant touch of greenery and organic texture without the need for constant maintenance.
- Seasonal Decor: Easily adapt your drawer for different holidays or seasons by filling it with thematic items like miniature pumpkins and colorful leaves for autumn, festive pinecones and ornaments for winter, or delicate decorative eggs and spring blossoms for Easter.
- Craft Supplies Organizer: Utilize the compartments to neatly organize small craft items such as buttons, spools of thread, beads, or small tools, keeping them easily accessible and beautifully displayed.
- Elegant Jewelry Organizer: Line the interior with soft velvet or a complementary fabric and add small dividers or ring holders to create a luxurious and organized space for rings, earrings, and necklaces.
- Entryway Catch-all: Position the drawer on a console table or shelf near your front door to serve as a convenient and stylish receptacle for keys, incoming mail, loose change, or other small everyday essentials.
- Charming Bathroom Storage: Ideal for storing guest towels, artisanal soaps, small lotions, or decorative bath bombs, particularly in a bathroom designed with a shabby chic or farmhouse aesthetic.
- Unique Wall-Mounted Display Shelf: Securely attach the drawer to a wall as an unconventional and captivating shelf for displaying small keepsakes, cherished photographs, miniature collectibles, or air plants.
- Decorative Fillers: Employ aesthetically pleasing fillers such as polished river stones, glass decorative beads, fragrant potpourri, collected seashells, or even a stack of small, vintage-inspired books.
Seamlessly Integrating Repurposed Drawers into Your Home Decor
A single repurposed drawer can function as a captivating focal point on a mantelpiece, a bookshelf, a console table, or a coffee table, instantly drawing the eye. If you are fortunate enough to acquire multiple drawers, the creative possibilities expand even further for grander displays. Consider stacking them artfully, perhaps varying their orientation, to construct a unique, small shelving unit or bedside table. Alternatively, mount several drawers onto a wall in a thoughtfully arranged grid or staggered pattern to create a distinctive gallery of small display boxes, perfect for showcasing tiny treasures. The potential uses are truly limited only by your imagination and the available space within your home. The charming distressed finish and unique antique details inherent in these drawers make them exceptionally versatile for various interior design styles, effortlessly enhancing farmhouse, rustic, bohemian, eclectic, or even subtly modern decor schemes.
Why Upcycle? The Profound Benefits of Creative Reuse
Kelli’s inspiring project beautifully encapsulates the numerous compelling reasons why upcycling has become such a widely embraced and beloved practice among homeowners and DIY enthusiasts alike:
- Environmental Responsibility: By consciously choosing to reuse existing items, we significantly divert them from entering landfills, thereby reducing waste and minimizing our collective ecological footprint.
- Unique & Personalized Decor: Upcycled pieces are inherently one-of-a-kind. Each item possesses its own unique story and character, adding a distinct level of individuality and personality to your home that mass-produced items simply cannot replicate.
- Cost-Effective Solutions: More often than not, the financial cost of materials required for an upcycling project is substantially less than the expense of purchasing new, comparable decorative items.
- Therapeutic & Creative Outlet: The hands-on process of transforming an old, forgotten object into something beautiful and functional can be an incredibly satisfying and deeply therapeutic experience, serving as a wonderful means to express your personal creativity.
- Preserving History and Craftsmanship: Giving new life and purpose to vintage items is a profound way to honor their past, celebrate traditional craftsmanship, and ensure that their beauty and utility continue to be appreciated by new generations.
Concluding Thoughts: A Masterpiece of Repurposing and Inspiration
I love the detail, and I love the creativity
to see these as a decorator’s item!
Great Job! What do you all think?
Kelli’s antique sewing machine drawer makeover stands as a shining example of how a clear vision, a touch of ingenuity, and a few diligent DIY steps can utterly transform forgotten pieces into treasured home decor. From the initial thrill of rescuing the drawers from a closing resale store to the careful process of repairing their intricate details, applying a beautiful layered paint finish, and finally styling them with creative flair, every stage in this project culminates in a truly charming and inspiring outcome. The subtle peek of blue paint through the distressed white finish, harmoniously combined with the vibrant, fresh faux grass, creates a delightful blend of vintage elegance and a contemporary, natural appeal.
This project serves as a wonderful source of inspiration for anyone looking to infuse their home with unique character and a deeply personal touch. Do not be intimidated or afraid to seek out unusual items at local thrift stores, bustling flea markets, or quaint antique shops. With just a little imagination, the right techniques, and a willingness to experiment, you too can create stunning, one-of-a-kind pieces that perfectly reflect your unique style and tell their own beautiful, evolving story. What forgotten treasures will you be inspired to bring back to life next?