Materials and the sequence of the job sit together on this page.
Submitted by At The Picket Fence
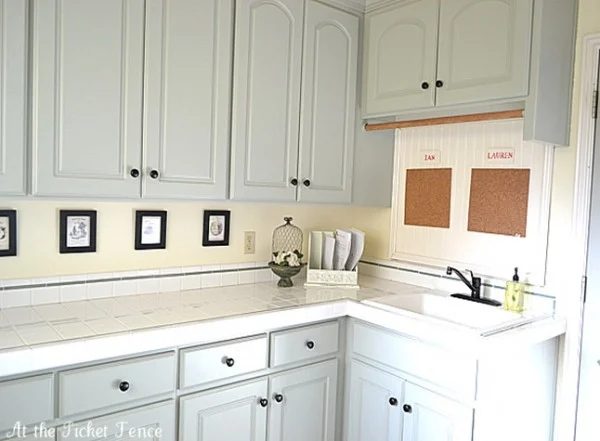
First things first…can we just all agree that as long as it ends up as the dumping ground for all things “muddy” it can be declared a “Mudroom“? Although, considering I live in the Pacific NW, any room in my house could technically be considered the Mudroom! Nonetheless, I am so grateful for this space which holds most of the mud. It is also our laundry room and is the first actual laundry room I ever had. My previous ones included a space in the garage in our first home and a little closet with bi-fold doors in the family room of our last house. Our current Mud/Laundry room is just down the hallway off of our entry and leads to the garage. It is also the ONLY room which we didn’t paint when we moved in. Why? Don’t ask me! The only reason I can come up with is that I wasn’t totally sure what color I would want and then it ended up being so challenging to tackle considering how often we are in and out of this room every day. But, with the New Year came New Resolve to get ‘er done! So, for your viewing pleasure and without further ado, here are a couple of Before photos: Thankfully, this room gave me lots to work with. Great storage and I have always loved the color of the cabinets in this soft, muddy green. Slate floors are well fitted for a room that sees so much traffic. And having a sink in here is like the icing on the cake. But, it was pretty blah. Not any more!!!Welcome to my newly improved Mudroom! I am very proud to say that I did 99.9% of this project myself! Painting (soft, pale yellow), installing chair rail, installing bead board and more painting.And, I just love it!
As you can see in the below pics, I already had the sweet little bench with baskets to store the Rascals shoes. But the fresh paint and bead board make such a huge difference!
The Bead Board Bulletin Board (say that 5 times fast!) was completed last September but the fresh paint and extra touches just make it feel new all over again!
It always amazes me how a direct can of Spray Paint can make such a huge difference! In order to keep costs down I gave the existing faucet several coats in an Oiled Bronze. Now, for the “laundry” side of the room. Yes, I know, our washer and dryer are ancient. But they just won’t break! A girl can hope right? Here is another angle which is coming in from the garage. direct Oiled Bronze hooks take the place of one crooked, rickety coat rack. The bench cushions were merely flipped over for a fresh new look! The biggest challenge in this space (and where I needed my sweet hubby’s help the most…love ya honey!) was this rounded corner wall you see below. It became the proverbial trying to fit a square peg in a round hole. The problem was solved when I found little trim molding which was curved on the inside and fit perfectly along the edges.Oh, and A LOT of caulk was used too! I just couldn’t bring myself to buy all new cabinet hardware… …so they received a few coats of Oiled Bronze spray paint too! I also knew I wanted a chalkboard in here (and yes, I am the last person on the planet to make a chalkboard!) but I was really trying to keep this a low-modest-cost project. So, I dug around under our bed and along with a bunch of dust bunnies I found this old framed painting. Popped out the glass and the “painting” and gave the frame a nice new chippy finish. A scrap of wood from the garage cut to size and a few coats of Chalkboard paint finished it off! Ok! Ok!! Don’t all yell at me at once! I do realize that my scrap piece of wood had too much grain showing in it which then came through on the chalkboard but give a girl some credit for trying, huh?!! This soft roman-shade-ish window treatment was made using leftover fabric from my daughter’s room. Sweet little vintage prints found in a second-hand store bring in some character. And I framed this painting which used to hang on the wall of my Great-Grandmother’s home. Now I see it every day when I leave the house and I love the connection it gives me to her. She made the best biscuits EVER! And Heather and I used to play outside in her front yard and make mud pies which we would then try to sell to our unsuspecting but totally indulging family members! There is a picture of us doing that somewhere…hmmm.. The colors of this rug are just well fitted in here and hide everything! My go-to little bucket had some life added to it by way of a Begonia and I couldn’t resist bringing in a touch of Valentine’s Day in here with this little caddy filled with goodies. Well, there you have it folks, my completed Mudroom Makeover.Time to bring back the “stuff” of life so that this room can get to work! Until next time, thanks so much for joining me at the Fence!