Materials and the sequence of the job sit together on this page.
Submitted by Maxwell House Interiors
Ballard Designs is my go-to catalog! I get so excited to see it in the mailbox. After the kids go to bed, I sit down on the couch to read it. Flipping through the pages of the catalog, I look at each and every detail. My only purchase to date is a monogrammed “M” throw pillow. It was on sale and I had a coupon. That’s pretty much the only way I would consider shopping there. Their prices are high!
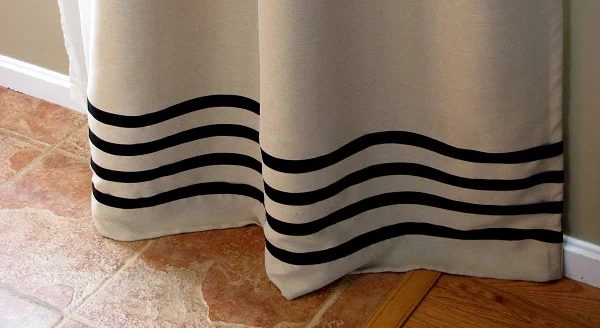
The Deux Ribbon Linen Drapes were featured in the Ballard Designs catalog last Spring:
The drapes were $89 for each 108″ panel. Our bay window has two panels. I had just finished painting my dining room (and adjoining living room) Universal Khaki by Sherwin Williams but the current curtain panels were so similar in color. I needed something to break them up. It had to be something fairly straightforward because my sewing machine lives in the basement and has never been used. After obsessing about them for a few days, I thought, curtain and ribbon…how hard could this be?
Here are steps you can take to make knock-off Ballard Designs panels:
Start by laying out your curtain panel (my panels are 108″ light blocking and 100% polyester). You could also use a cotton/linen blend. Because of the weight of the curtain, you won’t need to iron out any wrinkles.
Ballard’s bottom stripe starts out higher than mine. I chose my placement for a very important reason. I would rather pay $89 for each panel than to measure out the lines and make sure they are even. The thought of it gives me a headache! The easiest solution is to place no-sew tape right above the hem line on the bottom of the curtain (if you look real close you can see the thread line on mine) and iron it down.
Next, take masking tape (frog tape would also work) and tape right above the no-sew tape. I left a 2″ overhang of tape on each side so the panel was essentially taped to the table while I was working. This was much easier because it wasn’t shifting.
Now, lay another strip of no-sew tape above the masking tape and carefully iron it down (I tried not to run the iron directly over the masking tape). Next, pull up the masking tape. Use the same piece (it should still be sticky) and place it above the second strip of no-sew tape. Give the first two strips a quick ironing once the masking tape is out of the way to make sure they are attached securely. From there, the third strip of no-sew can be ironed down above the tape.
Once the tape is removed and placed above the third strip of no-sew, the final stripe can be ironed down (I chose four stripes using 1″ black satiny ribbon). The possibilities are endless – quantities of stripes, ribbon color and size of ribbon. You can customize your colors and quantities as you wish.
Here comes the fun part! Concentrate on one stripe at a time. Pull the paper backing from the no-sew tape and lay the ribbon over the translucent tape residue. It is really straightforward to eyeball whether or not it is straight. Just run the iron along the strip of ribbon while concentrating on a few inches at a time. Continue with all four (or how ever many you choose) stripes.
I left a 1″ overhang of ribbon on each side of the curtain. When all of the stripes on the front are ironed down and secure, flip the panel over and use a small tab of no-sew on the back to give it a nice finished look.
This may appear to be more work than it is. Both panels were completed within an hour. I’ve been living with them now for six months and couldn’t be happier with the results. Already having the curtain panels, tape, ribbon and no-sew on hand, this project was a lot of bang for $0 bucks. I saved $178!
If you purchased all of the required materials, you could still save a significant amount of money.
These panels are no longer sold at Ballard Designs. Glad I keep my back-issues of the catalog so I could share this copycat project! Please let me know if you have any questions!