
Transform Your Windows: A DIY Guide to Beautiful Faux Roman Shades (No-Sew Option!)
Embarking on a new DIY project always brings a mix of excitement and a touch of nervousness, especially when it involves sharing a personal design choice that diverges from popular opinion. Just recently, I reached out to our amazing community, asking for input on fabric choices for an upcoming window treatment project. The response was overwhelming, and nearly every single person championed a particular printed fabric. You can see the discussion here, where I playfully pinned up the options.
Despite the unanimous love for that sweet little print, sometimes a creative heart simply has to follow its own path. So, less than an hour after posting that poll, I made my decision and began working with the crisp white fabric instead. Forgive me, dear readers, but a designer’s intuition often calls for a bold leap of faith! This choice wasn’t a rejection of the beautiful print, however; rest assured, that charming fabric is eagerly awaiting its turn to shine in my craft room makeover. So, keep an eye out for that future reveal!
Why Faux Roman Shades Are a Home Decor Game-Changer
While the concept of DIY window treatments might seem well-trodden in the blogosphere, the beauty of a faux Roman shade project lies in its timeless appeal, incredible versatility, and remarkable ease. I’ve been creating my own window solutions since 2005, even before I knew what a “blog” was, as seen in this retro remodel project. So, rest assured, this isn’t just a copy-cat endeavor; it’s a testament to a classic, effective, and budget-friendly design trick.
Faux Roman shades offer a fantastic solution for adding a touch of elegance and softness to any room without the complexity of functional blinds. They are particularly brilliant for windows where you already have existing functional blinds – like the 2-inch faux wood blinds found throughout our home. These blinds are perfectly new and functional, and I certainly didn’t want to replace them. However, sometimes you just want to soften the stark lines of blinds or conceal them entirely for a more polished aesthetic. This project allows you to do exactly that, transforming your window’s appearance instantly.
Before & After: Witnessing the Transformation
Step-by-Step Tutorial: Crafting Your Own Faux Roman Shades
Ready to give your windows a fresh, stylish update? Follow these straightforward instructions to create your own beautiful faux Roman shades. The best part? This project is incredibly adaptable and can be completed with or without a sewing machine!
Gather Your Essential Supplies:
- Fabric: Choose a medium-weight drapery fabric that complements your room’s decor. Consider patterns or solids, depending on your desired look.
- Ribbon (if desired): For added decorative detail or contrasting trim.
- Heat Bond Adhesive Strip (e.g., Stitch Witchery): An essential for the no-sew option, allowing you to create clean, durable hems with just an iron.
- Velcro (adhesive backing recommended): For securely attaching your fabric shade to the mounting board.
- 1×2 Pine Board: This will serve as the mounting base for your shade. Its length should be slightly wider than your window frame.
- Measuring Tape or Ruler: Precision is key for a professional finish.
- Iron & Ironing Board: Crucial for pressing seams and activating the heat bond adhesive.
- Tools for Installation: A drill and screws, or small “L” brackets, for mounting the pine board above your window.
Step 1: Precise Measurements and Board Preparation
Begin by carefully measuring the width of your window. Decide how wide you want your finished faux Roman shade to be – typically extending a few inches beyond each side of the window frame for a fuller look. Cut your 1×2 pine board to this desired finished width. This board will be the foundation from which your shade hangs.
Next, determine the finished length for your shade. Since these are “faux” Roman shades, they don’t operate, meaning they don’t need to reach the windowsill or floor. They are purely decorative, designed to cover the top portion of your window and create the illusion of sophisticated folds. A good starting point is to have them hang about 12-24 inches down, depending on your window’s height and desired aesthetic. Remember, the goal is to add a stylish touch without obstructing light or the function of existing blinds.
Step 2: Fabric Preparation and Finishing Edges
Now, it’s time to prepare your fabric. Cut your chosen fabric to the following dimensions:
- Width: Take your desired finished shade width and add at least 2 inches for side hems (1 inch on each side).
- Length: Take your desired finished shade length and add at least 8.5 to 9 inches. This extra length accounts for the top attachment, the bottom hem, and the allowances needed to create the “faux” folds.
To achieve a clean and professional look, you’ll need to finish all four edges of your fabric. For the top and two side edges, fold the fabric over by 1/2 inch, press firmly with your iron, then fold it over by another 1/2 inch. Secure this double-folded hem either by sewing a straight stitch along the inner edge or by using your heat bond adhesive strip. If using heat bond, simply place the strip inside the second fold and press with a hot iron according to the product’s instructions. This creates a neat, durable seam.
For the bottom edge, fold the fabric over by 1/2 inch and press, then fold it over by a more generous 3 inches. This wider hem provides some weight to the bottom of the shade and helps it hang nicely. Again, secure this hem with a straight stitch or by using heat bond adhesive, ensuring a strong bond across the entire width.
Step 3: Creating the Roman Fold Effect
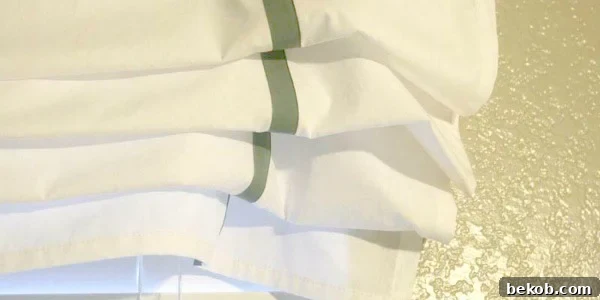
This is where the “faux” magic happens! While these shades don’t literally fold up and down, we create the *illusion* of soft Roman folds. Lay your finished fabric flat, right side down. From the bottom edge of your fabric (above the 3-inch hem), measure up your desired “fold” depth. A common depth is 6-8 inches. Mark this line. Fold the fabric up along this line, pressing firmly. This will be your first faux fold.
Repeat this process, measuring up the same “fold” depth from the top edge of your newly created fold, and fold the fabric down. Continue creating these alternating up and down folds, pressing each one crisply, until you have 2-3 prominent “folds” that give the shade its Roman blind appearance. You can secure the edges of these folds temporarily with pins, or for a more permanent hold, a few dabs of fabric glue or small stitches on the sides will keep them in place. The tutorial images below illustrate this folding process beautifully.
Step 4: Attaching Fabric to the Board
Once your folds are established, take the loop (soft) side of your adhesive-backed Velcro and attach it neatly along the front edge of your 1×2 pine board. Ensure it’s straight and firmly pressed into place. Next, take the hook (rough) side of the Velcro and apply it along the very top edge of the back of your fabric shade (the side that will be facing the window). Carefully align the Velcro on the fabric with the Velcro on the board, pressing firmly to secure the fabric to the board. This attachment method makes it easy to remove the shade for cleaning if needed.
Step 5: Installation: Hanging Your New Shades
With your fabric securely attached to the pine board, it’s time to install your beautiful new faux Roman shade. Position the board above your window frame. You can either screw the board directly into the wall studs above the window, ensuring it’s level, or use small “L” brackets for support. If using L-brackets, attach them to the wall first, then screw the board onto the brackets from underneath or from the side. Always use appropriate wall anchors if screwing into drywall without a stud. Once installed, step back and admire your handiwork!
Final Touches and Enjoying Your Stylish Space
I’m thrilled to report that going with the white fabric was absolutely the right decision for this space. It provides a clean, serene backdrop that enhances the room without competing with other elements. The subtle texture of the fabric adds warmth, and the tailored folds create an air of understated sophistication. It perfectly balances the functionality of the existing blinds with a much-needed aesthetic upgrade.
This DIY faux Roman shade project is an excellent way to add a custom, high-end look to your home without the high-end cost or the need for advanced sewing skills. It’s a testament to how simple fabric and a little creativity can drastically change the ambiance of a room. We encourage you to try this project yourself and discover the satisfying impact of a personalized window treatment!
About Remodelaholic
Remodelaholic is the creative hub of Cassity and Justin. With Cassity holding a degree in interior design and Justin as a skilled landscape architect, our passion revolves around every detail that crafts a beautiful and functional HOME! We are dedicated to sharing a wealth of home remodeling ideas, insightful tutorials, and exciting projects we constantly undertake. From ambitious kitchen renovations to charming small bathroom remodels, there’s hardly a home improvement challenge we won’t eagerly tackle (at least once!). Currently, we’re immersed in our third whole-home renovation, promising a continuous stream of fresh inspiration headed your way. We sincerely hope you’ll make Remodelaholic a frequent stop for daily doses of home design inspiration, practical DIY tutorials, expert interior design tips, delightful recipes, and glimpses into our family life. Join our journey as we transform spaces and share our love for all things home!