
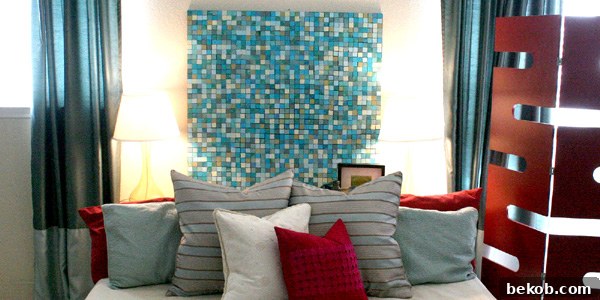
Create Stunning Pottery Barn Inspired Mosaic Art on a Budget
Are you yearning for that coveted high-end home decor aesthetic but find your budget pushing back? Look no further! Today, we’re diving into a captivating DIY project that allows you to craft magnificent mosaic wall art, reminiscent of pieces you’d find in a Pottery Barn catalog, without breaking the bank. This comprehensive tutorial will guide you through creating a bespoke piece that perfectly complements your home’s unique style, proving that luxury and creativity can indeed go hand-in-hand.
Imagine transforming a blank wall into a focal point with a custom-made art piece that speaks volumes about your taste. This isn’t just a craft; it’s an opportunity to inject personality and sophistication into your living space. We’ll show you how to achieve a visually striking mosaic using simple, accessible materials and straightforward techniques. Get ready to unleash your inner artist and decorate your home with pride, creating an affordable wall art solution that looks anything but inexpensive.
The Inspiration: Bringing High-End Design Home with DIY
My journey into this project began, as many great DIY endeavors do, with a browse through my favorite home decor catalog. I stumbled upon a stunning mosaic art piece that immediately captured my imagination. Its intricate pattern, rich texture, and elegant presence screamed “designer quality.” However, the price tag was, predictably, less appealing and certainly not within my budget for a single wall accent.
That spark of inspiration quickly ignited a determination: why buy when you can create? I challenged myself to deconstruct the look, understand its essence, and devise a method to replicate it using readily available materials. The goal was to achieve that sophisticated, custom feel without the hefty investment. And guess what? It’s entirely possible, and now I’m excited to share my foolproof technique so you can enjoy the same satisfaction and beautiful results in your own home. This project isn’t just about saving money; it’s about the joy of crafting something truly unique and personal, making it a perfect addition to your home decor crafts collection.
Gather Your Essential Supplies for DIY Mosaic Magic
Before we embark on this creative journey, let’s ensure you have all the necessary tools and materials. Choosing the right supplies is crucial for achieving a professional finish and a durable piece of art. This budget-friendly decor project relies on simple items you might already have or can easily acquire. Here’s a comprehensive list:
- Paper Cutter: A sturdy paper cutter will be your best friend for this project, ensuring crisp, straight lines for your mosaic “tiles.” While scissors can work for smaller pieces, a cutter vastly improves efficiency and precision, especially when creating a large scale wall art piece. The consistency of cut pieces is key for a polished look.
- Scrapbook Paper: This is where your personal style truly shines! Select scrapbook paper in a variety of colors, patterns, and even textures that perfectly align with your existing home decor. Consider a palette of complementary shades for a harmonious look, or go bold with contrasting hues for a more dramatic effect. Opt for good quality paper that won’t easily tear or bleed.
- Paint (for background): A good quality acrylic or latex paint in your chosen background color. I opted for a classic black, which provides a dramatic contrast and makes the paper colors pop, giving it a sophisticated, gallery-like feel. However, feel free to experiment with whites, grays, or even a deep navy to match your specific aesthetic. This base layer prepares your canvas and ensures a consistent foundation for your mosaic, acting as the ‘grout’ lines.
- Paper Glue: A reliable craft glue specifically designed for paper is essential for adhering your cut paper pieces securely to the board. Look for one that dries clear and offers a strong, permanent bond. White school glue (like Elmer’s) can also work effectively; just ensure it’s applied evenly and sparingly to avoid saturating the paper.
- Mod Podge (Matte or Gloss Finish): This all-in-one glue, sealer, and finish is indispensable for protecting your scrapbook paper art. It will seal your mosaic, provide a uniform finish, and ensure longevity against dust and moisture. You can choose between a matte finish for a subtle, understated look or a gloss finish for a vibrant, reflective sheen that enhances color. Apply several thin coats for optimal protection and a smooth surface.
- Piece of Wood or Art Canvas: This will serve as the sturdy foundation for your mosaic.
- Material Options: Inexpensive materials like MDF (Medium-Density Fiberboard) or OSB (Oriented Strand Board) are excellent choices for a robust art board project. They are readily available, cost-effective, and provide a smooth surface for adhesion. You can also use a pre-stretched art canvas for a lighter-weight option, though wood tends to offer a more substantial and durable feel, especially for larger pieces.
- Custom Dimensions: One of the greatest advantages of DIY mosaic art is customization! Determine the desired dimensions for your art piece. Do you want a subtle accent, or a grand statement piece to fill a large wall? Many hardware stores, such as Home Depot and Lowe’s, offer convenient cutting services for larger 4×8 foot boards, making it easy to get your chosen material cut to your exact specifications. They also often stock smaller, pre-cut 2’x4′ pieces, usually found on endcaps, which are perfect for medium-sized projects. For a significant statement piece that truly commands attention, I personally chose a 3’x3′ dimension. Think about the scale of your room and the visual impact you want to create when deciding on your MDF art board project size.
Having all your supplies ready before you start will streamline the process and allow you to focus purely on the creative aspects of making your stunning mosaic art, making for a smooth and enjoyable crafting experience.
Step-by-Step Guide: Crafting Your Custom Mosaic Art
Now that your supplies are gathered, let’s bring your vision to life. This process for creating your DIY mosaic art is rewarding and designed for crafters of all skill levels. Follow these detailed steps to create your custom mosaic art, perfect for any room in your home:
Step 1: Prepare Your Art Board
Begin by ensuring your wood or canvas board is clean and smooth. If using wood, lightly sand any rough edges or surfaces with fine-grit sandpaper for a professional finish, then wipe away any dust. Next, apply one to two coats of your chosen background paint to the entire surface of the board. Allow ample drying time between coats, typically 1-2 hours, depending on the paint type and humidity. This painted background will serve as the “grout” lines for your mosaic, so choose a color that will beautifully frame your paper pieces and enhance their vibrancy. A dark color like black or deep gray offers a dramatic contrast, while a lighter shade can create a softer, more subtle effect. Ensure the paint is completely dry before moving to the next step.
Step 2: Cut Your Scrapbook Paper “Tiles”
This is where the magic begins and your scrapbook paper art truly takes shape! Using your paper cutter, cut your scrapbook paper into uniform squares of your desired size. Common sizes include 1×1 inch, 1.5×1.5 inch, or even 2×2 inch squares. Experiment with different sizes – larger squares can create a bolder, more graphic look and significantly reduce cutting and gluing time, as noted by Rose’s project below! Smaller squares, conversely, allow for finer detail and a more traditional mosaic appearance. You can also mix sizes for a dynamic effect, perhaps using larger squares for the main design and smaller ones for borders. Cut a generous amount of squares in each of your chosen paper designs and colors. The key is consistency in size for a cohesive mosaic. If you want to add an extra layer of design, consider cutting some squares into rectangles or even triangles to introduce varied geometric patterns.
Step 3: Plan Your Mosaic Layout
Before you commit with glue, it’s highly recommended to dry-lay out your paper squares on the painted board. This allows you to experiment with different patterns, color arrangements, and densities. Try grouping similar colors, creating gradients, or alternating patterns for visual interest. Leave a small, consistent gap between each square – this gap will reveal your painted background, mimicking traditional grout lines. Use a ruler or spacers if needed to ensure even spacing. Stand back and observe your layout from a distance. Are there any areas that feel too crowded or too sparse? Does the color balance feel right? This planning stage is crucial for ensuring a harmonious and aesthetically pleasing final piece. Take a photo of your preferred layout with your phone for easy reference before you start gluing.
Step 4: Adhere Your Paper Squares
Working in small sections (e.g., a 6×6 inch area at a time) to prevent the glue from drying too quickly, begin to glue your paper squares onto the board, following your planned layout. Apply a thin, even layer of paper glue to the back of each square. Position the square carefully, maintaining consistent spacing from its neighbors. Press firmly with your fingers or a clean cloth to ensure good adhesion, removing any excess glue that might seep out immediately with a damp cloth or cotton swab. A craft stick or an old credit card can be useful for smoothing down the squares and ensuring they are perfectly flat without ripples. Take your time with this step, as precision here will lead to a much cleaner and professional-looking mosaic. If you notice a square isn’t perfectly aligned, you usually have a few seconds to gently reposition it before the glue sets.
Step 5: Seal Your Mosaic with Mod Podge
Once all your paper squares are glued down and the paper glue has completely dried (this typically takes a few hours, depending on humidity and glue thickness), it’s time to seal your artwork with Mod Podge. Using a clean, soft brush or a foam applicator, apply a thin, even layer of Mod Podge over the entire surface of your mosaic, including over the paper squares and into the “grout” lines. Ensure full coverage, but avoid applying it too thickly, as this can lead to streaks or bubbling. Allow this first coat to dry completely – Mod Podge usually dries clear in about 15-20 minutes, but check for tackiness before proceeding. Apply a second and, if desired, a third thin coat, allowing each to dry fully between applications. Multiple thin coats provide better protection and a smoother, more durable finish than one thick coat. This step not only protects your paper from moisture and dust but also unifies the surface, giving it that professional, finished Mod Podge art project look.
Step 6: Final Touches and Display
Once your final coat of Mod Podge has thoroughly cured (this can take up to 24-72 hours for a full, hard cure, depending on conditions), your stunning DIY mosaic art is ready for display! Inspect your piece for any missed spots or imperfections. If desired, you can add hanging hardware to the back of your wooden board. For canvas, a simple sawtooth hanger or picture wire will suffice. Step back and admire your handiwork – you’ve just created a custom, high-impact piece of art that rivals expensive store-bought decor. Position it in a prominent place in your home where it can be appreciated, whether above a sofa, in an entryway, or as a vibrant accent in a bedroom. This easy mosaic tutorial culminates in a beautiful, personalized piece that will surely draw compliments.
There you have it – an achievable, rewarding art project that results in a magnificent, custom-made piece tailored to any decor. The possibilities for color, pattern, and size are truly endless, making each creation uniquely yours.
Creative Freedom and Personalization for Your Mosaic
This easy mosaic tutorial offers unparalleled opportunities for personalization, allowing you to truly make the piece your own. Don’t feel confined to perfect squares! Experiment with different geometric shapes like rectangles, triangles, or even hexagons for a more intricate pattern. Consider using patterned scrapbook paper for some squares and solid colors for others to create depth and visual intrigue. You can also vary the spacing between your “tiles” – wider gaps will emphasize the background color, while narrower gaps will create a denser, more unified mosaic.
Think about the overall mood you want to convey with your custom home decor. Bright, vibrant papers can create an energetic and playful piece, perfect for a child’s room, a creative studio, or a lively kitchen. Muted tones and sophisticated patterns can result in an elegant, serene artwork ideal for a living room, master bedroom, or a quiet study. The beauty of this DIY project lies in its flexibility; you are the designer, and your home is your gallery. This is your chance to experiment with different textures and finishes of scrapbook paper to add another dimension to your mosaic.
Showcasing Community Creativity: Rose’s Mosaic Masterpiece
Since sharing this mosaic art project, the response from fellow DIY enthusiasts has been incredible! It’s truly inspiring to see how others have adapted and personalized this tutorial, showcasing the versatility of scrapbook paper art. I was particularly thrilled to receive a submission from Rose, who created her own version using 2×2 inch squares. Her project beautifully demonstrates how adjusting the size of your paper tiles can impact the final look and, notably, save a significant amount of time during the cutting and gluing phases!
Rose’s choice of larger squares not only streamlined the process but also resulted in a striking, bolder mosaic that perfectly suited her space. Her project is a fantastic example of the versatility of this technique for achieving large scale wall art. It looks absolutely fantastic, and I bet that larger scale made the whole process much quicker and just as rewarding!
Conclusion: Your Dream Decor, DIY Style
Transforming your home with custom art doesn’t have to be a costly affair. This Pottery Barn inspired mosaic art tutorial empowers you to create breathtaking wall decor that is both budget-friendly and deeply personal. From selecting your perfect color palette to meticulously arranging each paper square, every step of this DIY journey is an opportunity for creative expression and a rewarding experience.
You’ve now learned how to create a visually stunning piece that reflects your unique taste and enhances any room, whether you’re aiming for modern minimalism or eclectic charm. Whether you choose to replicate the exact style of a high-end catalog piece or put your own inventive spin on it, the satisfaction of displaying your handmade mosaic is immense. So gather your supplies, ignite your creativity, and start crafting your next favorite home accent today – an affordable wall art masterpiece awaits!