
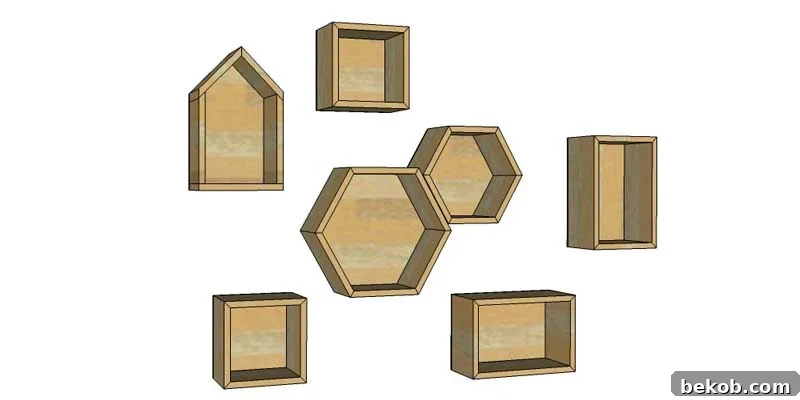
Next up in Deck The Walls: discover how to build simple and versatile geometric shelves. We’re not just showing you one design, but five distinct shapes to elevate your home decor!
Hello again! It’s Amy from Hertoolbelt, and I’m thrilled to share another fantastic DIY build plan with you. Geometric display shelves, particularly the ever-popular hexagon, have become a staple in modern wall decor and gallery wall arrangements. These trends combine beautifully to create dynamic and eye-catching displays. Why settle for just one type of shelving when you can craft a diverse collection of geometric shapes and sizes to personalize your space?
This comprehensive building plan provides detailed instructions for creating **five distinct display box shapes:** the classic hexagon, charming house, practical square, elegant rectangular, and modern triangle. These DIY geometric shelves are not only simple to construct as designed but also remarkably easy to customize. You can effortlessly adjust their height or depth to suit your specific needs and decor vision. Add an optional plywood back for a shadow box effect, or leave it open for a minimalist look. Embrace the natural beauty of the wood, or unleash your creativity with a coat of stain or paint to match your interior. Arrange a series of identical shapes for a cohesive display, or mix and match various shapes and sizes to craft a truly unique gallery wall. Whether mounted on the wall or artfully placed on a shelf or tabletop, these small but mighty shelves offer endless possibilities for stylish organization and decoration. They are an easy yet incredibly versatile woodworking project for anyone looking to add a touch of modern flair to their home!
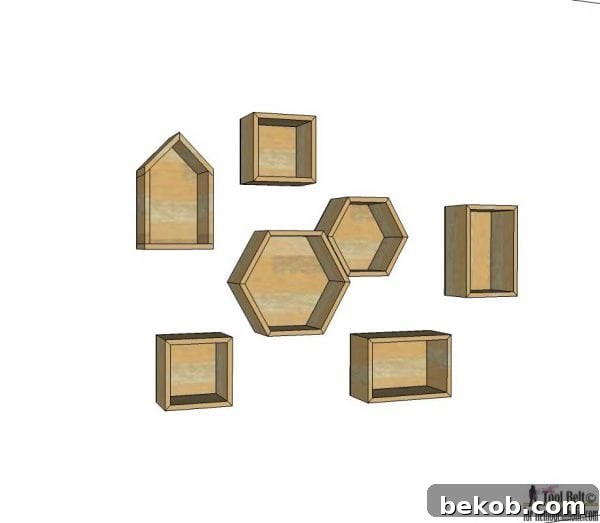
How to Build Your Own Modern Geometric Display Shelves
Building these geometric display shelves is a rewarding project that even novice woodworkers can tackle with confidence. With straightforward plans and common tools, you’ll be able to create stunning wall decor that reflects your personal style. Before diving into the specific shapes, let’s gather all the necessary materials and tools.
Materials You’ll Need
- 1″x 6″ Boards: These are the primary building blocks for your shelves. The actual dimensions are typically 3/4″ thick by 5 1/2″ wide. The total quantity will depend on how many shelves you plan to build and their specific dimensions. Always buy a little extra to account for miscuts or knots.
- 5 mm Underlayment Plywood: An optional but highly recommended material if you wish to add a solid back to your geometric shelves, transforming them into shadow boxes. A full or half sheet will suffice for multiple shelves.
- 1 1/2″ Brad Nails: Essential for strong joins in the main frame of your shelves. These provide excellent holding power without splitting the wood.
- 3/4″ Brad Nails: Used for attaching the optional plywood backing securely to the shelf frame.
- Wood Glue: Crucial for reinforcing all mitered joints, providing a durable bond that will last for years. Don’t skip this step!
- Sandpaper: Various grits (e.g., 80, 120-150, 220) for smoothing rough edges, preparing the surface for finishing, and achieving a professional look.
- Wood Filler: To fill any nail holes, minor gaps, or imperfections, creating a seamless surface.
- Picture Hangers: For easily mounting your completed shelves securely to the wall. Choose a style appropriate for the weight of your finished shelf and its contents.
- Paint/Stain: As desired, to customize the appearance of your shelves. Consider your existing decor, or experiment with bold colors for a pop of contrast.
Recommended Tools
- Compound Miter Saw: This tool is indispensable for making accurate and clean miter cuts at various angles, which are fundamental to creating geometric shapes.
- Brad Nailer: While you can use a hammer and nails, a brad nailer (pneumatic or cordless) significantly speeds up assembly and makes for a cleaner finish.
- Tape Measure & Pencil: For precise measurements and marking cuts.
- Safety Glasses & Hearing Protection: Always prioritize safety when working with power tools.
- Strap Clamp (or Ratcheting Tie Down Strap): Highly recommended for holding mitered joints tightly together during glue-up and nailing, ensuring square and strong assemblies.
- Jigsaw or Circular Saw: For cutting out the plywood backs if you choose to add them.
Building Your Hexagon Shelf – Small Version
Hexagon shelves are incredibly popular for their unique, honeycomb-like appearance, perfect for creating stylish wall art. This small version is ideal for displaying smaller trinkets or as part of a larger geometric arrangement.
Small Hexagon Cut List
- 6 pieces: 3/4″ x 5 1/2″ x 7″ long. Each end of these pieces will require a 60-degree miter cut, ensuring they fit together perfectly to form the hexagon.
- Optional Plywood Backing: 3/16″ x 14″ x 12 1/8″ plywood. This piece will be cut to the exact hexagon shape.
Pro Tip for Customization: The beauty of DIY lies in customization! You can easily modify the size of your hexagon shelf by simply changing the 7″ length to your desired measurement. Just remember that all six pieces must be identical in length to maintain the hexagonal symmetry.
Assembly Instructions for the Small Hexagon Shelf:
The most efficient way to achieve accurate cuts for your hexagon is with a compound miter saw. Set your saw’s bevel (head tilt) to 30 degrees. You will then cut six identical pieces of 1×6 board, each 7″ long, with precise 60-degree miter cuts on both ends. Ensure these cuts are angled inward so the pieces can form the hexagon. Once your pieces are cut, apply a generous amount of wood glue to each mitered end. Carefully assemble the hexagon shape, fitting each joint snugly. To secure the structure, nail the hexagon together using 1 1/2″ brad nails. A strap clamp or a ratcheting tie-down strap can be incredibly helpful at this stage to hold the hexagon firmly while you glue and nail, preventing gaps and ensuring a tight, strong assembly.
Adding the Optional Plywood Back: If you wish to create a shadow box effect, you can add a back to your hexagon shelf. For this small version, the simplest method is to tack it onto the back. Begin by tracing the exact shape of your assembled hexagon shelf onto the plywood sheet. Carefully cut out this shape using a jigsaw or circular saw. Apply wood glue along the back edges of your hexagon frame and secure the plywood back with 3/4″ brad nails. Allow the wood glue to dry completely for maximum strength. Finally, attach a picture hanger to the back for easy wall mounting.
Building Your Hexagon Shelf – Large Version
For a bolder statement or to accommodate larger display items, a large hexagon shelf is an excellent choice. This version also offers an option for an inset back, giving it an even more polished and professional finish.
Large Hexagon Cut List
- 6 pieces: 3/4″ x 5 1/2″ x 9″ long. Similar to the small hexagon, each end will have a 60-degree miter cut for perfect hexagonal alignment.
- Optional Plywood Backing: 3/16″ x 17 1/8″ x 14 7/8″ plywood. This larger piece is designed for the inset back.
Note on Sizing: Just as with the smaller version, the size of your large hexagon shelf can be easily adjusted. Simply change the 9″ length of your wood pieces to your desired measurement, ensuring consistency across all six segments.
Assembly Instructions for the Large Hexagon Shelf:
Again, a compound miter saw is your best friend here. Set the saw’s bevel to 30 degrees. Cut six pieces of 1×6 board, each 9″ long, with 60-degree miter cuts on both ends. These cuts should be oriented to form the interior angle of the hexagon. 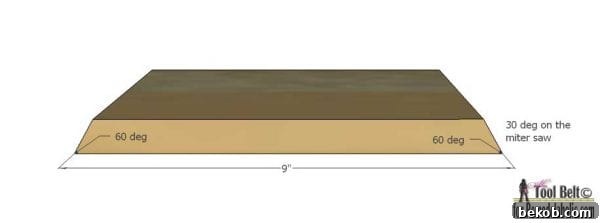 The plywood back is optional, and for this large shelf, you have two options: tack it onto the back (as described for the small hexagon shelf), or create a more refined inset back. To achieve an inset back, you will need to cut a shallow groove (a dado) along the back interior edge of each of the six wooden pieces. This groove should be approximately 3/8″ tall and 3/16″ deep, or whatever matches the exact thickness of your plywood backing.
Next, cut the hexagon shape for the plywood back. The easiest way to do this accurately is to mark the center of each side of your plywood rectangle, then cut 30-degree angles from each center mark to form a perfect hexagon that fits snugly into your grooves. 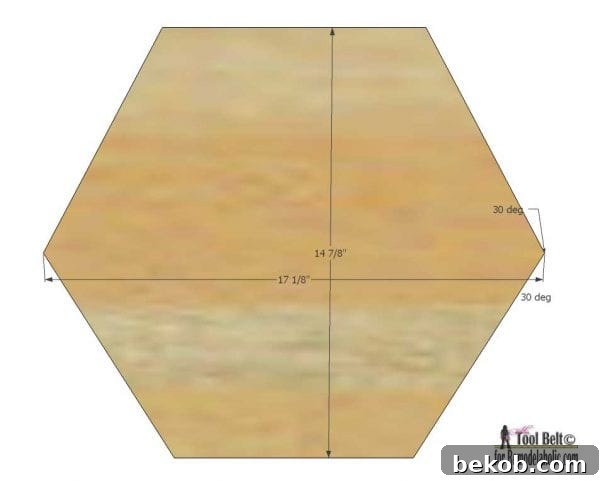 Apply wood glue to each mitered end of your six wooden pieces. Assemble the hexagon, carefully aligning all joints. Use 1 1/2″ brad nails to secure the hexagon shape. Again, a strap clamp is highly recommended to hold the pieces tightly together during assembly. After the hexagon frame is assembled, slide the plywood back into the inset groove. Apply glue along the groove and secure the back with 3/4″ brad nails, trimming any excess plywood if necessary for a perfect fit. Allow all glue to dry fully before handling. Finally, attach a picture hanger to the back for secure mounting.
Building Your Adorable House Shelf
House-shaped shelves bring a whimsical and cozy touch to any room, perfect for a nursery, child’s room, or a playful corner in your living space. They offer a unique silhouette for displaying small treasures.
House Shelf Cut List
- 2 pieces: 3/4″ x 5 1/2″ x 7 1/8″. Both ends of these pieces will have 45-degree miter cuts, angled in the same direction, to form the peak of the roof.
- 2 pieces: 3/4″ x 5 1/2″ x 10 1/2″. Each of these will have a single 45-degree miter cut on one end, forming the roof’s slope and the side wall.
- 1 piece: 3/4″ x 5 1/2″ x 10″. This straight piece will form the base of the house shelf.
- Optional Plywood Backing: 3/16″ x 10″ x 16 1/2″ plywood. This piece will be cut to match the house shape.
Note on Sizing: To adjust the size of your house shelf, you can easily change the 7 1/8″ length (for the roof peaks) and 10 1/2″ length (for the sides) to your desired dimensions. Remember to then cut the bottom base piece to fit your new width perfectly.
Assembly Instructions for the House Shelf:
For the precise miter cuts required for the house shelf, utilize your compound miter saw. Set the bevel (head tilt) to 45 degrees. Begin by cutting two pieces of 1×6 board, each 7 1/8″ long, with miter cuts on both ends facing the same direction to create the roof’s apex. Next, cut two pieces of 1×6, each 10 1/2″ long, with a single 45-degree miter cut on one end to form the sloped roof and side walls. Finally, cut one piece of 1×6 that is 10″ long for the bottom base.
Assemble the house shelf using wood glue on all joining surfaces. Secure the house shape together with 1 1/2″ brad nails. Ensure all corners are tight and square for a clean finish.
Adding the Optional Plywood Back: You have the option to add a back to your house shelf. For a simple approach, tack the back onto the frame (similar to the small hexagon shelf). To do this, trace the exact contour of your assembled house shelf onto the plywood and carefully cut it out using a jigsaw or circular saw. Apply wood glue along the back edges of the house frame and attach the plywood back using 3/4″ brad nails. Allow the glue to dry completely before proceeding. Once dry, attach a picture hanger to the back for easy display.
Crafting Your Classic Square Shelf
The square shelf is a timeless and versatile geometric shape that integrates seamlessly into any decor style, from minimalist to industrial. It’s perfect for creating clean lines and structured displays, either alone or grouped with other shapes.
Square Shelf Cut List
- 4 pieces: 3/4″ x 5 1/2″ x 10″ long. Each end of these pieces will require a 45-degree miter cut, ensuring a perfect 90-degree corner when assembled.
- Optional Plywood Backing: 3/16″ x 10″ x 10″ plywood. This square piece will form the back.
Note on Sizing: To change the size of your square shelf, simply adjust the 10″ length to your desired measurement. Remember that all four pieces must be the same length to maintain the square shape.
Assembly Instructions for the Square Shelf:
Using a compound miter saw, set the bevel (head tilt) to 45 degrees. Cut four pieces of 1×6 board, each 10″ long, with miter cuts on both ends. These cuts should be angled so that when joined, they form a perfect square. Apply wood glue generously to each mitered end. Carefully assemble the square, pressing the joints firmly together. Secure the corners with 1 1/2″ brad nails. A strap clamp or ratcheting tie-down strap can be very useful here to hold the square tightly while the glue sets and you nail the corners, ensuring a strong and precise assembly.
Adding the Optional Plywood Back: You can add an optional back to your square shelf for a finished look or to create a shadow box. For simplicity, you can tack the back onto the frame. Cut a piece of 10″ x 10″ plywood for the back. Apply wood glue to the back edges of the assembled square frame and secure the plywood back with 3/4″ brad nails. Allow the glue to dry completely. Once dry, attach a picture hanger to the back for easy wall display.
Constructing Your Elegant Rectangular Shelf
Rectangular shelves offer classic proportionality and ample space for display. They are perfect for creating organized visual interest, providing a strong horizontal or vertical element to your wall decor, and complementing more abstract geometric shapes.
Rectangular Shelf Cut List
- 2 pieces: 3/4″ x 5 1/2″ x 15″ long. Both ends will have 45-degree miter cuts for the longer sides of the rectangle.
- 2 pieces: 3/4″ x 5 1/2″ x 10″ long. Both ends will have 45-degree miter cuts for the shorter sides of the rectangle.
- Optional Plywood Backing: 3/16″ x 14 1/4″ x 9 1/4″ plywood. This rectangular piece will form the back.
Note on Sizing: You can easily customize the dimensions of your rectangular shelf. Simply change the 10″ vertical length and the 15″ horizontal length to your desired measurements, keeping in mind the ratio for a visually pleasing rectangle.
Assembly Instructions for the Rectangular Shelf:
Set your compound miter saw’s bevel (head tilt) to 45 degrees. Cut two pieces of 1×6 board, each 15″ long, with miter cuts on both ends for the top and bottom. Then, cut two more pieces of 1×6, each 10″ long, with miter cuts on both ends for the vertical sides. All miter cuts should be angled inward to form the rectangle.
Adding the Optional Plywood Back: The back is optional, and you have the choice to tack it onto the back (similar to the small hexagon or square shelf) or to inset it, providing a cleaner, more integrated finish. To create an inset back, cut a shallow groove (dado) along the back interior edge of all four wooden pieces. This groove should be approximately 3/8″ tall and 3/16″ deep, or match the exact thickness of your chosen plywood.
Assemble the rectangular shelf by applying wood glue to each mitered end. Nail the corners together using 1 1/2″ brad nails. A strap clamp or ratcheting tie-down strap can be incredibly helpful to hold the frame together tightly during assembly, ensuring square corners and strong bonds. After assembling the rectangle, if you’re using an inset back, slide the plywood back into the grooves. Apply glue along the grooves and secure the back with 3/4″ brad nails, trimming as necessary for a perfect fit. Allow the glue to dry fully. Finally, attach a picture hanger to the back for secure wall mounting.
Creating Your Dynamic Triangle Shelf
Triangle shelves offer a sharp, modern aesthetic, perfect for adding a geometric edge to your walls. They can be arranged in various configurations to create dynamic patterns and visual interest, especially when combined with other shapes.
Triangle Shelf Cut List
- 3 pieces: 3/4″ x 5 1/2″ x 15 3/4″ long. Each end of these pieces will require a 30-degree miter cut, angled towards each other, to form the equilateral triangle.
- Optional Plywood Backing: 3/16″ x 16 5/8″ x 14 3/8″ plywood. This piece will be cut to the exact triangle shape.
Note on Sizing: The size of your triangle shelf can be easily modified by changing the length of the sides. Just ensure all three pieces are of equal length to maintain an equilateral triangle.
Assembly Instructions for the Triangle Shelf:
Using your compound miter saw, set the bevel (head tilt) to 30 degrees. Cut three pieces of 1×6 board, each 15 3/4″ long, with miter cuts on both ends. These cuts should be angled towards each other so that when joined, they form the three corners of the triangle.
Assemble the triangle by applying wood glue to each mitered end. Press the joints together firmly and secure the triangle shape with 1 1/2″ brad nails. A strap clamp can be particularly useful here to ensure all three corners are tight and precise during assembly.
Adding the Optional Plywood Back: An optional back can be added to your triangle shelf. For a simple installation, you can tack it onto the back (as demonstrated with the small hexagon and square shelves). To do this, trace the exact shape of your assembled triangle shelf onto the plywood and carefully cut it out using a jigsaw or circular saw. Apply wood glue along the back edges of the triangle frame and attach the plywood back using 3/4″ brad nails. Allow the glue to dry completely for maximum strength. Once dry, attach a picture hanger to the back for secure mounting on your wall.
Finishing Touches: Sanding, Filling, and Decorating Your Geometric Shelves
The finishing stage is where your geometric shelves truly come to life and transform from raw wood into polished home decor pieces. First, meticulously remove any excess wood glue that may have squeezed out during assembly. Apply wood filler to all nail holes, minor cracks, and any blemishes to create a smooth, flawless surface. Allow the wood filler to dry completely according to the manufacturer’s instructions.
Once dry, begin sanding the shelves until they are smooth to the touch. Start with a coarser grit sandpaper (e.g., 80 or 100) to remove any major imperfections and shape the edges, then progressively move to finer grits (e.g., 120-150, then 220) for a silky-smooth finish. Always sand in the direction of the wood grain to avoid unsightly swirl marks. A well-sanded surface is crucial for a professional-looking paint or stain job.
After sanding, wipe down the shelves thoroughly with a tack cloth or a damp rag to remove all sawdust. Now, you’re ready to apply your chosen stain or paint. For staining, apply evenly with a brush or rag, allowing it to penetrate the wood, then wipe off excess for your desired shade. For painting, apply thin, even coats, allowing each coat to dry fully before applying the next, lightly sanding between coats if necessary for a super smooth finish. Once the paint or stain is completely dry, your beautiful new geometric display shelves are ready to be styled and showcased!
For more inspiring build plans and DIY projects, be sure to check out Hertoolbelt:
Star Wars Shelf // Geometric Wall // Mail Organizer
———————————–
Coming up next in the Deck The Walls series:
Expert tips for curating and arranging a modern gallery wall that truly stands out!
Don’t miss any of the inspiring Deck The Walls posts! Subscribe today by RSS or email to get immediate updates for every new post!