This decor walkthrough stays in the order the work happens.
I love what Angel at TaDa Creations does. She has a ton of talent, and has done such a great job at making the well fitted silhouettes. And she showed us how to do it! (Sorry this post is SO late, I am trying to catch up on party highlights!!)
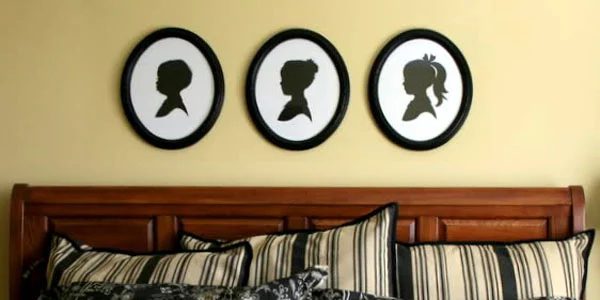
I’ve always loved the classic look of silhouettes. Especially when they are of children, and even better yet, a baby. I knew I wanted these over our bed with the new black and yellow color scheme of our bedroom. So I finally got busy yesterday and cut them out.I found oval 10″x12″ frames at JoAnn a while back. You can usually find them on sale for 50% off or buy one get one free. Or at the very least use a 40% off coupon (they accept competitors coupons too). I bought a new Exacto knife and 7 sheets of black scrapbook paper. I figured I’d make some mistakes and be thankful for the extra paper. I actually could have gotten away with just 2 sheets. For both the black and the white I bought paper with a mock linen texture to it.
I took pictures of the kiddos earlier, trying to get them all about the same distance away in the photo. Then I copied them into Word and printed them onto regular paper to use for my templates. I later had to print Emily’s a tad bigger to be in scale of Allison and Sam.
I determined that I wanted the final faces to all be looking to the left to I traced the back of the pint outs. I knew that later they would be traced to the back of the black paper so any ridges from cutting would end up on the backside. Drawing the outline on the backside also helped to be better able to see just the lines I wanted to cut on. Tape it to a window so you can see through from the front.
My initial first drawing. Lots to clean up and more details to add including eyelashes. You don’t really see eyelashes protruding from a sideview, but they add a lot to a silhouette.
Here is where I noticed that the scale of Emily’s face was a little smaller than Allison’s, so I went back to my Word doc and dragged it a little bigger until it seemed right.
Now to tweak the details. Allison originally had side buns, but I made it look more like one bun in the back and added the little flyaways under it. I also gave a better shape to their bows and to Emily’s ponytail. Sam got a bit more definition to his hair so he didn’t look so bald. And they all got retro looking collars, perhaps my go-to part of all.
Then I was ready to start tracing the lines with my knife (on top of my cutting mat of course). I didn’t tape anything down, I just held the template very tightly with my left hand. I did all of them while kneeling on the floor, which wasn’t fun, but it gave me good leverage.
On the right is the photo I cut out and the left is where the silhouette came out of. It was tough to get it to cut through the whole way around even though I pressed so hard my fingers ached (especially after cutting out all three). Just go back over those spots and when it’s all detached you’ll have a few rough spots to spruce up.
Next I double checked to make sure I liked the overall scale.
Here is all three cut out. It looks like I need to makes Sam’s nose a little more round, it’s pretty pointy here. And Emily’s upper lip got cut a little smaller than it should have. I need to redo hers for sure, but my fingers still ache so that will wait until tomorrow. I would suggest starting with the face so that if you make a mistake you haven’t wasted all your time and energy with the rest of the details. I learned that the hard way.
Close up of her mis-cut lip. Sorry Sweetie!
Next I used the glass from the frames to cut the white background paper out. I just swiped the Exacto knife all the way around the glass. That worked pretty slick. Of course you’ll have to wash the glass and get all the upc label residue off. Why do they always put stickers where they don’t belong?
I used archival double sided tape on the backs to secure them.
Then Ilaid them all in the frames to see what they would look like. I measured to make sure they were centered correctly. I thought I could eyeball them, but I did have to move one down and another over slightly, so I’m glad I measured.
well fitted, now they are ready for hanging!
I am so in love with these on my yellow walls.
You could really have fun with these and use a patterned paper for the background.
Or how fun to cut the images from a different color?
But I really love the classic look for this spot. They are just what this wall needed.
Do you think I hung them too high? I didn’t have the luxury of someone else to hold them up so I could see them from far away.
I love the styling of the silhouettes,
they are well fitted and totally classic!
What do you think?