Read the sequence from the top before cutting, painting, or moving pieces.
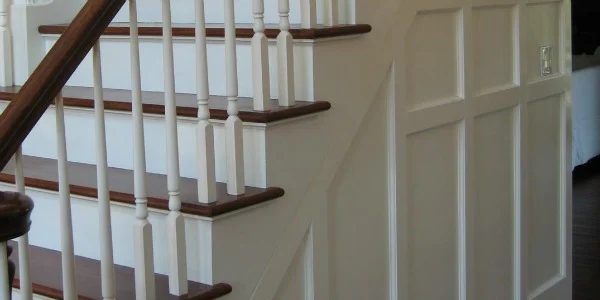
I feel like I am way late highlighting this project, but it is a MUST see. I am so in love with this all and since I am in the middle of working on my stairs I think this project is just heavenly! Sandra, I love your style! Please go look at a few of other projects on her blog, Sawdust and Paperscraps. Here is their entry:After finishing the powder room, I was feeling motivated to finish another “little detail” project. I just needed to replace a small piece of moulding on the stairs. (I removed it for stain matching and never replaced it so it got lost.)
Distracting right?
The replacement involved some cutting, routing, gluing, painting, nailing, filling, caulking and some more painting.
Well, after two days (and two additional projects that I got distracted with while waiting for the paint to dry on this one) I’m done!
As always, I don’t have enough before pictures. You can let your imagination fill in the blanks. It was all the same kind of ugly!
Up next: 2 distraction projects. BIG SMILE!
Edited to answer a few questions.
Tearing out the carpet involved 2 pairs of big pliers and alot of elbow <leo_highlight id=”leoHighlights_Underline_0″ leohighlights_keywords=”grease” leohighlights_underline=”true” leohighlights_url_bottom=”http%3A//shortcuts.thebrowserhighlighter.com/leonardo/plugin/highlights/3_1/tbh_highlightsBottom.jsp?keywords%3Dgrease%26domain%3Dwww.blogger.com” leohighlights_url_top=”http%3A//shortcuts.thebrowserhighlighter.com/leonardo/plugin/highlights/3_1/tbh_highlightsTop.jsp?keywords%3Dgrease%26domain%3Dwww.blogger.com” onclick=”leoHighlightsHandleClick(‘leoHighlights_Underline_0’)” onmouseout=”leoHighlightsHandleMouseOut(‘leoHighlights_Underline_0’)” onmouseover=”leoHighlightsHandleMouseOver(‘leoHighlights_Underline_0’)” style=”-moz-background-clip: -moz-initial; -moz-background-inline-policy: -moz-initial; -moz-background-origin: -moz-initial; -moz-background-size: auto auto; background-attachment: scroll; background-color: transparent; background-image: none; background-position: 0% 50%; background-repeat: repeat; border-bottom: 2px solid rgb(255, 255, 150); cursor: pointer; display: inline;”>grease. Just grab the carpet and pull with all your might. Probably a good job to wait for a big, strong man to take on. If you’re impatient like me and want it done RIGHT NOW! Just get ready for a GOOD workout and be mindful of your back.
Staining the stairs and railing. I hired a “professional” because he gave me a shockingly low price and so I said Heck Yes! Here’s what they did: Light sanding (just by hand-no power sander) and then a gel stain over the old stain. (This is why I tore out that missing piece of wood, to take to the paint store along with a piece of my new flooring. They played around with the stain color until they had a well fitted match.) Then a few coats of spray on polyurethane. It is a project a DIYer could definitely take on. If you have 100 other projects going on though, it might be worth getting a few quotes, it was really reasonable.
I created the wainscoting with MDF and a router table. Measured it out precisely as the pieces all fit together like a puzzle. Nailed them into place, filled holes and painted. A lot of DIYers don’t have a router table so I probably won’t do a tut on that.
Bekob speaking now: As if that lusciousness wasn’t enough, look at the art on the walls, LOVE!
Somewhere in the process of replacing my piece of stair moulding, I got sidetracked by a couple more projects.
1. I had some white picture frames hung above the wainscoting and felt like I needed a few more. (Darn–I didn’t take enough before pictures again!) So my first sidetrack project was to hang some more picture frames. I went digging through storage containers, wading through the construction mess in the basement because I was sure I had more frames somewhere. What I found there was this forgotten gem and some random pieces of glass. (Now hold that thought) I did find some more frames in a storage closet upstairs so I got hanging. First distraction complete.
2. Now for the glass and frame I found in the basement. I love everything about this frame. The colors, the color combination, the weathered, rustic look with the nail holes in full view…When I re-discovered it, I knew I was going to create something for this big empty space in my entrance. (We’ll see if it turns out.)
I haven’t done that yet so I guess that’s a third project.
What I did do, was decide that my white frames needed some paint. (Honestly, these frames have been all white, all black, all white and now this. Will I ever just do something and leave it alone!?!)
Here’s what I did with them.
And here is the finished wall.
Maddie knew I was trying to take a picture and kept jumping out into my shot. Silly girl!
I had to steal some of the large frames from this hallway to finish the stairway wall and have yet another project in mind to remedy the blank spaces.
Here’s a hint: it involves all those pieces of glass I found.
Here’s another hint: