
Updating a Child’s Chair: A DIY Project with a Touch of Nostalgia
By Creative Art and Design
Growing up, my life unfolded in the small town of Friendswood, Texas. When my family settled there in 1954, the population sign proudly displayed a number: 911. This community was steeped in Quaker traditions, a group also known as “Friends,” hence the name, Friendswood. My family, however, were not Quakers. We found a sprawling 25-acre plot and that became our haven. My parents divided this land, selling portions to build our house, fund our education, and eventually, support our college endeavors. In essence, my parents pioneered the first subdivision in Friendswood, laying the groundwork for the town’s growth.
Attending the Church of Christ, my family stood somewhat apart in Friendswood’s social landscape of 1954. When it was time for me to begin kindergarten, the only available option was the Friends Church kindergarten, well before public schools offered the program. So, at the young age of five, I embarked on my educational journey at the Friends Church.
I share this background because it’s intertwined with a special piece of furniture: my childhood chair. Somehow, my parents held onto this chair that had been my constant companion. My siblings, with a hint of humor, used to say no one wanted it after I had sat in it. It seemed to spend a considerable amount of time in the “time out” corner! This chair bore my name, etched on its underside, a silent testament to countless memories. It’s truly been through a lot. My two children later used it. It served as a makeshift step stool to reach high places. The chair eventually found its way to an attic in Bridge City. When we returned to Friendswood in 2008, the chair came with us, carrying with it echoes of the past. When I decided to restore it, I discovered a broken piece. After some careful repairs, here’s how it looked:

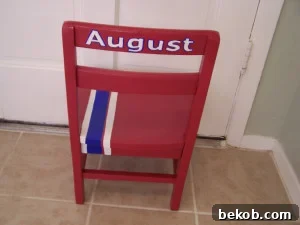
Now, with a new generation arriving, my grandson needed a chair of his own. I began the process, sanding, priming, and painting. With the invaluable assistance of my daughter-in-law, Emily, in choosing the perfect paint color, this is the finished result: a chair reborn, ready for a new chapter of adventures.


He now has two chairs to go with the table I found in the trash earlier. This little seating area is a testament to the joy of upcycling and the enduring value of cherished objects.

Why Upcycling Children’s Furniture is a Great Idea
Upcycling children’s furniture is an excellent way to breathe new life into old items, reduce waste, and create unique pieces that are both functional and sentimental. This approach is not only environmentally conscious but also allows you to personalize furniture to match your child’s personality and the overall aesthetic of their room. The process can be a rewarding creative outlet, transforming forgotten items into beloved treasures.
Benefits of Restoring a Child’s Chair
- Personal Touch: Restoring a chair allows you to add a personal touch that mass-produced furniture can’t offer. You can choose colors, designs, and finishes that perfectly reflect your child’s interests and your home’s style.
- Durability: Old furniture, often made from solid wood, can be more durable than newer, mass-produced pieces. With proper restoration and care, a refurbished chair can last for many years, even through multiple children.
- Cost Savings: Upcycling is a budget-friendly alternative to buying new furniture. You can often find used chairs at thrift stores, garage sales, or even in your own attic, significantly reducing costs.
- Environmental Benefits: By reusing and repurposing existing furniture, you’re contributing to a more sustainable lifestyle. You’re reducing the demand for new materials and minimizing waste, making a positive impact on the environment.
- Sentimental Value: Restoring a piece of furniture, especially one with a history like the chair described, adds a layer of sentimental value. This chair now holds memories and becomes a cherished family heirloom.
Step-by-Step Guide to Refurbishing a Child’s Chair
- Assessment and Preparation:
- Examine the chair carefully for any damage, such as loose joints, broken parts, or significant wear.
- Gather your supplies: sandpaper (various grits), wood filler, primer, paint (latex or acrylic), paintbrushes, rollers, drop cloths, and protective gear (gloves, mask).
- Repairing the Chair:
- If the chair has loose joints, disassemble them, apply wood glue, and reassemble. Use clamps to hold the pieces together while the glue dries.
- Fill any cracks, dents, or holes with wood filler. Let it dry completely and then sand it smooth.
- If any parts are broken, repair or replace them before proceeding.
- Sanding:
- Sand the entire chair to remove old paint, varnish, and any imperfections. Start with a coarser grit sandpaper (e.g., 80-grit) to remove old finishes and then switch to finer grits (e.g., 120-grit, 220-grit) for a smoother surface.
- Pay special attention to any areas with peeling paint or rough surfaces.
- Wipe away the sanding dust with a tack cloth or a damp cloth.
- Priming:
- Apply a coat of primer to the entire chair. Primer helps the paint adhere better and provides a uniform base for the color.
- Let the primer dry completely according to the manufacturer’s instructions.
- Lightly sand the primed surface with fine-grit sandpaper (e.g., 220-grit) to ensure a smooth finish.
- Wipe away the sanding dust.
- Painting:
- Choose your desired paint color and finish (e.g., satin, semi-gloss, or gloss).
- Apply the first coat of paint using a brush or roller, ensuring even coverage.
- Allow the first coat to dry completely.
- Lightly sand the first coat with fine-grit sandpaper (e.g., 220-grit) to remove any imperfections.
- Apply a second coat of paint for better coverage and durability. Two coats are usually sufficient, but you may need a third coat depending on the paint and color.
- Let the final coat of paint dry completely.
- Finishing Touches (Optional):
- Add decorative elements such as stencils, decals, or hand-painted designs to personalize the chair.
- Apply a clear coat sealant for added protection and durability, especially if the chair will be used frequently.
Tips for Choosing the Right Paint and Colors
- Safety First: Choose low-VOC (volatile organic compounds) paints, especially for children’s furniture, to minimize exposure to harmful chemicals.
- Durability: Opt for paints that are designed for furniture, offering good durability and resistance to wear and tear.
- Color Psychology: Consider the impact of colors on your child’s mood and development. Soft, calming colors like blues, greens, and pastels can create a relaxing environment. Bright, energetic colors like red and yellow can stimulate creativity and excitement.
- Theme and Decor: Choose colors that complement the existing decor of your child’s room. Consider the overall theme and style to create a cohesive and visually appealing space.
- Experiment: Don’t be afraid to experiment with different colors and finishes. You can create a unique and personalized piece of furniture by mixing and matching colors or using techniques like distressing or ombre effects.
Maintaining Your Refurbished Chair
- Regular Cleaning: Wipe down the chair regularly with a damp cloth to remove dust and dirt.
- Avoid Abrasive Cleaners: Do not use harsh or abrasive cleaners, as they can damage the paint finish.
- Protect from Sun Exposure: Prolonged exposure to direct sunlight can fade the paint color over time. Position the chair away from direct sunlight or use window treatments to minimize sun exposure.
- Touch-Ups: Keep a small amount of the paint you used for touch-ups in case of scratches or minor damage.
- Re-evaluate: As your child grows and their interests change, you may want to refresh the chair with new colors or designs. This allows you to easily adapt the furniture to their evolving needs and preferences.
Conclusion: A Legacy of Love and Sustainability
Restoring a child’s chair is more than just a DIY project; it’s a journey through time, a celebration of family history, and a commitment to sustainability. By embracing this approach, you create furniture filled with character, love, and purpose. The chair I refurbished for my grandson is a tangible connection to the past, a symbol of our enduring bond, and a reminder of the joy found in giving new life to old treasures. It’s a legacy of love, resourcefulness, and the simple beauty of a well-loved chair.