
Sweeten Your Space: Creative & Easy DIY Candy Decor Ideas for Every Occasion

The Irresistible Allure of Candy: Beyond Just a Treat
Candy. Just the word itself conjures up images of vibrant colors, delightful aromas, and an explosion of sweet flavors. It’s a universal symbol of joy, celebration, and perhaps a little bit of indulgence. For generations, people have sung songs about it, yearned for it, and savored its delectable charm. But what if we told you that the magic of candy extends far beyond its delicious taste? What if you could harness its inherent beauty, its endless palette of colors, and its playful spirit to transform your living spaces?
That’s right! You don’t always have to eat candy to enjoy it. In fact, candy offers an incredibly versatile and budget-friendly medium for crafting stunning, eye-catching decorations that can brighten any room, elevate any party theme, or add a whimsical touch to your home. Forget expensive, mass-produced decorations; with a little creativity and a handful of your favorite sweets, you can craft DIY candy decor that’s as unique and charming as it is easy to make.
The benefits of decorating with candy are plentiful. Not only is candy generally inexpensive and readily available in every imaginable color, shape, and size, but it also allows for endless customization. Its visual appeal is undeniable, bringing an instant burst of cheer and festivity to any setting. Plus, there’s a secret bonus for all you crafters out there: no need to prep separate snacks when you’re working on these projects – you’ve got a supply of edible inspiration right at your fingertips! Get ready to explore five awesome, simple, and incredibly sweet ways to decorate with candy for any occasion, from festive holidays to everyday celebrations, proving that decorating with candy is a delightful and rewarding endeavor.
Creative Candy Decoration Ideas for Every Celebration
1. Delightful Candy Wreaths: A Sweet Welcome
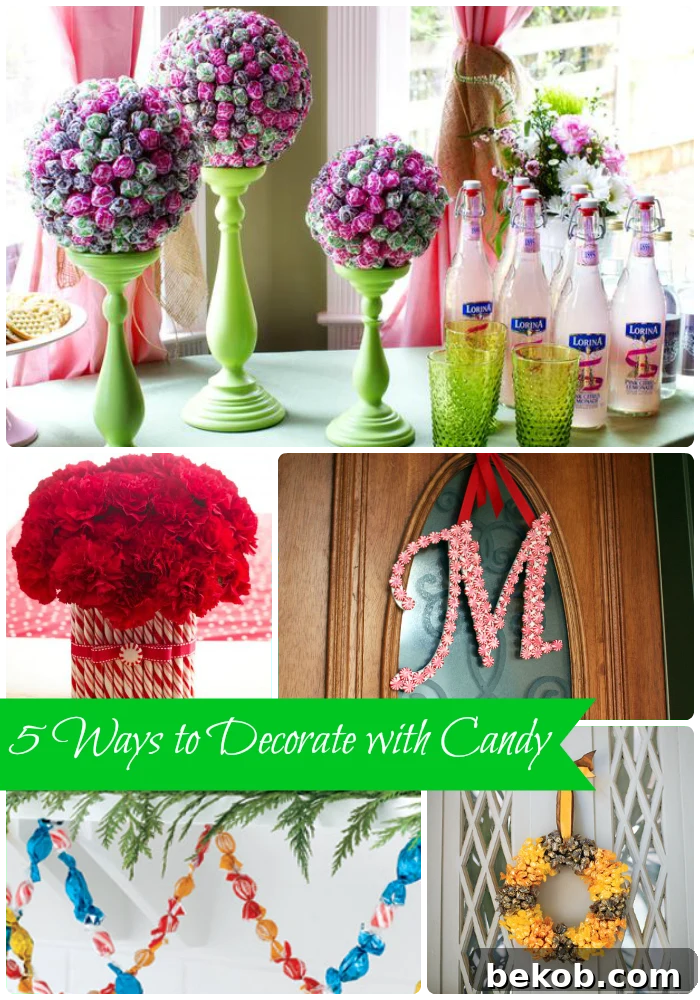
Wreaths are a timeless decorative element, traditionally gracing doors and walls to welcome guests or celebrate seasons. But imagine a wreath, not of leaves and berries, but of vibrant, gleaming candies! This concept elevates the classic wreath into a playful, mouth-watering focal point. A clever candy wreath, as seen in Martha Stewart’s inspired designs, can add a unique charm to your fall decor, perfectly complementing autumn hues with warm-toned candies like butterscotch or chocolate.
The beauty of a candy wreath lies in its incredible adaptability. For the Christmas season, envision a magnificent creation adorned with red and green peppermints, white chocolate candies, and perhaps a few silver-wrapped delights. Think pastels for a charming spring or Easter display, using jelly beans, pastel M&M’s, or foil-wrapped chocolate eggs. For a birthday party, choose candies that match the party’s color scheme, or even incorporate small toy candies for a child’s theme. For Halloween, black and orange wrapped candies, or even gummy worms and eyeballs, can create a spooktacular welcome. The possibilities truly are endless, allowing your creativity to shine through with every sweet selection.
How to Craft Your Candy Wreath: Start with a basic foam or wire wreath form, which you can find at any craft store. Using a hot glue gun (for non-edible display) or even edible adhesive if you plan for it to be consumed, begin attaching candies in layers. Hard candies, individually wrapped chocolates, or gummy treats (secured with toothpicks) work wonderfully. Consider a consistent pattern or a delightful mix of textures and sizes. For a more sophisticated look, use candies of a single color or in a gradient. Finish with a decorative ribbon for hanging, and you’ll have a truly unique piece that will spark smiles and conversations. Ensure candies are well-secured to prevent them from falling off.
2. Festive Candy Garlands: Stringing Sweetness
Garlands effortlessly infuse a sense of festivity and whimsy into any space, draped across mantels, stair railings, doorways, or even around a Christmas tree. A candy garland takes this decorative classic to an entirely new level, adding a delightful touch of panache and unexpected charm. Don’t let the intricate appearance of some candy garlands intimidate you; many designs are surprisingly simple to create, making them perfect for a fun afternoon craft session with the family.
The simplest approach involves using individually wrapped candies. Imagine a vibrant string of colorful saltwater taffy, charming mini chocolate bars, or shiny foil-wrapped hard candies. Simply gather your chosen sweets and, for a quick and easy method, staple the wrapper ends together. This creates a flexible and visually stunning chain of sweetness that can be stretched to any desired length. For a more robust garland, you can carefully thread a needle and strong fishing line or dental floss through the wrappers, or even directly through the candies themselves (if they are firm enough, like gumdrops or soft peppermints, and meant for a short-term display where they won’t be eaten after handling).
Occasions & Variations: A candy garland is perfect for birthday parties, adding a playful border to a dessert table or hanging across a doorway. During Halloween, use orange, black, and purple wrapped candies, perhaps with some gummy worms interspersed for a creepy-crawly effect. For patriotic holidays, red, white, and blue candies create a festive display perfect for Fourth of July picnics. The variety of candy types, from gummy bears to lollipops, ensures you can customize your garland to suit any theme or aesthetic you desire. Consider mixing in small bells, beads, or ribbons for added visual interest. It’s an interactive, eye-catching decoration that truly brings a touch of magic and a hint of something sweet.
3. Elegant Candy Vases: A Sweet Centerpiece
Floral arrangements are undeniably beautiful, but sometimes an occasion calls for something truly distinctive, something that marries elegance with a touch of playful sweetness. Enter the candy vase! While the example of a candy stick vase might evoke a charming, Christmas-y glow with its vibrant reds and greens, this concept is far from limited to just one holiday. The immense versatility of candy means you can craft stunning centerpieces for countless other events and celebrations throughout the year.
Consider the classic candy stick vase: it typically involves arranging colorful candy sticks (like old-fashioned hard candy sticks, rock candy, or swizzle sticks) around a smaller inner vase or jar. The outer layer of candy sticks forms the decorative “vase” itself, completely hiding the inner vessel that holds fresh flowers, artificial blooms, or other decorative elements. Candy sticks of all sizes, flavors, and an incredible spectrum of colors can be readily found online, from specialty candy stores to larger retailers like Oriental Trading, making customization effortless. You can secure the sticks with ribbon, twine, or even a discreet rubber band covered by decorative trim.
Beyond Candy Sticks: Don’t feel confined to just sticks! You can create similar effects with other types of candy. Use wrapped chocolates or taffy stacked neatly in a clear cylindrical vase, or fill clear glass containers with beautiful, colorful layers of brightly colored jelly beans, M&M’s, gumballs, or even gumdrops. For a sophisticated touch, use white and silver-wrapped chocolates, or even sparkling rock candy crystals, around a vase holding white roses. These candy vases make exceptional centerpieces for weddings, baby showers, anniversaries, or simply as a delightful, long-lasting decoration for your dining table. They offer a dual delight: captivating visual appeal and the promise of a sweet treat at the end of the event.
4. Whimsical Lollipop Topiaries: Edible Sculptures
Topiaries, traditionally sculpted plants, bring an element of refined artistry and structure to decor. A candy topiary, however, transforms this elegance into a burst of playful energy and vibrant color, making it an irresistible centerpiece for any party, festive gathering, or even just a fun room accent. A colorful lollipop topiary, for instance, is practically begging to make a vibrant appearance on your dessert table, welcoming guests with its cheerful display and offering a readily accessible treat.
The construction of a simple lollipop topiary is surprisingly straightforward, making it an ideal DIY project even for beginners. You’ll typically need a Styrofoam ball (which forms the “head” of your topiary), a sturdy dowel or a decorative painted candlestick (to serve as the “trunk”), and a base or small pot to hold it upright. The magic truly begins when you insert a bag of colorful lollipops into the Styrofoam ball. Start from the bottom and work your way up, ensuring even spacing and full coverage. For added flair, you can paint your candlestick to match your party’s theme, wrap it with ribbon, or even adorn the pot with more candies. Small candies or crinkled paper can be glued to the base of the Styrofoam ball to fill in any potential gaps and create a polished look.
Customizing Your Topiary: Lollipop topiaries are fantastic for children’s parties, offering both striking decor and a delightful party favor in one! But they can also be adapted for more sophisticated events. Imagine a topiary crafted from miniature chocolate truffles (secured with toothpicks), delicate meringue cookies, or even elegant hard candies in a monochrome palette. For a wedding, use white and gold wrapped candies on a gilded base, perhaps topped with a small floral accent. A Halloween topiary could feature orange and black lollipops or chocolate eyes for a spooky touch. These edible sculptures are not only visually stunning but also serve as a delightful conversation starter, proving that decor can be both beautiful and deliciously fun.
5. Personalized Candy Monograms: Sweet Statements
Nothing adds a touch of bespoke elegance quite like a monogram. Whether it’s your initial, a family initial, or a letter representing a significant word or theme, monograms personalize a space in a unique and stylish way. But why settle for a plain old painted letter when you can infuse it with a touch of sweetness and creativity? Get ready to get crazy and add a little bit of sweetness to this simple decoration, turning a standard initial into a truly memorable piece of edible art. The best part? Practically any candy will do, offering endless possibilities for texture, color, and flavor!
To create a candy monogram, you’ll need a pre-cut wooden, cardboard, or even foam letter. These are widely available at craft stores in various sizes and fonts, allowing you to choose the perfect base for your project. Once you have your letter, the fun begins. Consider a festive classic like a peppermint candy monogram, where shattered or whole peppermints are meticulously glued onto the letter for a striking, holiday-inspired look. But don’t stop there! Think about using mini M&M’s arranged in a mosaic pattern, creating a vibrant, colorful effect. Gummy bears, jelly beans, Skittles, or even small wrapped chocolates can be carefully adhered to the surface of the letter, either covering it completely or creating intricate designs.
Designing Your Monogram: The key to a successful candy monogram is planning your candy layout before gluing. Decide on a consistent pattern, a random assortment of colors, or even an ombre effect. Use a hot glue gun (for decorative purposes) or a strong craft adhesive for durability. These monograms make fantastic personalized gifts for birthdays or anniversaries, unique bedroom decor, charming additions to a dessert table at a bridal or baby shower, or a welcoming accent on an entryway table. They’re a sweet, handcrafted way to express personality and add a touch of delightful originality that truly stands out.
Tips for Successful Candy Decorating
To ensure your candy creations are as delightful as they are durable (for display purposes), here are a few expert tips to keep in mind:
- Choose Wisely: Select candies that are robust enough for your project and can withstand handling. Wrapped candies tend to be much easier to work with as they don’t get sticky or attract pests. Hard candies, lollipops, foil-wrapped chocolates, and firm gummies are excellent choices. Avoid extremely soft or meltable candies unless you’re working in a very cool environment.
- Adhesive Matters: For decorations that are purely for display and not meant to be eaten after crafting, a hot glue gun is your best friend. It provides a strong, quick bond. If you intend for the candy to eventually be consumed (e.g., for a party favor that will be disassembled), use edible glue or royal icing, but be aware of its setting time and strength, and handle gently.
- Consider the Environment: Candy can melt, become sticky, or lose its shape in warm or humid conditions. Plan where you’ll display your creations to ensure they maintain their integrity. Avoid direct sunlight, very warm rooms, or outdoor display on hot days.
- Storage: If making decorations in advance, store them in a cool, dry place away from direct light and potential pests. Airtight containers can help preserve freshness if the candy is intended for consumption. For purely decorative items, just ensure they are protected from dust.
- Get Creative with Bases: Don’t limit yourself to traditional forms. Styrofoam balls, cardboard cutouts, clear glass jars, wooden blocks, and even repurposed items can serve as fantastic, inexpensive bases for your candy art.
- Food Safety First: If your candy decorations are meant to be eaten, ensure all crafting tools and surfaces are clean and food-safe. Minimize direct handling of the edible parts, and inform guests if the candy has been handled extensively or used with non-food-safe adhesives.
Unleash Your Inner Sweet Artist: A Conclusion
Seriously, what’s not to love about decorating with candy? It’s a wonderfully creative outlet that taps into our collective love for sweets, transforms ordinary items into extraordinary decor, and offers endless possibilities for personalization. From the charming simplicity of a candy garland to the refined elegance of a candy vase or topiary, these projects prove that you don’t need to be a seasoned artisan to create something truly spectacular and unique for your home or next event.
The next time you find yourself wandering the aisles of the grocery store or a craft supply shop, don’t just grab a bag of sweets for snacking. Snag a few extra bags with a spark of creative inspiration in mind. See what incredible, sweet masterpieces you can come up with. Whether it’s for a holiday, a special event, or simply to add a burst of joyful color to your everyday surroundings, decorating with candy is a delightful and rewarding endeavor. Get ready to craft, decorate, and perhaps, indulge in a little taste of your handiwork along the way!
Kayla Lilly is a photographer, writer, wife, and mama making a house a home in eastern Idaho. She met her mister while working at an amusement park and married him a year later after deciding there was no way to live without him. The amusement has continued as they’ve added three kids and a passel of pets to their lives while finishing college and starting a photography business. Drawing inspiration from the whirlwinds of marriage, parenthood, and the media, Kayla blogs at www.utterlyineperienced.blogspot.com, and spends the rest of her time chasing chickens, organizing junk drawers, diapering toddlers, and photographing everyone willing to step in front of her lens.