
Unlock a world of DIY possibilities and sustainable crafting by transforming humble shipping pallets into stunning home decor, furniture, and functional pieces. Pallet wood, often overlooked, offers a unique blend of affordability, rustic charm, and environmental consciousness, making it a popular choice for budget-friendly projects. While working with reclaimed pallet wood presents distinct challenges compared to new lumber, its characterful imperfections and cost-effectiveness make the effort incredibly rewarding.
Unlike store-bought timber, pallet slats come with inherent variations in length, thickness, and often feature weathered surfaces, uneven edges, and nail holes. These characteristics are a blessing for those aiming for a rustic aesthetic, lending immediate warmth and history to any creation. However, if your vision leans towards a more refined finish, be prepared to invest some time in meticulous preparation, particularly sanding, to achieve smoother, more uniform results. The allure of free or low-cost material, combined with the satisfaction of upcycling, makes pallet projects a truly appealing endeavor for any DIY enthusiast.
This comprehensive guide will equip you with all the essential knowledge to confidently embark on your pallet wood journey. We’ll cover everything from responsibly sourcing and selecting the right pallets to safely dismantling, thoroughly cleaning, and effectively preparing the wood for your next masterpiece. Our aim is to empower you to build amazing things for virtually no cost, all while embracing the charm of reclaimed materials.
A note on safety and suitability: The debate regarding the best use cases for pallet wood—be it for indoor or outdoor projects—is ongoing. We encourage every crafter to conduct their own thorough research and make an informed decision based on their specific project and comfort level. Whether you choose to incorporate pallet wood into your designs or opt for alternative reclaimed materials, the principles of creative repurposing remain invaluable. This guide is primarily designed to assist those who have chosen to work with pallets, providing crucial information on processing them effectively and safely. Many of our featured projects can also be adapted for new lumber or other types of reclaimed wood, ensuring broad applicability for all makers.
This post contains affiliate links for your convenience. Learn more and read our full disclosure policy here.
Pallets 101: Your Complete Guide to Finding, Choosing, Dismantling, and Prepping Pallets for DIY Projects
Embarking on a DIY project with pallet wood can be an exciting and cost-effective venture. The key to a successful project lies in understanding the material and mastering the techniques for its preparation. Here, we delve into the crucial steps for working with pallets, ensuring safety and quality from start to finish.
Finding and Sourcing Pallets Responsibly
The first step in any pallet project is, naturally, acquiring the pallets themselves. Fortunately, these ubiquitous shipping platforms are often readily available. Most businesses that receive large shipments frequently have surplus pallets they are happy to give away, reducing their own disposal costs. Think locally and look around for potential sources:
- **Grocery Stores:** Often have a steady supply due to continuous inventory turnover.
- **Garden Centers & Nurseries:** Receive plants and landscaping materials on pallets.
- **Hardware & Home Improvement Stores:** Always a good bet, especially for larger, sturdier pallets.
- **Specialty Retailers:** Furniture stores, tile suppliers, and appliance dealers often have pallets from incoming stock.
- **Small Businesses:** Many independent shops receive deliveries on pallets.
- **Construction Sites:** With permission, you might find sturdy pallets used for building material delivery.
It is paramount to **always ask for permission** before taking any pallets. Some companies reuse their pallets or return them to suppliers, and taking them without consent is considered theft. A quick, polite inquiry can save you trouble and ensure a good relationship with local businesses. Beyond commercial establishments, keep an eye on online classifieds like Craigslist, local Facebook marketplace groups, or community forums, where individuals often offer free pallets.
If you’re interested in reclaimed wood but not exclusively pallets, consider other readily available sources. Old fences, for instance, are an excellent option for achieving a “barn wood” aesthetic without the need to locate actual barn wood. After strong winds or storms, many homeowners replace damaged fence panels, presenting an opportunity to acquire weathered wood. Always seek permission before collecting any materials. This type of reclaimed wood is perfect for projects like a rustic TV frame, a beautiful curvy headboard, or to add character to a kitchen island or peninsula.
Choosing the Right Pallet for Your Project
While pallet wood is an economical choice, not all pallets are created equal. Careful selection is crucial for both safety and the success of your project. Pallet wood will never replicate high-end exotic hardwoods, but its rustic appeal is precisely why it’s so popular. Here’s what to look for:
- **Treatment Codes:** Inspect the pallet for stamps or markings on the side. The most critical marking is the **HT symbol**, which indicates the wood has been **heat-treated**. This means it was heated to kill pests and fungi, making it generally safe for use. Avoid pallets marked with **MB**, which stands for Methyl Bromide, a toxic pesticide. Chemically treated pallets are generally not recommended, especially for indoor use or anything that will come into contact with food. Pallets with no markings should be approached with caution, as their origin and treatment are unknown.
- **Cleanliness:** Look for obvious signs of contamination. Avoid pallets with severe stains, chemical spills, mold, mildew, or a strong, unusual odor. These indicate potential health hazards or structural degradation.
- **Structural Integrity:** Choose pallets with relatively straight, intact boards. While some minor imperfections are part of the charm, heavily warped, cracked, or rotten boards will be difficult to work with and may compromise the stability of your project. Check the nails; bent or twisted nails can make dismantling much harder.
- **Wood Type:** Most pallets are made from softwood (pine, fir, spruce), but some can be hardwood. Hardwood pallets are generally heavier and more durable, offering different characteristics for your project.
How to Safely and Efficiently Dismantle a Pallet
Dismantling a pallet is often the most challenging part of working with reclaimed pallet wood. It can be a labor-intensive process, but with the right tools and techniques, it becomes much more manageable. Regardless of your chosen method, **prioritize safety above all else.**
Essential Safety Gear:
- **Eye Protection:** Safety glasses or goggles are non-negotiable to protect against flying splinters or nail fragments.
- **Hand Protection:** Durable work gloves are essential to prevent splinters, cuts, and scrapes.
- **Hearing Protection:** If using power tools, earplugs or earmuffs are vital to prevent noise-induced hearing damage.
- **Foot Protection:** Sturdy closed-toe shoes or work boots are recommended to protect against dropped tools or wood.
There are two primary approaches to dismantling pallets: manual labor or power tools.
Manual Dismantling: Muscle and Leverage
If you prefer a good workout or don’t have access to power tools, manual methods are effective, though they may require more effort and time. This approach typically involves a combination of prying and hammering.
Pry Bars and Hammer:
A reliable pry bar and a sturdy hammer are your basic tools. The technique involves carefully inserting the pry bar between the pallet slats and the stringers (the thicker support beams), then using leverage to separate the boards. Tapping the pry bar with a hammer can help it get started. It’s often beneficial to have several different sizes of pry bars, as some gaps might be tighter than others. A nail puller or cat’s paw can be very helpful for extracting stubborn nails once the boards are loose. Once a slat is removed, carefully tap out or pull any remaining nails and dispose of them properly to prevent hazards like flat tires. Colleen from Lemon Thistle demonstrates this method effectively in her video.
Specialized Pallet Tools:
For those who regularly work with pallets, investing in specialized tools like a deck wrecker or a pallet buster can significantly speed up the process and reduce physical strain. These tools are designed to provide superior leverage, making it much easier to separate boards without damaging them. They are highly reviewed for their efficiency and effectiveness.
Power Tool Dismantling: Speed and Precision
For faster dismantling, especially when processing multiple pallets or needing longer, less damaged boards, power tools are invaluable. Always read your tool manuals and follow all safety guidelines when operating power equipment.
Circular Saw:
A circular saw can be used to cut the pallet boards on either side of the nails. This method is quick and yields shorter, nail-free lengths of pallet wood, ideal for smaller projects where specific lengths aren’t critical. The downside is that you lose the sections of wood around the nails, resulting in shorter salvaged pieces.
Reciprocating Saw or Oscillating Multi-tool:
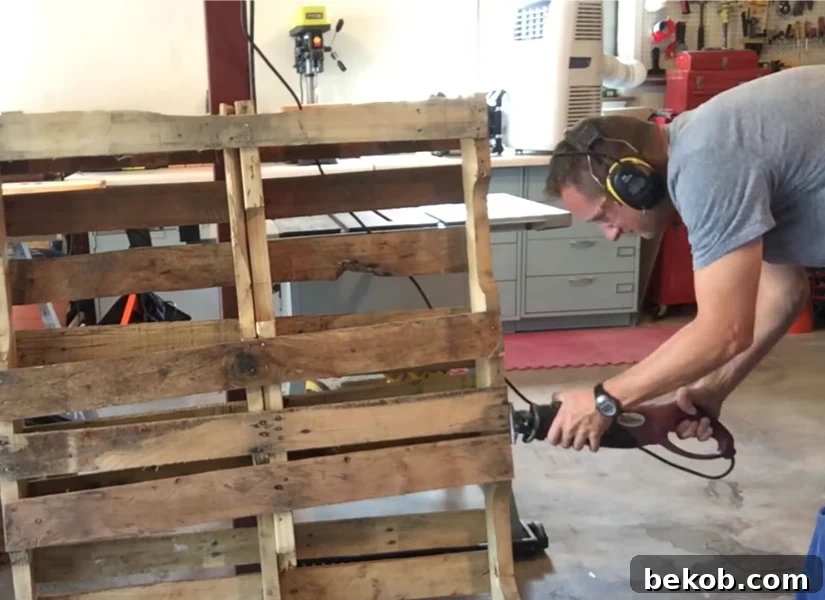
These tools are excellent for cutting directly through the nails that hold the pallet together, allowing you to salvage much longer, more intact boards. A reciprocating saw (often called a Sawzall) fitted with a durable metal-cutting or remodel blade can slice through nails with impressive speed. Similarly, an oscillating multi-tool like a Dremel MultiMax with a wood/metal blade offers precision for smaller, trickier cuts. Justin’s video demonstration (below) shows how efficiently a reciprocating saw can dismantle a pallet in just minutes, providing a ready pile of wood for projects like our pallet wood coffee table with drink bins. For more visual guides on using circular saws or oscillating multi-tools, check out Brittany’s tips at Pretty Handy Girl.
Prepping Pallet Wood for Your Next Project
Once you’ve successfully dismantled your pallets and have a pile of reclaimed wood, the next critical step is proper preparation. This “extra love and attention” ensures your wood is safe, clean, and ready for whatever masterpiece you envision. This prep work can be done either before or after dismantling, depending on the scale and nature of your project.
Cleaning and Sanitizing Pallet Wood
Cleaning is paramount, especially if your project is for indoor use or involves food contact. You want to remove dirt, grime, and potential contaminants without stripping away the wood’s inherent character. Here are effective cleaning methods:
- **Basic Scrub-Down:** Start with a good scrub using a stiff brush and a cleaning solution. You can use a diluted bleach solution (1 part bleach to 10 parts water) or a white vinegar solution (equal parts vinegar and water). **Crucially, never mix bleach and vinegar, as this creates toxic fumes.** For vinegar solutions, you might add a few drops of essential oil, like tea tree oil, for added disinfectant properties and a pleasant scent (though always test on a small area first). Rinse thoroughly with water and allow the wood to dry completely in the sun.
- **Pressure Washing:** For outdoor projects or heavily soiled wood, a pressure washer is a highly effective tool. It quickly blasts away dirt, mildew, and loose debris, revealing the wood’s natural grain. Be mindful of the pressure setting to avoid damaging softer wood fibers. Explore more great pressure washer options here.
- **Steam Cleaning:** For thorough sanitization, especially for indoor furniture or items that might come into contact with skin, a steam cleaning machine is an excellent choice. As shared by Stacy Risenmay from Not Just a Housewife, steam effectively kills bacteria, mold spores, and even some pests without harsh chemicals.
Preparing Pallet Wood for Projects: Sanding and Shaping
Once clean and dry, pallet wood typically requires significant sanding to make it safe and aesthetically pleasing for most projects. Pallet wood is inherently rough, prone to splinters, and often has uneven surfaces. Sanding is crucial for both safety and achieving a professional finish.
The extent of sanding depends on your desired outcome:
- **For a Rustic Look:** A lighter sanding pass might be enough to remove loose splinters and rough edges while preserving the weathered appearance.
- **For a Smoother Finish:** More intensive sanding will be required. Start with a coarser grit sandpaper (e.g., 60-80 grit) to remove major imperfections and achieve a flatter surface. Gradually work your way up to finer grits (120, 180, 220 grit) for a silky-smooth finish.
Investing in a power sander (like an orbital or palm sander) is highly recommended, as it will save you immense time and effort. For highly refined projects, consider planing the wood to achieve uniform thickness and perfectly flat surfaces, though this requires specialized equipment and might remove some of the rustic charm. Proper sanding not only enhances the wood’s appearance but also makes it safer to handle and easier to apply finishes like paint or stain.
Embrace the Pallet Wood Journey: Inspiration and Next Steps
Working with pallet wood is a journey that combines resourcefulness, creativity, and hands-on skill. The inherent variations and imperfections of reclaimed wood ensure that every project you undertake will be truly unique, carrying its own story and character. As Ananda from A Piece of Rainbow beautifully illustrates in her fabulous post, the possibilities with pallets are virtually endless, from small decorative items to large furniture pieces.
Ready to Transform Pallets? Try These Easy Pallet Wood Projects:
To kickstart your pallet wood crafting adventure, explore these accessible and rewarding projects. They are perfect for beginners and seasoned DIYers alike, providing practical applications for your newly acquired pallet wood:
Rustic Letters Made from Pallets and Old Blinds: Add a personalized, industrial-chic touch to your home decor with these charming reclaimed wood letters.
Pallet Charging Station or Wall Shelf: Create a practical and stylish charging station or a convenient wall shelf using small pallet wood scraps, perfect for decluttering your space.
Build a $10 Pallet Table: Discover how to construct a sturdy and attractive console or side table for a minimal cost, showcasing the rustic beauty of reclaimed pallet wood.
Don’t miss out on future inspiring projects and valuable tips! **Be sure to subscribe by email** or RSS, and follow along with us on Facebook and Instagram using the hashtag #PalletsAplenty. We’re constantly sharing new ideas and projects to fuel your DIY passion!