
Transform Your Kitchen: The Ultimate Guide to a Peel and Stick Vinyl Flooring Backsplash
Are you dreaming of a kitchen refresh but dreading the high costs and complex installation of traditional tiling? You’re in luck! This guide will introduce you to an innovative, incredibly budget-friendly, and simple DIY project that can dramatically change the look of your kitchen: a backsplash made from peel and stick vinyl flooring. Forget the grout, the mess, and the specialized tools – this is a game-changer for anyone looking for a quick and stylish update without breaking the bank.
Many homeowners seek an affordable and impactful way to update their kitchen without committing to expensive, permanent renovations. Whether you’re a renter, on a tight budget, or simply looking for a temporary fix before a major overhaul (like new countertops), this peel and stick vinyl backsplash solution offers versatility and stunning results. Join us as we dive into how you can achieve a beautiful, personalized backsplash that looks far more expensive than it is!
The Ingenious Idea: Why Vinyl Flooring for a Backsplash?
The journey to this clever DIY solution often begins with a common desire: a desire for a plank wall aesthetic without the hassle and cost of real wood. While searching for traditional wood planks for a kitchen backsplash, I stumbled upon an unexpected gem in the flooring aisle: peel and stick faux wood vinyl planks. Priced at around $1 each, these lightweight, self-adhesive planks immediately sparked an idea – why not use them on the wall instead of the floor?
This unconventional approach offers several compelling advantages over standard backsplash materials:
- Unbeatable Affordability: At roughly a dollar per plank, the total cost for even a generous backsplash area is incredibly low, often less than $20 for an entire kitchen section. This makes it one of the most budget-friendly renovation options available.
- Effortless Installation: The “peel and stick” nature means no messy glues, no heavy tools, and no specialized skills are required. It’s a project almost anyone can tackle.
- Time-Saving: Traditional tile backsplashes can take days, involving cutting, setting, and grouting. This vinyl plank method can be completed in just a few hours.
- Non-Permanent & Versatile: Ideal for renters or those who anticipate future renovations. While adhering well, it’s generally easier to remove than traditional tile if you decide to change your mind down the line.
- Easy to Clean & Durable: Vinyl is naturally water-resistant and incredibly easy to wipe clean, making it a practical choice for a high-splash area like a kitchen backsplash.
- Customizable Look: With various faux wood finishes available, you can achieve anything from a rustic farmhouse vibe to a sleek modern aesthetic. Plus, as we’ll show, you can even paint them for a truly unique finish.
My husband might have thought I was a bit “nuts” at first – a common reaction to bending the rules in DIY! – but the end result almost always speaks for itself. This project is a testament to thinking outside the box and finding creative solutions to common home decor challenges.
This post contains some affiliate links for your convenience. Click here to read our full disclosure policy.
Gathering Your Materials and Tools
One of the beauties of this project is the minimal list of supplies. You won’t need a wet saw, tile spacers, or grout floats. Here’s what you’ll want to have on hand:
- Peel and Stick Vinyl Flooring Planks: These are the star of the show. Look for “faux wood” or “luxury vinyl plank” (LVP) options. You can find these at most home improvement stores (e.g., Home Depot) or online retailers like Amazon. Watch for sales to score the best deals! Remember to measure your backsplash area and buy approximately 10-15% extra for cuts and mistakes.
- Measuring Tape: For accurate measurements of your wall and planks.
- Pencil: For marking cuts.
- Sharp Scissors or Utility Knife: Vinyl planks are surprisingly easy to cut. For straight, clean cuts, a utility knife with a straight edge might be preferred, but scissors work perfectly well for most shapes.
- Level: Essential for ensuring your first row is perfectly straight.
- Cleaning Supplies: Degreaser, all-purpose cleaner, and clean rags to prepare your wall surface.
- Outlet Covers & Screwdriver: To remove and reattach outlet covers.
- Optional (if painting): Primer suitable for vinyl or slick surfaces, your chosen paint (e.g., chalky finish paint), a paintbrush or roller, and a clear protective topcoat or wax.
Step-by-Step Installation Guide
Installing your peel and stick vinyl backsplash is a straightforward process that yields impressive results. Follow these steps for a smooth application:
1. Prepare Your Wall Surface
This is a critical step for ensuring optimal adhesion and longevity. Start by removing all existing outlet covers and light switch plates. Thoroughly clean the entire backsplash area with a degreaser or all-purpose cleaner to remove any grease, grime, or residue. A clean, smooth, dry surface is paramount for the adhesive to bond correctly. If your wall has any texture, consider sanding it down lightly or applying a skim coat for a smoother finish, as significant texture can affect adhesion and appearance.
2. Plan Your Layout and First Row
Before you start sticking, it’s wise to “dry lay” a few planks on your countertop or floor to visualize your desired pattern. A staggered pattern, mimicking traditional hardwood flooring, generally looks most natural. Decide where you want your first row to begin. For a backsplash, it’s usually best to start from the lowest point closest to your countertop. Use a level to draw a straight guide line across your wall where the top of your first row will sit. This ensures a perfectly straight installation, which is crucial for the entire project’s success.
3. Install the First Planks
Begin with your first plank. Peel off the wax paper backing to expose the adhesive. Carefully align the plank with your guide line and the corner of your wall, then press it firmly into place. The great thing about many peel and stick products is that you have a little bit of wiggle room to reposition them if you don’t get it right the first time. However, once you’re satisfied with the placement, press down firmly across the entire plank, ensuring good contact with the wall.
4. Continue with Subsequent Rows and Staggering
For the second plank in the first row, push it tightly against the first, then press firmly. When starting the second row, cut a plank to a shorter length to create your staggered pattern. This means the seams between planks in adjacent rows will not line up, giving it a more authentic planked look. Maintain consistent tight seams between planks for a seamless appearance.
5. Navigating Obstacles: Outlets and Corners
This is where those simple cutting tools come in handy! When you encounter electrical outlets, light switches, or window frames, you’ll need to cut the vinyl planks to fit precisely. This is surprisingly easy to do with just scissors or a utility knife.
For Outlets: Hold the plank up to the outlet and mark the dimensions of the outlet on the plank. You can create a paper template first if you’re nervous. Cut out the marked area. Remember to cut slightly smaller than the actual opening; the outlet cover will hide any minor imperfections. Always ensure the power is off when working near outlets.
For Corners and Edges: Measure the remaining space at the end of a row. Mark this measurement on a new plank and cut it to size. The offcut can often be used to start the next row, minimizing waste and enhancing the staggered look. The flexibility of vinyl makes it easy to trim for a perfect fit, even in slightly uneven spaces.
6. Ensuring Final Adhesion
Once all your planks are in place, go over the entire backsplash surface, pressing firmly on each plank. You can use a rolling pin, a J-roller, or even just your hands to ensure every part of every plank has made solid contact with the wall. This step is crucial for preventing planks from lifting over time.
Customizing Your Peel and Stick Backsplash
One of the most exciting aspects of this DIY method is the opportunity for personalization. While faux wood planks look great on their own, painting them opens up a world of design possibilities.
Choosing to Paint
For a small kitchen, a cohesive look is often desirable to make the space feel larger and more unified. Painting the vinyl planks can achieve this, allowing the texture of the planks to shine through while blending seamlessly with your existing color scheme. It’s an excellent way to introduce a subtle architectural detail without overwhelming the space.
Painting Process
1. Clean Again: Lightly wipe down your newly installed planks to ensure they are dust-free.
2. Prime (Optional but Recommended): While not strictly necessary for all paints, applying a thin coat of a good quality primer designed for slick surfaces can significantly improve paint adhesion and durability, especially on vinyl.
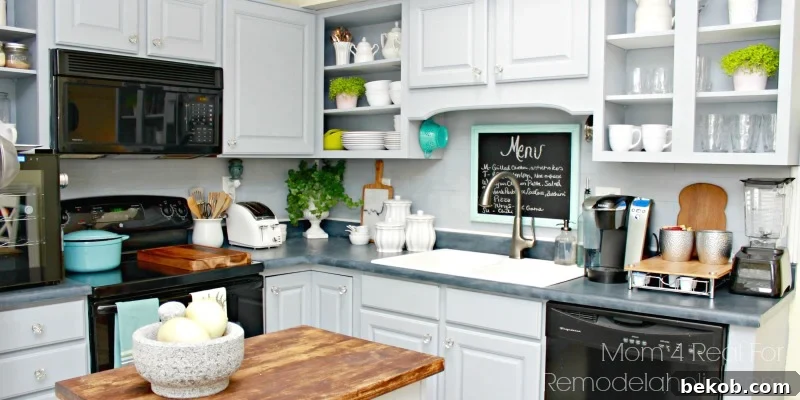
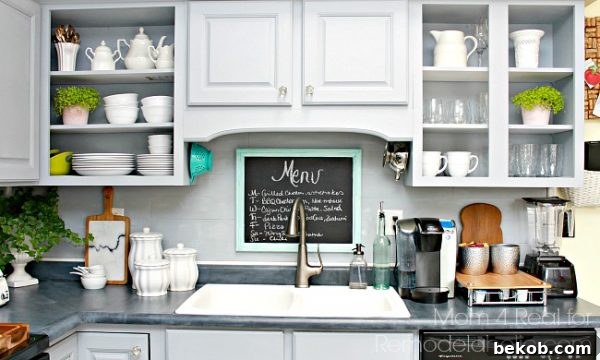
3. Paint: I opted for a beautiful grey chalky finish paint, applying two thin coats. Chalk paint is fantastic for its matte finish and excellent coverage. You could also use a high-quality latex paint with good adhesion properties. Thin coats are always better than one thick coat, as they prevent drips and ensure even coverage.
4. Seal: To protect the paint and add to its durability, finish with a clear protective topcoat or wax. For a rustic, chalk-painted look, a clear wax is perfect for sealing and adding a subtle sheen. If using latex paint, a clear polyurethane or acrylic sealer would work well. This step is crucial for a kitchen backsplash where splashes and frequent cleaning are expected.
The Stunning Result and Beyond
The transformation is truly remarkable. The painted peel and stick vinyl backsplash instantly elevates the kitchen, adding a touch of rustic charm and sophistication. The overall look is cohesive, stylish, and feels custom-made, all for an incredibly low cost. It’s hard to believe such a significant impact can be made with less than $20 and a few hours of DIY effort!
Long-Term Care and Maintenance
Maintaining your vinyl backsplash is exceptionally easy. For daily cleaning, simply wipe it down with a damp cloth and mild dish soap. Avoid abrasive cleaners or harsh chemicals, as these can damage the paint or the vinyl itself. If a plank gets damaged or starts to lift, the beauty of this system is that individual planks can often be carefully removed and replaced without redoing the entire wall.
While vinyl is durable, it’s worth noting that extreme heat (e.g., direct contact with very hot pots or pans) can potentially affect it. For areas directly behind a high-BTU gas range, consider adding a thin sheet of heat-resistant glass or metal as an extra layer of protection, or choose a different material for that specific section.
Expanding the Creativity: Other Applications for Peel and Stick Planks
The versatility of peel and stick vinyl planks isn’t limited to the kitchen backsplash. Once you experience how easy and effective they are, you’ll likely start seeing other possibilities around your home:
- Accent Walls: Create a feature wall in a bedroom, living room, or entryway.
- Bathroom Walls: Ideal for half-walls or moisture-prone areas (though direct shower walls might require a more robust, waterproof solution).
- Laundry Rooms: Add character and protection to utility spaces.
- Inside Cabinets or Shelves: Give old cabinets a new lining or revitalize open shelving.
- Desk Fronts or Tabletops: A quick way to update furniture with a new finish.
- Playrooms: Durable and easy to clean, they’re perfect for kid-friendly spaces.
This project proves that you don’t need a huge budget or advanced DIY skills to make a significant impact on your home decor. Peel and stick vinyl flooring offers an accessible and creative solution for a wide range of design challenges. So go ahead, unleash your inner remodelaholic and give this budget-friendly backsplash idea a try!
Want more clever home and garden ideas? Jessica from Mom 4 Real is always sharing fantastic tips. Head over to her blog to learn an amazing garden trick: How To Start Seeds In 3 Days. It’s another simple solution for impactful results!