
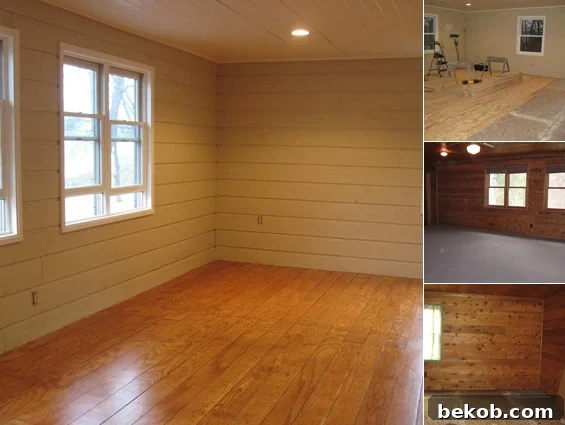
Dreaming of beautiful hardwood floors but facing budget constraints? Discover how to achieve a stunning, custom plank floor look with this comprehensive DIY plywood flooring tutorial. Transform ordinary plywood into an extraordinary surface that rivals traditional hardwood, all while saving significantly on costs.
Looking for more insights? Explore the pros, cons, and essential tips for installing plywood floors, and gain valuable knowledge from our 10 expert tips for successful hardwood flooring installation.
Transform Your Space: An Amazing Plank Look Plywood Flooring Tutorial
Are you ready to elevate your home’s aesthetic with a flooring project that’s both affordable and deeply satisfying? This detailed guide will walk you through creating plank-style flooring from plywood, a solution that offers the visual appeal of hardwood without the hefty price tag. We’re excited to share a project that exceeded our own expectations, proving that with a little ingenuity, you can turn a basic material into a show-stopping feature.
Contributed by Shannon @ Quarry Orchard
When undertaking the renovation of the room situated above our garage, a crucial decision point arrived: we were unequivocally done with the existing carpet. Our initial vision involved removing the old carpet, installing plywood planks, and then painting them for a fresh, uniform look. What began as a practical and budget-friendly approach soon evolved into something truly remarkable. We never anticipated that the plywood planking we meticulously crafted would possess such inherent beauty and character that it would be worthy of staining, rather than merely painting!
Yes, you read that right—the luxurious, warm plank floor you see is indeed crafted from simple plywood. This project serves as a testament to the incredible potential of readily available materials when combined with careful planning and execution. If you’re seeking an affordable, customizable, and visually stunning alternative to traditional hardwood, prepare to be inspired.
DIY Plywood Floor Installation: Your Step-by-Step Guide to a Stunning Floor
Embarking on a DIY flooring project can seem daunting, but with the right instructions and a bit of patience, you can achieve professional-looking results. Here’s how we transformed a carpeted room into a beautiful planked space, complete with essential materials and detailed steps.
Materials & Tools Required:
Before you begin, gathering all necessary materials and tools is crucial for a smooth and efficient installation process. While the material cost is significantly lower than traditional hardwood, the tools ensure precision and ease. Our project for a 533 square foot room came in at roughly $520, offering substantial savings.
- Plywood Sheets: 16 sheets of 15/32 pine plywood (approximately $16.49 per sheet). Pine plywood offers a beautiful grain that takes stain well, making it ideal for a natural wood look.
- Liquid Nail Adhesive: 9 gigantic tubes of Liquid Nail (approximately $4.75 each). This construction adhesive provides a strong, lasting bond between the plywood planks and the subfloor, minimizing movement and squeaks.
- Cut Nails: 10 lbs of cut nails (ordered from Tremont Nail Company) (approximately $69.63, including shipping & handling). Cut nails offer superior holding power and a distinctive, rustic aesthetic that complements plank flooring beautifully. Their square shank provides excellent grip.
- Varathane Polyurethane: 4 gallons of Varathane polyurethane (approximately $37.46 per gallon). A high-quality polyurethane sealer is essential for protecting your floor from wear, moisture, and stains, ensuring its longevity and durability.
- Wood Stain: 2 quarts of stain (approximately $9.99 each). Choose a stain color that complements your desired aesthetic. For plywood, testing the stain on a scrap piece is highly recommended to ensure it achieves the desired tone.
Essential Tools for the Job:
- Table Saw: For accurately ripping plywood sheets into consistent planks. Safety first when operating a table saw; always wear eye protection and follow manufacturer guidelines.
- Shop Vacuum: To thoroughly clean the subfloor and remove dust after sanding.
- Hammer & Nail Punch: For securing the planks with cut nails and ensuring the nail heads are flush or slightly below the surface.
- Measuring Tape & Carpenter’s Square: For precise measurements and ensuring planks are laid squarely.
- Jig (DIY): A custom-made jig greatly aids in consistent nail spacing, speeding up the installation process.
- Orbital Sander / Floor Sander: For smoothing rough spots, removing imperfections, and preparing the surface for staining and sealing. Start with a coarser grit (e.g., 80-100) and finish with a finer grit (e.g., 120-150).
- Applicator Pads/Brushes: For applying stain and polyurethane evenly. A bristle applicator was preferred for polyurethane in this project for better control.
- Safety Gear: Eye protection, ear protection (especially for sawing), work gloves, and a face mask for ventilation during staining and sealing.
- Small Paint Brush: For meticulously painting the plank gaps (if staining).
Step 1: Transforming Plywood Sheets into Planks
The journey to our beautiful plank floor began with standard sheets of 15/32 pine plywood. We meticulously ripped these sheets on a table saw, transforming them into uniform 6-inch wide strips, each 8 feet long. The choice of 6-inch width provides a balanced aesthetic, creating a rustic yet refined plank appearance. Consistency in width is key here for a professional finish; take your time and ensure your table saw is properly calibrated.
Following the cutting, we, or more accurately, Dustin, diligently carried all these newly cut planks up to the room where they would be installed. This crucial step allowed the wood to “acclimate” to the room’s environment—specifically, its temperature and humidity levels. While not always strictly necessary for every plywood project, acclimation is a widely recommended practice for traditional hardwood flooring. It helps prevent warping, gapping, or buckling after installation, as the wood adjusts to its new surroundings. We allowed the planks to sit in the room for several days, giving them ample time to stabilize.
Surprisingly, the entire process of cutting the 16 sheets of plywood into precise planks took us only an hour and 45 minutes. This relatively quick step highlighted the efficiency gained from having the right tools and a clear plan.
Step 2: Preparing the Subfloor for Installation
With our planks cut and acclimating, the next critical phase involved preparing the subfloor. A clean, stable, and level subfloor is the foundation of any successful flooring project, ensuring durability and preventing future issues like squeaks or unevenness. Dustin began by thoroughly cleaning the room using a shop vac, removing all debris, dust, and any remnants from the old carpet installation.
Once clean, he meticulously inspected every subfloor panel, ensuring each one was nailed down securely. Any loose spots were promptly addressed by adding additional screws, which provide a stronger, more reliable hold than nails, crucial for preventing movement and potential squeaks under the new planks. This attention to detail in subfloor preparation is paramount; it directly impacts the longevity and quality of your finished floor. A well-secured subfloor means your new plywood planks will have a solid, stable base for years to come.
Step 3: Precise Measuring and Plank Installation
With the subfloor perfectly prepared, the exciting part began: the installation of our plywood planks. This stage demands careful measurement and planning to achieve a professional and aesthetically pleasing result. We dedicated significant time to measuring and planning our layout, ensuring every detail was considered before any planks were permanently affixed.
A key aspect of our planning involved figuring out a staggered pattern for the plank joints. This is standard practice in hardwood flooring, enhancing both the structural integrity and visual appeal by distributing stress evenly and avoiding long, unsightly seams. We also decided to alternate the position of the cut nails in each row for a more cohesive and deliberate look. Additionally, we determined that shorter pieces, approximately 11 inches long, would be needed for the ends of certain rows, and we planned to alternate these “short” pieces back and forth to maintain the staggered pattern across the entire floor.
We commenced by squaring the very first board against the wall, meticulously leaving a 1/16-inch expansion gap. This small but crucial gap allows the wood to expand and contract naturally with changes in humidity and temperature, preventing buckling. We always performed a “dry fit” first, placing the board without adhesive to ensure it fit perfectly. Once satisfied, a consistent bead of Liquid Nail was applied along the length of the board. The board was then carefully positioned, and Dustin hammered in the cut nails at our pre-marked spots. Later, he followed up with a nail punch to ensure every nail head was driven flush with or slightly below the surface of the plywood, preventing any protrusions.
Maintaining the 1/16-inch gap was critical not just against the walls but also between each plank and each subsequent row. Our initial plan was to paint this flooring, so these deliberate gaps were essential to create the authentic look of individual planks rather than a seamless, solid painted panel. This detail makes a significant difference in the final aesthetic. We strategically worked our way across the room, alternating the starting side with each row to maintain the staggered pattern. We opted to tackle the 11-inch end pieces only after the main body of the room was fully planked, streamlining the workflow.
To ensure the nails were perfectly aligned, we initially marked their positions as we progressed. As the project advanced, I took over marking ahead of Dustin, which proved to be a significant time-saver since it eliminated the need for him to measure every 16 inches individually. Eventually, Dustin ingeniously crafted a simple jig specifically for measuring and marking the nail placement. This jig revolutionized the process; I simply had to align it with the previous board and mark, rather than measuring each individual nail. This small innovation drastically increased our efficiency and consistency, highlighting the value of creative problem-solving in DIY projects.
We ultimately settled on using 11 nails per board, employing an alternating pattern of two nails, then one, then two, and so on, as clearly visible in the accompanying image. Our goal was to achieve a visually ordered and pleasing nail pattern. Initially, we had only used two nails spaced every 16 inches. However, during Dustin’s first break, we realized that the planks required more secure fastening. The Liquid Nail was still wet, and the boards exhibited slight movement when walked upon. This observation prompted us to go back and strategically add the single nails in line with each board, greatly enhancing stability and preventing any future movement or squeaks. This iterative process, learning and adjusting as we went, was a valuable part of the DIY experience.
Step 4: Sanding for a Smooth and Ready Surface
Once all the plywood planks were securely installed, the next crucial step was sanding. This process is vital not only for achieving a smooth, splinter-free surface but also for preparing the wood to properly accept stain and sealer. We meticulously sanded down any rough edges, uneven spots, and areas where there might have been residual blue or green paint marks from the lumber yard. A good orbital sander, starting with a medium-grit sandpaper (e.g., 80 or 100 grit) to tackle imperfections, and then progressing to a finer grit (e.g., 120 or 150 grit) for a smoother finish, is highly recommended. Throughout this entire hands-on process, our beloved animal companions provided unwavering moral support, adding a heartwarming touch to the DIY journey.
It’s worth noting that up until this point, our intention was still to paint the boards a dark brown, aiming for a rustic farmhouse plank floor aesthetic. We truly never imagined, when we initially embarked on this project, that the plywood’s natural grain and texture would lend itself so beautifully to staining. Sanding played a key role in revealing this unexpected potential, making the wood ready to absorb the stain evenly and beautifully.
Step 5: Staining for a Rich Hardwood Look
This was the moment of truth that transformed our practical plywood planks into a surface resembling high-end hardwood. We decided to hand-stain the entire plywood floor. While there are specialized tools designed to make staining quicker and easier, we opted for the hand-application method. This allowed us greater control over the stain’s evenness, a critical factor when working with plywood, as its absorption can sometimes be unpredictable. We were initially unsure how the plywood would react to the stain, but to our delight, it went on perfectly, revealing a beautiful depth and warmth. The entire staining process, covering the 533 square feet, took us approximately 4.5 hours of dedicated effort.
When staining plywood, it’s highly recommended to test your chosen stain on a scrap piece of the same plywood first. This allows you to see how the wood absorbs the color and predict the final outcome. Apply the stain evenly with a cloth or brush, working in small sections, and wipe off any excess according to the manufacturer’s instructions. This prevents blotchiness and ensures a consistent finish across your entire floor.
Step 6: Sealing for Durability and Protection
To protect our newly stained plywood floor and ensure its longevity, we applied four generous coats of polyurethane. This robust sealer is essential for guarding against wear, moisture, and scratches, transforming the plywood into a durable, easy-to-clean surface. The first coat typically takes the longest to dry, about 8 hours in our experience, depending on environmental conditions like humidity and temperature. To avoid the tedious task of sanding between coats, a common requirement for polyurethane, we made sure to recoat each section within 12 hours. This critical recoat window allows the subsequent layer to chemically bond with the previous one, creating a seamless, stronger finish without the need for additional sanding.
For application, Dustin chose a bristle applicator over a traditional wool one. He found that the bristle applicator offered superior control over the thickness and evenness of the polyurethane application, leading to a smoother and more consistent finish. Proper ventilation is paramount during this stage due to the strong fumes emitted by polyurethane. While Dustin isn’t pictured wearing it at the very start, he diligently wore a protective face mask throughout the entire application process for safety. Given that it was in the 30s outside, opening windows was not a viable option for ventilation, necessitating temporary evacuation of the house at night while the coats were drying. Always prioritize safety and follow product instructions for proper ventilation and personal protective equipment.
Step 7: Enhancing the Plank Gaps with Paint
One unforeseen challenge arose from our last-minute decision to stain the floor instead of painting it. Since we originally intended to paint the entire surface, we weren’t concerned that the white subfloor was visible through the narrow 1/16-inch gaps between our plywood planks. We simply assumed these would be completely covered by the paint. However, once the rich stain and glossy polyurethane were applied, those exposed white spots became glaringly obvious, especially under overhead lights at night. A solution was clearly needed to complete the illusion of a solid plank floor.
To rectify this, I ventured out and purchased some Burnt Sienna Americana craft paint. One evening, while Dustin was busy installing the new ceiling fan, I scooted around the floor, armed with my tiny paintbrush and Americana paint, meticulously filling in each and every crack. The beauty of doing this after the polyurethane was that if (or rather, when) I accidentally got paint on the finished flooring, it simply wiped right off with a paper towel. The Burnt Sienna proved to be the perfect color match, seamlessly blending with the stained plywood and offering an ideal solution to our dilemma.
For those embarking on a similar project with the intention of staining, you could save yourself this meticulous work by painting your subfloor a complementary dark color before installing the plywood planks. Alternatively, you could paint the edges of the individual plywood planks before installation, which would also help conceal the subfloor through the gaps. Planning ahead for this detail can streamline your process and achieve an even more polished final look.
The Stunning Result: A Beautiful, Budget-Friendly Plywood Plank Floor
It’s truly astonishing to reflect on this transformation. Can you believe this is the same room, or that this elegant floor began its life as humble plywood sheets? We are absolutely thrilled with this flooring project and the decisions we made along the way, especially the choice to stain rather than paint.
By opting for DIY plywood plank flooring, we’ve realized substantial savings, well over $1500, compared to the cost of traditional hardwood flooring. Not only did we save money, but we also achieved a uniquely charming and durable surface that perfectly suits our home’s style. We are so delighted with the outcome that we’re already making plans to implement this same technique in our kitchen soon, though we intend to paint or whitewash it there for a different aesthetic, showcasing the versatility of plywood flooring.
With all the furniture now moved back into the room, the final touches are falling into place. I’m currently enjoying the process of figuring out what artwork and decor to hang on the walls to complement our beautiful new floor. I’ll definitely be finding a prominent spot for the starburst mirror I crafted. The remaining wall space offers endless possibilities for personalization. We hope this comprehensive plywood flooring tutorial has inspired you to consider this fantastic DIY option for your own home!
Related Reading to Inspire Your Next Project:
- 10 Expert Tips for Successful Hardwood Flooring Installation
- Plywood Flooring: Uncovering the Pros, Cons, and Insider Tips
- DIY Brown Paper Wood Plank Flooring: An Innovative Faux Wood Solution