The steps below follow the order of the work for this workshop project.
–
Submitted By A To Being Creations
CAN I GET A DRUM ROLL PLEASE?! First, let’s start with a good before picture.
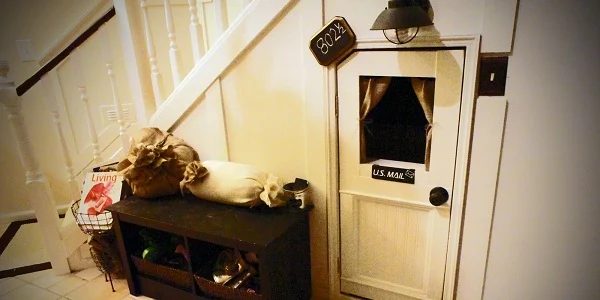
Yep, seems like a long time ago, but I cut that little sliver of a whole in the wall on January 8th! So, this is LITTLE makeover was started and completed in 18 days! I spent very little money on the whole thing…I’ll do a break down at the bottom. Here’s the playhouse…fit for Royalty! Wait! What’s a playhouse fit for royalty without a bench outside?!?
I made the pillow covers out of yep…you guessed it…burlap. I’m doing a project for Janette from The Johanson Journey and Ashley from Cherished Bliss. They’re doing a Show us Your Plum Challenge, and I’m going to save the walkthrough and reveal for that…but they were FREE…recovered and made them with stuff I had…and didn’t have to sew a thing!!!! Whoooo Hoooo! Go visit their blogs for the deets…and maybe you can get in on the action too! I made the curtains out of yep…Burlap.
I made the address plaque and gave them an address of their own….so they can receive mail silly!!! I found the plaque at Good-To-The-Will for only 1$ but you can buy them at Hobby-To-The-Lobby for around 4$ or so with a coupon.
The pillows on the bench outside the clubhouse….
Too cute!
Closeups of some details…
Yes, the mailbox opens! I made the letters and clipart with my Silhouette…actually found Postmaster font!
Why the bucket of chalk? Because the top of the bench is a chalkboard…silly!
So, take off your shoes, wipe your feet on the new welcome mat, (burlap that was left over), and come on in! (I’ll do a walkthrough on painted rugs soon…PROMISE!
This is what you’ll see as you enter the playhouse; The ampersand next to the picture was borrowed from another place in the house. I buy these when ever they’re on sale at Hobby-To-The-Lobby. I LOVE THEM!! And to your immediate right, another bookshelf.
As you turn to your left…you’ll see these “mini” doors. They lead to “MOM’S STORAGE” area. To view their transformation click here. They were part of the EPIC FAIL…actually they caused it. Here they are now, much better. I used pieces of old pallets from the 9-5 to make these little doors. They turned out great!
I made the little shelf that’s holding the tray and doggie…read about that and see its transformation here.
Here’s a closeup of the knobs…see…much better. I also put another one of those knobs on the inside of the door (the outside knob is not real…..lol!!!) so the little Monsters can close the door.
I found this little tray at Good-To-The-Will for 1$!! I painted it with the same paint I used on the ceiling. It fits perfectly!
This little bird cage was a random find at Good-To-The-Will for 1$! I didn’t do anything to it….just hung it up! The little Monsters LOVE putting random things in there. This morning, it was being occupied by a Barbie Camera.
Here’s the view if you’re sitting with “Mom’s Storage” to your back…My second experience with Crown. Thanks to my solid GIFT from Dad, it wasn’t as hard as I thought it would be. Compound Miter Boxes ROCK!! The Telephone booth on the wall I made with my Silhouette, and the light you see is actually an outdoor deck light that I found on clearance! The chair rail (base-cap trim) I had left over, and the shelves are made of leftover MDF for the Board and Batten wall. The picture frame says “This Makes Me Happy…and I made it on my Silhouette too. (I already had the frame).
This little pillow was the splurge. It was $18 and I found it on Etsy. The shop is All the Trimmings. Go visit! Very cute packaging….very high quality…and very quick shipping. The pillow cover was actually only $14.50, including shipping it was $18.
Tater digs the clubhouse. The curtain in the background was just something extra…There was a water pipe that I wanted to leave exposed (I’m digging the “Industrial Style” right now). So, I used some left over burlap and made a faux curtain. I made the “curtain hooks” out of loose leaf rings and binder clips. I purchased them at work…so they were clearly low-cost, – I wanted specific colors, but I HAVE tons of these things around the house. If I wasn’t so picky, they would have been FREE!
LOVE me some UNION JACK. A big shout-out to Marian over at Miss Mustard Seed for the inspiration!
This little stool was SCREAMING “Take me with you!!!” when I was in Hobby-To-The-Lobby the other day; probably because it was on clearance and knew I’m a sucker for bargains. So, since I had a giftcard, and the stars were aligned, little stool (who remains unnamed…any options?) came home with me, and made new friends.
And one last before and after. Here’s what the plain wall looked like before I started this thing…sorry…bad pic…I don’t think I knew what blogging was at this point (hence the awful decorating!!)
And after some furniture rearranging, and blood sweat and tears…(Okay, seriously you should see all of the nicks and bruises all over my body) here’s the after…
The “wasted space” (actually a non-existence) before…
And the Royal Playhouse/Storage space after…
I hope you enjoyed this transformation as much as I did. It took me a long time (kinda more than I’d hoped) to complete, but I couldn’t be happier with the outcome. Here’s a breakdown of cost/materials.
Paint: (I’ll get colors posted asap) Red, Gray, and Blue $11 ea -$33 total
Lighting: $26 Outside $11 Inside -$37 total
Electrical Stuff (outlet box) -$3
Cover- Already had
Sub-flooring -FREE (used old pallets ripped apart from skids in the warehouse at the 9-5)…I have a whole stash in the corner and no one messes with em’!
Walls -FREE (old pallets again)
Wallpaper -Already had
Trim (all of it, including Crown) -Already had (that’s why it’s a combination of lots of different kinds!)
Door -Made from Scraps
Door Knob -$13 (because it’s fake!!)
Curtain Hooks -$2 Because I wanted specific colors…and the loose leaf rings I already had.
Burlap -Already had
Union Jack Pillow -$18
Union Jack Bunting -$11 (isn’t here yet)
Stool -$12 used gift card, so $0
Tray on shelf – $1 Goodwill
Frame -Already had
Wall Art -Made it with the Silhouette
Hinges for the mailbox -Already had
Address Plaque -$1 Goodwill find (already had the chalkboard paint, and for the gold, I used paint markers!)
Carpet and Pad -$14 for both (scraps at Lowe’s)
Knobs for my storage area and back of the door -$2 ea (X3) $6 total, but I had a gift card, so $0
2X4’s -$1.98 ea (low-cost because I used the ones for decks) (x6) -$12 total
Bird Cage -$1 Goodwill find
Total cost for the renovation- $163-$19 gift cards =
$144!!!!!