
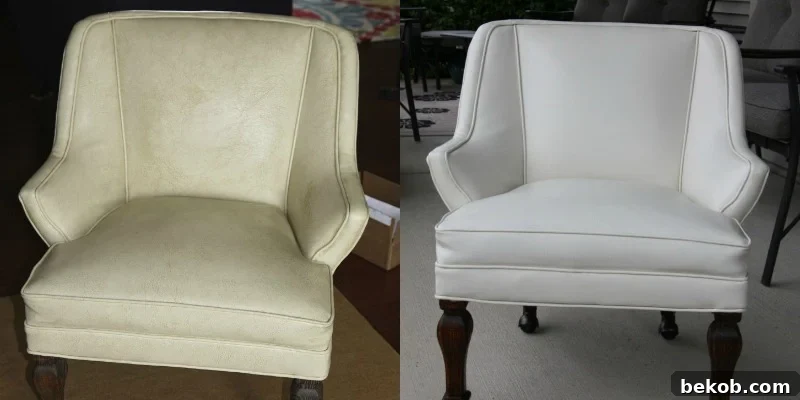
Embracing the charm of vintage pieces often means discovering furniture with character and unparalleled craftsmanship, qualities that modern items sometimes lack. From their distinctive style to their enduring sturdiness, a true gem is often found through the rewarding thrill of thrifting. There’s a unique satisfaction in unearthing a forgotten treasure and envisioning its new life. However, these finds, especially a beloved leather chair or sofa, typically require a touch of DIY magic to reclaim their former glory. Imagine transforming a worn-out leather piece into a stunning focal point, like the example below, with surprising ease and impressive results. We’re thrilled to share an incredible, yet simple, method to restore an old leather chair, making it look brand new.
If you’ve ever dreamt of giving an aged leather chair a complete facelift without the exorbitant cost of professional restoration, you’re in the right place. Our expert guest, Cara from The Project Addict, is here to guide you through her proven process for breathing new life into tired leather. Her step-by-step instructions promise a transformation that will leave you amazed and inspired. Keep reading to unlock the secrets to restoring leather furniture with remarkable simplicity.
Of course, not every cherished furniture find is leather, but that doesn’t mean it can’t be revitalized! The world of DIY furniture makeovers offers a myriad of possibilities to suit any fabric or material. If your heart is set on a non-leather piece, consider these fantastic alternatives to give it a fresh, personalized look:
Give it a new look with a stylish slipcover.
Slipcovers are an excellent, versatile option for changing the look of a fabric chair or sofa without permanent alteration. They’re perfect for updating decor, protecting upholstery, or even hiding minor imperfections. With countless fabric choices, from elegant neutrals to vibrant patterns, you can instantly refresh a room’s aesthetic. A well-fitted slipcover can make an old piece feel brand new, offering both protection and a customizable style solution for any home. They are also incredibly practical for homes with pets or children, as many are machine washable, making maintenance a breeze and extending the life of your furniture.
Embark on a full reupholstering project.
Reupholstering is a more involved but incredibly rewarding project that allows you to completely transform a piece of furniture, especially if the original fabric is beyond repair or simply doesn’t suit your taste. This option gives you full control over the fabric, padding, and even minor structural elements, ensuring the piece not only looks stunning but also offers optimal comfort. It’s an ideal choice for quality antique frames that deserve a modern update or a beloved chair that needs structural as well as aesthetic rejuvenation. The effort invested in reupholstering translates into a custom, high-quality piece that perfectly complements your home’s unique style.
Or get brave and paint it for a bold statement!
Painting upholstery might sound unconventional, but it’s a surprisingly effective and budget-friendly way to drastically alter the appearance of a fabric chair. Ideal for pieces with sturdy fabric but outdated patterns or colors, painting can provide a smooth, durable finish that mimics a new dye job. It’s a fantastic solution for those seeking a dramatic change without the complexities or costs of reupholstering. With specialty fabric paints or clever paint mixtures, you can achieve a custom color that perfectly matches your decor, offering an innovative path to furniture transformation and a unique personal touch to your space.
Now, let’s dive into the core of our discussion: how to restore an old leather chair. Cara is about to reveal how a straightforward product can achieve stunning results, making your vintage leather piece look brand new. Get ready to be inspired and learn valuable DIY skills!
How to Restore a Leather Chair: An Easy DIY Guide
by Cara of The Project Addict
Before we delve into the simple yet highly effective restoration process, take a moment to appreciate the potential that lies within an old leather chair. The transformation you’re about to witness is a testament to the power of thoughtful DIY and the right products, turning a worn item into a cherished piece. This particular chair, once faded and dingy, is ready for its incredible comeback, proving that beautiful furniture doesn’t always have to come with a hefty price tag.
Hello, creative community! My name is Cara, and I’m absolutely delighted to be visiting from The Project Addict. It’s a genuine honor to be here today, and I couldn’t be more thrilled to share my latest furniture makeover adventure with all of you. Before we jump into the exciting details of this leather chair restoration, let me tell you a little bit about myself and what drives my passion for DIY.
I’m a happily married working mom, constantly juggling life with my spirited, almost two-year-old daughter. My mind is a whirlwind of project ideas and creative concepts – my husband affectionately calls it “scheming,” but I prefer to think of it as a constant state of creative inspiration! Being very budget-conscious, I always seek out the most economical ways to achieve stunning results, ensuring that my projects look anything but cheap. My greatest joy comes from taking what others might dismiss as mere junk and transforming it into something truly beautiful and functional. If you’re curious about dramatic transformations, you absolutely must see this rocking chair my grandmother gifted me; it stands as my most astonishing before-and-after project to date. My vintage play kitchen and child’s rocker are also high on my list of cherished makeovers, showcasing the potential in forgotten items.
As a self-proclaimed “project addict,” it’s incredibly challenging for me to pass up a great chair. My basement currently houses a small collection, and let’s be honest, there’s only so much seating one household needs! Luckily, when I stumbled upon this little leather chair for a mere $15 at the Habitat ReStore, I immediately envisioned its perfect spot in our home. This foresight was a blessing, as it justified yet another delightful addition to my growing list of projects. The chair, though aged, possessed a sturdy frame and undeniable potential, making it an irresistible find for any DIY enthusiast looking for a rewarding leather restoration challenge.
Initially, my plan was to completely reupholster the chair, a common approach for fabric pieces. However, upon closer inspection, I realized the leather itself, despite its dingy appearance, was in remarkably good condition structurally. This discovery prompted me to explore alternatives to a full reupholstery job. After several attempts to simply clean it, which left it still looking dull and tired, I began researching specialized leather restoration products. It was during this search that I providentially discovered Rub n Restore. The transformation showcased in their YouTube video was truly convincing, demonstrating how a simple application could achieve professional-level results. Confident in its potential, I decided to invest in the product. The total cost, including the Ivory Rub n Restore, a protective top coat, and shipping, came to around $47 – a small price to pay for such a significant transformation compared to buying new or even professional reupholstery.
The beauty of this product lies in its incredible ease of use. If you can confidently wield a sponge, you possess all the skills necessary to achieve a successful restoration with Rub n Restore! It’s designed to be user-friendly, allowing even novice DIYers to achieve professional-looking results. The process is remarkably straightforward, making leather chair restoration accessible to everyone.
The first and most crucial step in any restoration project is proper preparation. Before you begin applying the product, ensure your leather chair is meticulously clean. While you don’t need to tackle deep, set-in stains that the product will cover, it’s absolutely vital to remove all surface dirt, grime, grease, and any other contaminants. Use a gentle leather cleaner or a mild soap solution with a damp cloth, making sure to wipe down every inch of the leather surface. Allow the chair to dry completely before moving on to the next step. A clean base ensures optimal adhesion and a smooth, even finish for your new color.
Once your chair is perfectly clean and dry, you’re ready to apply the Rub n Restore. The application method is incredibly simple: dampen a clean sponge (this helps spread the product evenly and prevents it from drying too quickly), pour a small amount of the Rub n Restore product onto it, and then begin working it into the leather in circular motions or long, even strokes. Think of it less like painting and more like conditioning the leather with a rich, new color. Focus on applying thin, consistent coats rather than thick, heavy layers. This approach allows the product to absorb properly, creating a natural finish that flexes with the leather.
Patience is key during the application process. Multiple thin coats consistently yield the best results, ensuring even coverage and a durable finish. It’s essential to let each coat dry thoroughly before applying the next. The company recommends using a hairdryer on a low setting to speed up the drying process if you’re in a hurry, but in my experience, it dries quite quickly on its own under normal room conditions. The goal is to build up the color gradually, achieving a deep, uniform hue that revitalizes the leather. You’ll be amazed at how quickly the transformation begins to take shape with each subsequent layer.
For this project, I applied approximately five coats of the Ivory Rub n Restore, which was likely more than strictly necessary given the product’s excellent coverage. A little truly goes a very long way; I only used about a fifth of the bottle for this entire chair! The chair I was working on features extensive piping and numerous nail head trims, which naturally added considerably more time to the restoration process compared to a simpler, flat-surfaced chair. These intricate details require careful attention and precision, but the effort is well worth it for the stunning final result.
To meticulously cover all the intricate trim areas, I found that a small paintbrush was indispensable. It allowed me to get into every crevice and around each nail head with precision. If, by chance, you get any of the product on the nail heads, don’t fret – it’s an easy fix! While the company suggests using fine steel wool for cleaning them off, I discovered that nail polish remover applied carefully with a Q-tip worked just as effectively, if not better, without risking damage to the surrounding leather. The entire chair restoration probably took me about three hours from start to finish. However, a significant portion of that time, perhaps half, was dedicated solely to painting around the multitude of nail heads, highlighting the attention to detail these features demand. I also tested the protective top coat on a small, inconspicuous area. Ultimately, I preferred the more natural, satin sheen that the chair achieved with just the Rub n Restore product alone. I’m certain, though, that the top coat will be an invaluable asset for many future projects, especially for items that will endure heavy use or require extra durability. The decision to use a top coat, I believe, hinges on several factors: the specific color you’re working with, the existing condition of your leather, and the precise look and level of protection you aim to achieve.
I am absolutely thrilled with the final outcome of this chair! The transformation is truly remarkable. What I love most is that the texture and feel of the chair remain completely natural; it doesn’t look painted or feel stiff in the slightest. The leather retains its supple quality, making it as comfortable as it is stylish. One of the most fantastic aspects of the Rub n Restore product is its versatility: you can actually change the color of your chair! They offer a generous selection of 18 stock colors, or for those with a specific vision, you can even send in a swatch to get a custom color match. This opens up a whole new world of possibilities for furniture restoration. This successful project has truly broadened my horizons, allowing me to consider a wider array of furniture pieces that I might have previously overlooked or bypassed. Now, instead of investing in an expensive new office chair, I have a chic, comfortable, and beautifully restored piece that cost me significantly less – and it has a story to tell!
————————
What an absolutely incredible transformation, Cara! This leather chair restoration is a true testament to your skill and vision. The results are nothing short of amazing, turning a forgotten piece into a stunning focal point. Your detailed guide empowers so many to tackle similar projects with confidence and creativity.
For more inspiring projects and clever DIY ideas, be sure to visit Cara at The Project Addict. She consistently shares fantastic insights into restoring, upcycling, and crafting beautiful items for the home. Get ready to add more projects to your own “to-do” list!