
Revitalizing the Laundry Room: A Complete Flooring and Paint Transformation
Contributed by The Cellar Door Stories
Every homeowner dreams of spaces that are not just functional but also aesthetically pleasing, reflecting their personal style. For many, the laundry room is often an overlooked utility area, tucked away and rarely given the design attention it deserves. However, we believe it holds immense potential to be a bright, efficient, and even charming space. Join us as we unveil the dramatic transformation of our laundry room, a journey from a neglected, outdated area to a vibrant, highly organized hub in our home.
When we first purchased our home, we knew there were a few areas that would require significant imagination and effort. The laundry room, along with an adjacent space, presented one of our biggest challenges. These rooms had previously been utilized for dog breeding, leaving behind an aesthetic that was far from ideal and certainly not what we envisioned for our living space. For three and a half years, we patiently waited, brainstormed, and planned, knowing that someday we would embark on the mission to turn these areas into something truly useful and beautiful. Today, we’re thrilled to share the stunning results of our renovation, though we do wish we had more “before” photos to truly capture the extent of the change!
The Vision: From Drab to Dream Laundry Space
Our goal for this renovation was clear: create a highly functional, well-organized laundry room and an inviting mudroom. We wanted to shed the dated look and the previous, undesirable purpose of the rooms, infusing them with a fresh, clean, and welcoming vibe. This wasn’t just about utility; it was about crafting a space that would make daily chores more pleasant and contribute positively to our home’s overall flow and aesthetic. The transformation involved more than just cosmetic changes; it was a complete overhaul, focusing on practical solutions, smart storage, and a touch of personal flair.
While the major renovation work is complete, a few finishing touches remain. Here’s a quick peek at our still-to-do list, not including the longer-term projects like filling the walls with artwork:
Putty holes & paint trim!(Achieved!)- Paint doors
- Baskets for shelves (for enhanced organization)
Shelves for above washer & dryer!(Done! You can see it here!)- Doormats!
- Curtains (to add softness and privacy)
Now, prepare yourself for a visual feast as we walk you through the stunning “after” pictures, complemented by a few “before” glimpses to truly appreciate the scale of this home improvement project. Please excuse the varying picture quality; our focus was on documenting the transformation!
A Dramatic Entryway Transformation: Before & After
Let’s begin our tour in the hallway, looking towards what is now our beautifully renovated space. The original hallway was a relic of a bygone era, dominated by an abundance of wallpaper and a prevalent blue color scheme that seemed to be a recurring theme throughout the house. The distinctive border, adorned with what appeared to be ducks or geese, added to its uniquely dated character. This was the first impression, a visual bottleneck that needed a complete reimagining.
Before: A glimpse of the former hallway, showcasing its blue wallpaper and animal border.
The transformation here is truly breathtaking. The oppressive wallpaper has been stripped away, revealing clean, freshly painted walls. The new flooring extends seamlessly, creating a cohesive and inviting pathway. The doors and trim have been revitalized with a fresh coat of paint, instantly brightening the space. A significant structural change involved removing the door to the garage, which allowed us to extend and connect the old hallway to the newly incorporated mudroom and laundry areas, drastically improving the flow and functionality of our home. It’s a testament to how thoughtful design can completely redefine a space.
After: The same view, now transformed with new flooring, painted walls, and an open, airy feel. (Includes a peek at my daughter’s jammie-covered bum!)
Continuing our journey into the heart of the newly renovated space, the sense of openness and modernity becomes even more apparent.
The bright and inviting entryway leading into our new utility spaces.
The Mudroom: A Functional & Welcoming Transition Space
Turning left around the corner, we enter the mudroom, a crucial transitional area designed to handle the daily comings and goings of family life. This space seamlessly blends practicality with rustic charm, providing essential storage and a welcoming atmosphere. It’s where muddy boots can be shed, coats hung, and bags dropped, preventing clutter from spreading into the main living areas.
A wide view showing the connection between the laundry room and the functional mudroom.
Straight ahead in the mudroom, you’ll find a delightful focal point:
Our charming green bench, a true vintage treasure.
The Charm of a Vintage Find: Our Green Bench
One of my absolute favorite pieces in this new space is this little green bench. It was a fantastic discovery, found tucked away in our basement when we moved in! I’m still searching for the perfect cushion or decorative items to adorn it, but its inherent charm needs little enhancement. The bench boasts a beautiful, aged aesthetic that simply cannot be replicated by new furniture. Every scuff and faded patch tells a story, and while I wish I knew its full history, its presence adds an undeniable character and warmth to the mudroom. It’s a perfect example of how repurposing existing items can bring unique personality to a renovated space.
A closer look at the unique, well-worn character of the green bench.
Looking to the right, you’ll see a clever storage solution: built-in shelves. These are ideal for keeping everyday essentials organized and easily accessible. Our plan is to add stylish baskets to these shelves, perfect for stowing away hats, mittens, scarves, and other small items that tend to accumulate near an entry point. To the left, a sliding door leads out to a small, private porch area, connecting our indoor mudroom with the outdoors.
The organized shelves awaiting storage baskets, and the sliding door to the porch.
Now, let’s turn around and take a “backwards walk-through,” heading back into the main laundry area from the mudroom. This perspective highlights the seamless transition between the two spaces and offers another view of the thoughtful design choices.
A reverse view, showcasing the open connection between the mudroom and laundry space.
One of the practical additions to the mudroom is this sturdy metal bucket. It serves as a designated spot for “outside stuff” – garden tools, muddy shoes, or anything that needs to be contained before entering the cleaner parts of the house. It’s a simple yet effective solution for maintaining cleanliness and organization.
The robust metal bucket, ready to store outdoor essentials.
The Utility Zone: Sink, Drying Rack & Essential Appliances
Just on the other side of the door, we find the essential utility sink, a true workhorse in any functional laundry room. This deep basin is indispensable for pre-treating stains, hand-washing delicate items, or even cleaning up after gardening tasks. Its strategic placement ensures it’s readily accessible without impeding the flow of the room.
The practical utility sink, a must-have for any busy laundry room.
The Prized Drying Rack: A Story of Patience and Thoughtful Gifting
Perched above the utility sink, you might notice a fascinating contraption: our cherished drying rack! This isn’t just any drying rack; it carries a wonderful story. I first spotted it over two years ago at a store closing down. Despite my admiration for it, I regretfully passed it up, believing I had no suitable place for it in our then-unrenovated home. Unbeknownst to me, my thoughtful husband mentioned it to my mother-in-law, who, to my utter delight, surprised me with it! It patiently waited in my closet for years, anticipating the day it could finally be hung and admired in its full glory. Now, it stands as a testament to thoughtful gifting and serves as a highly practical solution for air-drying delicate garments, keeping them off countertops and preventing clutter.
Our treasured drying rack, a perfect blend of form and function.
Storage & Organization: Making Every Inch Count
Continuing our “backwards walk-through” into the main laundry area, we encounter another wall dedicated to storage and organization. This space efficiently houses our freezer and pantry shelves, demonstrating how a laundry room can double as a valuable overflow pantry. We also have plans for a great cabinet to place under the window, which is currently serving a purpose in another part of the house, but will eventually enhance the storage capabilities here.
The storage wall, featuring our freezer and practical pantry shelves.
On top of the freezer, we’ve placed these fantastic vintage-looking grape boxes. They add a touch of rustic charm and provide some elevated storage, though I’m still pondering their ultimate purpose. We’re always open to creative ideas for utilizing decorative yet functional pieces like these!
Decorative vintage grape boxes, seeking their next functional role.
Above the pantry shelves, a collection of sentimental items adds a personal touch to the utilitarian space. This includes a distinctive Hops bottle, a memento from the restaurant where Jon and I had our very first date – a sweet reminder of our beginnings. Alongside it are a classic crock and several beautiful blue mason jars, cherished heirlooms from my Grandma’s house. I absolutely loooove blue mason jars; their vintage appeal and lovely hue bring a sense of history and warmth to the room, proving that even a utility space can house treasured memories.
A curated collection of personal artifacts, adding charm and history.
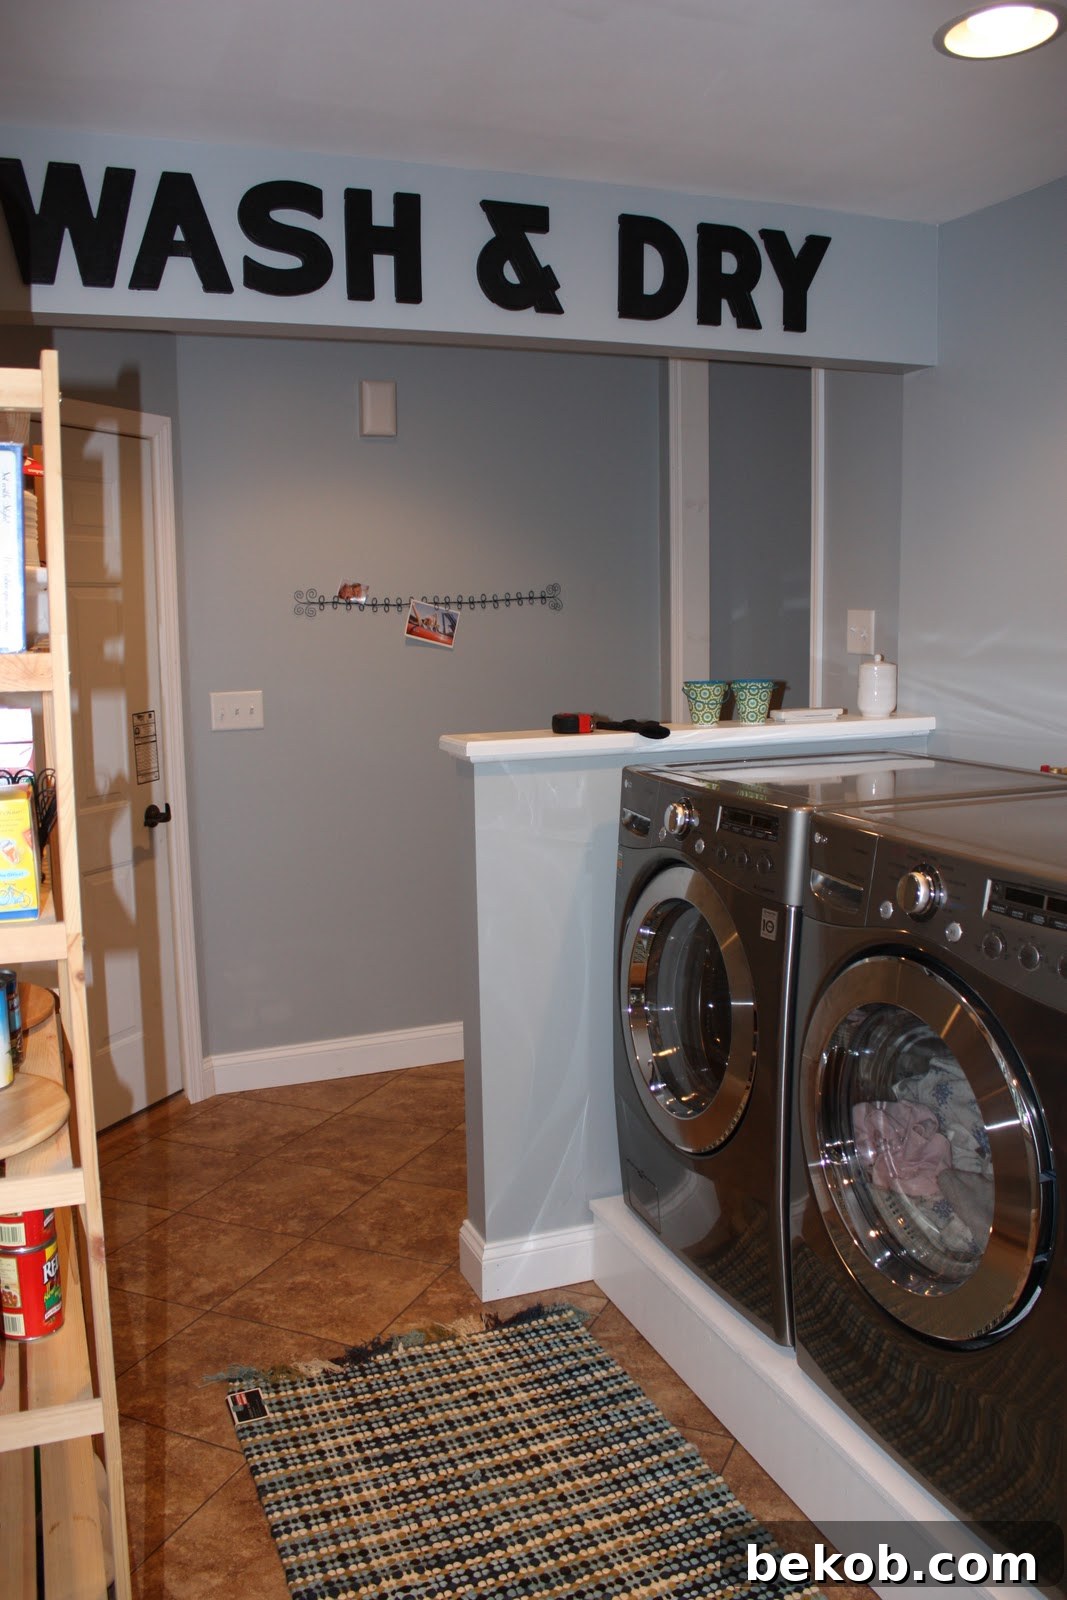
The other side of the laundry room is where the core washing and drying action happens. To help put it in perspective, the utility sink we discussed earlier is located to the right of the dryer, making for a very efficient workflow.
The main laundry zone, featuring our washer, dryer, and a clever DIY solution.
DIY Washer & Dryer Pedestal: Smart Savings & Ergonomics
In the picture above, you can see one of Jon’s brilliant DIY contributions: the custom-built box that elevates our washer and dryer. Standard pedestals can easily cost upwards of $200 per appliance, a significant expense we were keen to avoid. This DIY solution not only saved us a considerable amount of money but also provided a sturdy and aesthetically pleasing base. Elevating the appliances is a game-changer for ergonomics, reducing the need to bend down excessively and making loading and unloading laundry much more comfortable. As for the rug, it might still have a Target price tag, as I’m currently debating whether it’s the perfect fit for this space!
Unique Personal Touches & Decor
Beyond the functional appliances and the beloved green bench, my absolute favorite element in the entire room has to be this unique piece:
Our personalized, vintage marquee sign: “LA & DRY”.
“LA & DRY”: A Creative & Sentimental Marquee Sign
These fantastic vintage marquee letters spell out “LA & DRY” and hold a special place in our hearts. We discovered them at an antique/flea market, originating from an old, now-defunct movie theater. Initially, I thought about spelling out “LAUNDRY,” but Jon wisely suggested it was too conventional. When we stumbled upon the “&” symbol, everything clicked into place – “LA & DRY” offered a witty and unique take on a traditional laundry room sign. The project wasn’t without its challenges: some letters were red, others black, but a little spray paint quickly harmonized them. The biggest hurdle was the absence of an “A.” Resourcefully, we inverted a “V” and, with my husband’s expertise as an insulator, used a small piece of Armaflex to craft the crossbar for the “A.” This DIY ingenuity not only saved the day but also added to the sign’s character and our pride in it.
For our final close-up, I want to share this charming wire display. Pottery Barn once sold similar items as elegant Christmas card holders, but I found this little gem on Etsy from curlywire several years ago, patiently waiting for its moment to shine. While I’m still deciding if this is its permanent home, I anticipate it will look even better once filled with more cherished photos and cards. For now, it proudly displays an adorable picture of our niece and nephew, alongside a birthday card from a few years back that consistently brings a smile to my face.
The versatile wire display, showcasing cherished memories and a dash of humor.
Conclusion: The Joy of a Renovated Laundry Room
Well, there you have it – the full reveal of our renovated laundry room and adjacent mudroom! This project has been incredibly rewarding, transforming a once-neglected and uninspiring space into a truly functional, organized, and beautiful area of our home. The extra space and, most importantly, the convenience of no longer having to trek down to the basement for laundry have significantly improved our daily routine. It’s a testament to how investing in thoughtful home renovations, even in utility areas, can profoundly enhance comfort, efficiency, and overall living quality.
Ready for Your Own Laundry Room Makeover?
We hope our journey inspires you to look at your own laundry space with fresh eyes. Remember, even small changes can make a big difference. Consider these tips for your next home improvement project:
- Plan Thoroughly: Define your needs and vision before starting.
- Embrace DIY: Simple projects like painting or building custom storage can save money and add personal flair.
- Seek Vintage Finds: Repurposing old items can add character and history.
- Prioritize Functionality: Think about workflow and storage solutions to make daily tasks easier.
- Don’t Forget the Details: Personal touches, sentimental items, and good lighting can elevate any room.
We are absolutely loving our refreshed laundry room, and it stands as a bright, functional cornerstone of our home. What are your favorite elements of a well-designed laundry room? Share your thoughts and questions in the comments below!