
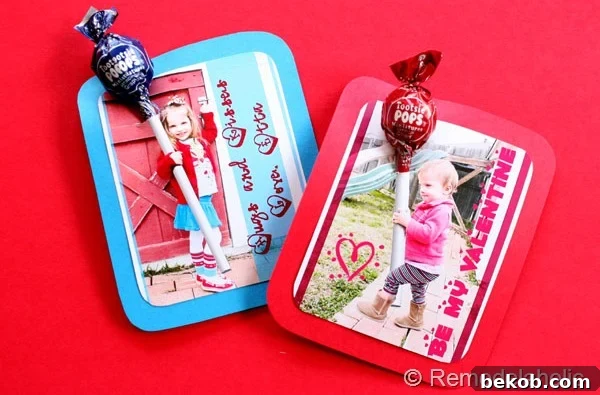
Welcome, fellow crafters and parents! Valentine’s Day is just around the corner, and what better way to celebrate love and creativity than with a charming, personalized DIY project? This year, I’m absolutely thrilled to share a delightful homemade Valentine’s Day craft for kids that combines heartwarming photos with a sweet treat: personalized lollipop valentines. Forget the generic store-bought cards; these unique creations are sure to bring smiles to everyone who receives them, from classmates to grandparents. They’re not just cards; they’re little bundles of joy and a cherished memory.
Creating custom Valentine’s cards is one of my favorite holiday traditions, especially when it involves my little ones. There’s something incredibly special about seeing their personalities shine through a handmade gift. While we haven’t quite decided who will be the lucky recipients of these adorable valentines yet, one thing is certain: they are undeniably cute and packed with love!
The Sweet Inspiration Behind Our DIY Lollipop Valentines
If you’ve been following along, you might recall an exciting idea I stumbled upon via Pinterest not too long ago. It was a fantastic concept for Valentine’s decor and crafts that immediately sparked my imagination. My take on these personalized lollipop valentines is a playful spin on that initial inspiration, tailored to be a fun, hands-on activity with my girls. It’s truly amazing how a simple image or idea online can blossom into a delightful family project!
Specifically, the brilliant concept for these “ginormous lollipop” valentines originated from a fantastic feature in Family Fun Magazine. Seriously, for anyone with kids, grandkids, or educators looking for engaging, creative ideas, that magazine is an absolute treasure trove. It’s packed with so many inventive crafts and activities that truly live up to its name. I highly recommend checking it out for endless inspiration beyond just Valentine’s Day!
Materials You’ll Need for Your DIY Photo Lollipop Valentines
Before diving into the fun, let’s gather our supplies. Most of these items are likely already in your craft stash or easily found at a local dollar store or craft supply shop:
- Camera (a smartphone camera works perfectly!)
- Pipe insulation (leftover from a previous project like my wreath project) or a 2-3 inch white PVC pipe (about 3 feet long)
- Photo editing software (or a photo editing app on your phone/tablet)
- Photo paper (or good quality cardstock if you prefer a matte finish)
- Printer
- Scissors or a paper cutter
- Cardstock (in a color that complements your photos)
- Craft glue or double-sided tape
- Mini Tootsie Pops or other small lollipops
- Clear tape
- A dash of patience and a sprinkle of fun!
Step-by-Step Guide: Crafting Your Personalized Lollipop Valentines
Step 1: The Fun Photo Shoot
The first and arguably most entertaining step involves a mini photo shoot with your little ones. We headed outside, equipped with the leftover pipe insulation from my recent wreath project. The goal was to capture images of the girls holding what would eventually become the stick of their giant lollipop. If you don’t have pipe insulation handy or prefer a more rigid prop, a 2-3 inch white PVC pipe (around 3 feet long) works just as well. This might even save you some editing time later, though personally, I wasn’t keen on an extra trip to the store!
Photographing a one-year-old and a two-year-old can be quite the adventure, to say the least! Some pictures turned out okay, but it was genuinely challenging to get perfect, focused shots. Expect a lot of giggles, wiggles, and maybe a few blurry moments – embrace the candidness! We didn’t end up dressing them up specifically for the shoot as I had originally planned; these were simply their adorable outfits for the day. However, I must admit, I absolutely adore what Etta is wearing in her photos. Those leggings are a personal favorite! I promise to share a tutorial on how I made them in a future post.
Step 2: Editing Your Photos for That Perfect Lollipop Look
After the photo shoot, it was time to select our favorite two images for editing. This is where the magic truly happens! My husband, Justin, skillfully added a full white “pole” to the images where the girls were holding the pipe insulation, transforming it into a convincing lollipop stick. I then personalized them further by adding a bit of sweet text – like “You’re a SUCKER for me!” or “Hope your Valentine’s Day is POPPIN’!” – and a simple border. A little tip from my own experience: be mindful of your printer’s margins! My border annoyingly got cut off during printing, but admittedly, I was too lazy (and ink-conscious!) to reprint. Learn from my minor oversight!
There are many user-friendly photo editing software options available, from free online tools to professional programs. Even many smartphone apps now offer excellent editing capabilities, allowing you to easily add text, graphics, and enhance your photos right from your device. Don’t be intimidated by the editing step; a simple white rectangle for the stick and a cute font can make all the difference.
Step 3: Printing Your Adorable Valentines
Once your photos are perfectly edited, it’s time to print! I opted to print them out onto photo paper directly from my picture file, selecting the “wallets” size option. Most printers allow you to specify how many copies you want per page, automatically arranging them for efficient printing. Using photo paper gives the valentines a professional, vibrant finish, but a good quality cardstock would also work if you prefer a less glossy look.
I specifically chose to use mini Tootsie Pops for this project, which meant I didn’t want the pictures to be too large. The smaller size of the lollipops and the wallet-sized photos creates a charming, “mini valentine” aesthetic that I absolutely adore. It feels sweet, quaint, and perfectly suited for little hands to give and receive. You could experiment with other small candies, but make sure they fit the scale of your printed photos.
Step 4: Assembling Your Lollipop Masterpieces
Now for the final assembly! Carefully cut out all your printed cards. To add stability and prevent the photo from bending too much once the lollipop is inserted, I highly recommend gluing each picture onto a piece of similar-colored cardstock. This adds a lovely backing and makes the valentine feel more substantial. Use craft glue or double-sided tape for a clean finish.
Next, lay a mini Tootsie Pop onto the card to determine the best placement for the lollipop stick. You want it to align perfectly with the “pole” in your photo. Once you’ve found the ideal spot, carefully cut a small slit where the stick will go. Make sure you cut all the way through the photo and the backing cardstock if you glued it! The slit should be just wide enough for the lollipop stick to pass through snugly.
Ensure your cut goes completely through the card and any backing paper!
Carefully slide the lollipop stick through the slit. (My first attempt without the cardstock backing resulted in a bit of bending, but with the backing, it’s much more sturdy! Just ensure you push the stick through both layers.)
Finally, secure the lollipop by placing a piece of clear tape loosely across the back of the stick and the card. You don’t want to tape it too tightly, just enough to keep it in place without damaging the photo. And just like that, you’re done! You’ve created a truly unique and adorable personalized lollipop valentine.
Why These Personalized Lollipop Valentines Are a Must-Try
Beyond their undeniable cuteness, these personalized photo lollipop valentines offer a unique blend of creativity, sentimentality, and fun. Here’s why I believe they’re a fantastic choice for your Valentine’s Day celebrations:
- Uniquely Personal: In a world of mass-produced goods, a handmade valentine featuring your child’s smiling face truly stands out. It shows thoughtfulness and effort, making the recipient feel extra special.
- Memorable Keepsake: These aren’t just temporary treats; they’re tiny photo souvenirs! Parents, grandparents, and friends will cherish these miniature portraits long after the lollipop has been enjoyed.
- Engaging for Kids: While younger children might need more assistance, even toddlers can participate in the photo shoot and perhaps help with gluing or picking out lollipops. It’s a wonderful way to involve them in the spirit of giving.
- Budget-Friendly: With a few basic supplies, you can create a batch of these unique valentines for less than what a comparable number of store-bought cards might cost, especially when factoring in the personal touch.
- Creative Expression: This project encourages creativity, from choosing outfits for the photo shoot to designing the text and borders. It’s an opportunity to let your imagination (and your child’s!) run wild.
There you have it – a truly delightful and personalized DIY Valentine’s Day craft that’s as fun to make as it is to receive! These personalized photo lollipop valentines are more than just a sweet treat; they’re a tangible expression of love, creativity, and the joy of making memories with your little ones. Whether they’re handed out at a school party, shared with family, or given to special friends, they are sure to be a cherished gift.
Wasn’t that a fun project to create?
What are your thoughts on these adorable DIY Lollipop Valentines? Share your ideas and creations in the comments below!