
Transforming your home doesn’t always require a complete gut renovation. While some spaces might demand a full overhaul, often the most stunning makeovers come from strategically working with what you have. It’s the thoughtful details and finishing touches that elevate a room from merely functional to truly breathtaking – think a fresh coat of paint, elegant trim work, or carefully curated decor that reflects your personality. These seemingly small adjustments can collectively create an awe-inspiring transformation, especially in a central hub like the kitchen.
Today, we’re thrilled to share an exceptional example of such a transformation from our talented reader, Jenny. Her kitchen makeover perfectly illustrates how a series of smart, self-taught DIY projects can turn a “nice” space into something truly “amazing.” Jenny’s journey is a testament to the power of vision and perseverance, and we’re incredibly honored that she credits our site as an early source of inspiration: “Yours was the first DIY home improvement site I ever came across and the inspiration for me believing that maybe, just maybe, I could do a little DIY, too.” Get ready to be inspired by Jenny’s gorgeous kitchen facelift and learn her invaluable tips for achieving a successful home renovation without breaking the bank.
UPDATE: Find all paint colors and decor sources at the bottom of this inspiring post!
Unlock Your Dream Kitchen: Jenny’s 4-Step DIY Makeover Guide
In the two years since moving into her current home, Jenny, a busy mom of four, has tackled countless home improvement projects, often performing the work herself, even while pregnant. Through these experiences, she’s uncovered two profound truths:
- “Yes, I can!” – With unwavering hard work and determination, she discovered the ability to transform her living spaces entirely on her own, embracing the true spirit of DIY.
- The significant impact of small, simple changes – Jenny learned that thoughtful, minor modifications can drastically alter the aesthetics and atmosphere of any room.
Her incredible kitchen facelift stands as a shining example of how a “can-do” attitude, coupled with well-planned improvements, can completely revitalize a space. Jenny didn’t start with a ‘bad’ kitchen; rather, it was a space that lacked a distinctive personality. Upon moving in, she envisioned its potential, realizing that with a touch of care and creativity, she could tailor it to her tastes without embarking on a costly, major renovation. And that’s exactly what she did! Here’s her inspiring process:
1) Catch the Vision: Defining Your Kitchen’s Potential
The first crucial step for any home improvement project, according to Jenny, is to develop a clear vision. This involves imagining how the space could be better. For her kitchen, Jenny began by analyzing her family’s daily usage of the area and identifying what was needed to optimize its functionality. Immediately, she recognized a significant deficiency: light. The kitchen felt dimly lit, especially in the evenings, creating an unwelcoming atmosphere. Addressing this, she hired an electrician to install several new pot lights in the ceiling and two stylish pendant lights over the island. This was the most substantial expense of her makeover, totaling around $1,000, but it was an investment she felt confident leaving to professionals. The difference it made was immeasurable, profoundly changing the room’s ambiance and utility.
Beyond lighting, Jenny pinpointed the minimal wire shelving in her pantry as a major functional flaw. She took swift action, ripping out the inadequate shelving and installing custom-built wood shelves that offered superior storage and organization. To further expand her food storage capabilities, she ingeniously converted a nearby coat closet into a second pantry. Maximizing every inch, she even constructed a custom spice rack and affixed it to the pantry door, ensuring everything had its place. This thoughtful approach to organization not only enhanced efficiency but also brought immense satisfaction.
The pantry makeover was a standout success, demonstrating how strategic planning can profoundly impact daily living. The custom shelving allowed for better categorization and rotation of goods, making meal prep and grocery shopping far more efficient.
Jenny didn’t stop there. She implemented other, smaller updates that significantly improved the kitchen’s overall efficiency. This included relocating an under-cabinet microwave to a less obtrusive spot and adding a convenient towel bar directly across from the kitchen sink. As a mom of four, she also incorporated a giant magnetic chalkboard onto the exposed side of the cabinets housing the double ovens – a perfect spot for notes, lists, and kid’s artwork. Instead of buying an expensive custom piece, she had a local sheet metal shop cut a piece to size, then mounted it with construction adhesive and painted it with chalkboard paint. This clever, budget-friendly solution added both functionality and a touch of personalized charm.
To further refine her vision, Jenny dedicated time to browsing Pinterest and various home decorating websites. While many featured brand-new, professionally designed kitchens, she understood that her budget wouldn’t allow for an exact replication. Instead, she focused on identifying specific design elements and customization ideas she admired, then strategizing how to adapt and recreate those concepts within her own kitchen on a DIY scale. This process of selective inspiration was key to achieving a high-end look without the high-end cost.
2) Plan and Prepare: Strategic DIY for Real Life
With a wealth of ideas gathered, Jenny moved to the critical planning phase. This involved sifting through her inspirations and making realistic decisions about what she could achieve through DIY. She acknowledged that many desirable projects were simply not feasible due to time constraints or excessive expense. Being a mom of four children, all under the age of ten, Jenny had to be pragmatic about how much she could disrupt her family’s living space and how much time she could realistically dedicate to the project. Prioritizing projects that offered the most impact for the least disruption became paramount.
Once the “what” was decided, the “how” came into play. Jenny is a remarkable example of a self-taught DIYer. Every skill, every technique, every trick she employed in her home improvements was learned through diligent research – watching countless YouTube videos and poring over online tutorials. Her advice is simple yet powerful: if there’s something you want to do, “Google it!” This approach empowers anyone to tackle projects they once thought were beyond their capabilities, proving that dedication to learning is the ultimate DIY tool.
3) Don’t Forget the Little Stuff: The Cumulative Power of Detail
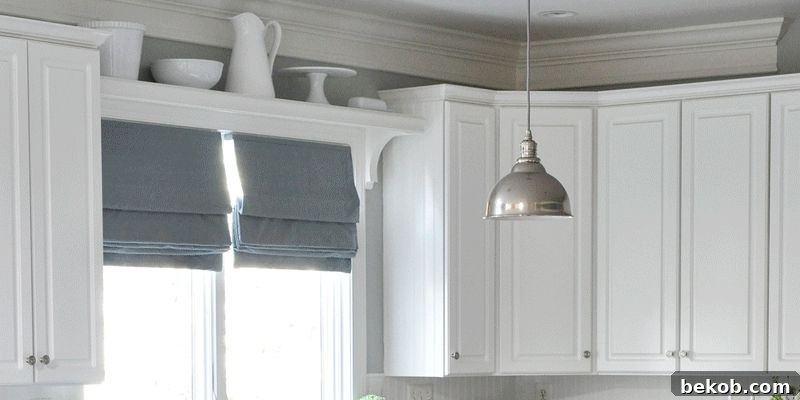
Jenny’s kitchen makeover is a powerful testament to the impact of “the little stuff.” She didn’t undertake major overhauls like painting or replacing cabinets, redoing floors, or installing new appliances. Instead, she focused on a collection of smaller, more manageable improvements. Yet, when you tally up all these seemingly minor details—custom shelves above the windows, a fresh coat of paint, elegant crown molding, sophisticated wainscoting, and personalized decorative touches—the cumulative effect is nothing short of transformative. By tackling these projects herself, Jenny saved a significant amount of money, making a high-impact renovation remarkably affordable.
Her detailed budget breakdown highlights just how much impact can be achieved on a modest spend. For instance, she spent less than $200 on all the trim wood for the crown molding, chair rail, and shadow boxes. The charming shelf above the kitchen eating area was largely constructed from scrap wood, with the main expense being around $30 for the hooks. The decorative shelf above the kitchen sink was an equally economical creation, costing about $30 to build using corbels, a board, and a piece of trim. Many of the signs adorning her kitchen were crafted from scrapwood and existing paint. Even the bar stools and desk chair were garage sale finds, costing a mere $23 total, needing only a fresh coat of paint. She utilized sheets of beadboard to enhance the ends of all the cabinets, create a stylish backsplash, and upgrade the kitchen island, a project that cost approximately $100. These examples vividly demonstrate how resourcefulness and DIY skills can dramatically cut costs without compromising on style or quality.
Perhaps one of her most impressive DIY feats was building her own kitchen table. She meticulously banded a piece of plywood with trim for the tabletop, then attached it to four table legs recycled from an old table, painting it to perfectly match her kitchen’s aesthetic. The result is a custom table that comfortably seats eight, built for less than $50. This project alone speaks volumes about Jenny’s ingenuity and commitment to crafting a personalized home within a budget.
4) Get to Work!: Embracing the Journey and Enjoying the Reward
This is where the vision truly comes to life, a stage that is both exciting and demanding. Jenny emphasizes the importance of thorough preparation and thoughtful planning before commencing any work. Starting small and gradually building confidence in your skills is a strategy she highly recommends. Acknowledging the unpredictable nature of DIY projects, she warns that they often take longer than anticipated, and unexpected challenges are almost guaranteed to arise. However, her unwavering advice is to “hold on to your vision. Don’t give up!” The satisfaction of seeing your transformed space, knowing you created it with your own hands, makes every obstacle worthwhile.
The pictures speak for themselves, showcasing the incredible results of Jenny’s dedication and keen eye for detail:
SOURCES: Recreate Jenny’s Stylish Kitchen Look
Paint Colors:
- Beadboard: Custom color-matched at Home Depot to the existing cabinets using Behr paint.
- Crown Molding, Chair Rail, and Shadow Boxes: White Dove by Benjamin Moore.
- Kitchen Walls: Restoration Hardware Silver Sage.
Decor Sources:
- Bird Plates: Birch Lane.
- White Plates (above the doorway): Home Goods.
- Large Bakery Sign: AntiqueFarmhouse.com.
Jenny, your dedication, ingenuity, and impeccable taste shine through every detail of this kitchen. Thank you for sharing your inspiring journey and demonstrating the incredible impact of thoughtful, small changes. Your kitchen truly proves that DIY can lead to astonishing results!
Inspired to Showcase Your Own Home Transformation?
We love celebrating successful DIY projects! Share your amazing skills and inspiring makeovers by submitting a brag post here!
Explore More Beautiful White Kitchen Inspiration!
Click each photo below to discover additional white kitchen ideas and stunning renovations: