
Transform Your Kitchen: A Comprehensive Guide to DIY Shaker Cabinet Doors
Hello, home improvement enthusiasts! Jill here from The Rozy Home, and I’m thrilled to bring you a tutorial that promises to be a game-changer for your kitchen. You might be thinking, “Jill, it’s just a cabinet door. How life-changing can it be?” But as any seasoned renovator knows, kitchen cabinet doors are the unsung heroes of style; they either beautifully elevate a space or glaringly betray its age. If your current cabinet doors are screaming their decade, a fresh coat of paint might offer a temporary facelift, but it won’t erase their dated design. Why settle for just painting when you can easily craft stunning, custom shaker cabinet doors yourself, completely transforming the heart of your home?
Shaker cabinets represent the pinnacle of timeless kitchen design, characterized by their clean lines, minimalist aesthetic, and versatile appeal. They’ve consistently topped the list of hottest cabinet styles for a reason: they effortlessly infuse any kitchen with a sense of modern elegance while honoring classic craftsmanship. The best part? They are incredibly accessible for DIYers. With a few essential tools—primarily a table saw—and some common materials like oak strips and plywood, you can achieve professional-looking results without breaking the bank. This guide will walk you through every step, ensuring that even if you have existing flat panel cabinets, you can update them to the coveted shaker style, much like the sleek drawer fronts shown here.
Why Choose Shaker Cabinets for Your Kitchen Update?
Shaker style cabinets have enjoyed enduring popularity for centuries, and for good reason. Their unadorned, utilitarian design, originating from the Shaker religious community, emphasizes functionality and simplicity – principles that remain highly relevant in contemporary interior design. A shaker door features a flat, recessed center panel and a simple frame made of four pieces, known as stiles (vertical) and rails (horizontal). This clean, understated aesthetic makes them incredibly versatile, suitable for a vast array of kitchen styles, from traditional farmhouse to ultra-modern and industrial. By choosing to build your own shaker cabinet doors, you’re not just saving money; you’re investing in a timeless look that enhances your home’s value and provides immense personal satisfaction.
Imagine transforming your kitchen over a single weekend, replacing outdated, ornate, or bland cabinet fronts with crisp, elegant shaker doors. This DIY project allows for complete customization in terms of wood species, finish, and hardware, ensuring your new cabinets perfectly complement your home’s unique character. The durability achieved through classic joinery techniques, which we’ll explore in detail, means these doors aren’t just beautiful – they’re built to withstand the daily hustle and bustle of a busy kitchen for years to come.
How to Build Your Own Shaker Cabinet Door: A Step-by-Step Tutorial
Step 1: Precisely Determine Your Cabinet Door Dimensions
Accuracy is paramount when building custom cabinet doors. This initial step lays the foundation for a perfect fit. Start by meticulously measuring the existing opening of your cabinet. With this measurement in hand, you’ll decide on the desired overlay – how much the new door will overlap the cabinet frame on all sides. Most homeowners opt for a 1/2-inch overlay, providing a classic, balanced look. For example, if your cabinet opening measures 17 inches wide by 37 inches high, and you choose a 1/2-inch overlay, your finished shaker cabinet door should be 18 inches wide by 38 inches high. This extra inch in both dimensions accounts for the 1/2-inch overlap on each side (left/right for width, top/bottom for height). Take your time with these measurements; a little extra care here will save you headaches later. The illustration below visually represents how the overlay affects the final door size, with the grey area indicating the new cabinet door’s extended dimensions.
Step 2: Gather Your Essential Materials and Tools
Selecting the right materials is crucial for both the aesthetic appeal and longevity of your DIY shaker cabinet doors. For this project, a few key components and tools will be needed:
Wood Selection:
- Red Oak Strips: For the stiles (vertical pieces) and rails (horizontal pieces) of the frame. Red oak is a popular choice due to its strength, durability, and attractive grain, making it ideal for staining or painting. It’s readily available at most home improvement stores. You’ll typically find 1″ x 2″ (actual dimensions are closer to 3/4″ x 1 1/2″) red oak strips, which are perfect. An 8-foot piece usually costs around $10. Look for straight pieces with minimal knots.
- 1/4″ Red Oak Plywood: This will form the recessed center panel of your shaker door. Plywood offers stability and resists warping, which is ideal for this application. A 4′ x 8′ sheet of 1/4″ red oak plywood typically costs around $25 and can yield enough panels for approximately 6 cabinet doors, making it very cost-effective.
Necessary Tools:
- Table Saw: This is the most critical tool for precise, repeatable cuts for dados, tongues, and dimensioning your wood.
- Measuring Tape: For accurate dimensioning.
- Pencil: For marking cuts and measurements.
- Safety Glasses: Always wear eye protection when operating power tools.
- Wood Glue: A high-quality wood glue for strong, lasting joints.
- Wood Clamps: Essential for holding the door frame together securely while the glue dries.
- Optional: Router with a flush trim bit (for minor adjustments), orbital sander (for finishing).
Taking the time to select good quality, straight wood and ensuring you have all your tools ready will make the building process much smoother and more enjoyable.
Step 3: Precisely Cut Your Stiles and Rails to Length
With your measurements from Step 1, it’s time to cut the frame components. Remember, the stiles are the vertical pieces of your door frame, and the rails are the horizontal pieces. For our example door size of 18″ x 38″ (based on a 17″ x 37″ opening with a 1/2″ overlay):
- Vertical Stiles: You will need two pieces, each cut to the full height of the door, which is 38 inches.
- Horizontal Rails: You will need two pieces. To determine their length, you’ll subtract the combined width of the inner portions of the stiles from the total door width. Since each stile is roughly 2 inches wide (actual 1 1/2″), and the horizontal rail will inset into each stile by approximately 1/2 inch (this is where the tongue and dado joint comes in), the effective width contributed by the stiles to the rail length is about 3 inches (1.5″ stile width – 0.5″ inset = 1″ visible stile per side, so 2″ total. But the full width of the stile is 2″, so if the rail fits *inside* the stiles, you subtract the full width of the stiles from the overall door width). A simpler, more accurate calculation: take the overall door width (18″) and subtract the width of the two stiles (2 * 2″ = 4″). Then add back the amount of the tongue that goes into the dado on each side. If the stiles are 2 inches wide and the rails butt up against the inside edges, and the tongues fit inside dados that are 1/2 inch from the end, then each stile contributes 2″ to the outside width. So, 18″ (overall width) – 2″ (stile 1) – 2″ (stile 2) + 1/2″ (inset on first stile) + 1/2″ (inset on second stile) = 15″. So, for an 18″ wide door, your horizontal rails should be 15 inches long.
Always double-check your measurements and cuts. Precision here directly impacts the squareness and stability of your finished door. Use a stop block on your table saw for consistent cuts when making multiple pieces of the same length.
Step 4: Mastering the Dado Joint for Your Cabinet Frame
The dado joint is a cornerstone of strong woodworking, and once you master it, it will truly change your approach to many projects. A dado is essentially a flat-bottomed groove cut across the grain of a piece of wood, designed to receive another piece of wood snugly. In our shaker cabinet door, the dados will be cut into the stiles and rails to hold the plywood center panel securely.
For this project, you need to create a 1/4-inch wide dado (to accommodate your 1/4″ plywood panel) in each of your four frame pieces (two stiles and two rails). This groove will run along the inside edge of each piece, forming the channel for the center panel.
Steps for Cutting Dados:
- Set Blade Height: Adjust your table saw blade to a height of 1/2 inch. This will determine the depth of your dado.
- First Pass – Off-Center: Position your vertical stile on the table saw so the blade is slightly off-center from where you want the dado to be. Make the first cut.
- Second Pass – Even Out: Flip the stile end-for-end and run it through the table saw again. This second pass should widen the groove to the desired 1/4-inch width and center it properly. When finished, your dado should look like a clean, even channel.
Important Tip: Practice Makes Perfect! Cutting dados takes a bit of feel. I highly recommend practicing on scrap wood of the same width and thickness before cutting your actual cabinet pieces. I once went too far off-center and ended up with a useless piece, like this:
This mishap happened because I “eyeballed” it. To avoid this, mark the exact center of your wood and align the blade precisely with the actual edge of your marked line for the first cut. Then, make slight adjustments for the second pass to achieve the perfect 1/4″ width.
Test Fit: After cutting your dado, grab a piece of your 1/4″ plywood and perform a test fit. The plywood should slide into the dado snugly, but not so tight that it requires excessive force. If it snaps on perfectly, your groove is ideal. If it’s too small, make another tiny pass to widen the groove. If it’s too big, unfortunately, that piece of wood is likely scrap, and you’ll need to start over with a fresh piece to ensure a strong joint.
Repeat this precise dado cutting process for both vertical stiles and both horizontal rails. Consistency across all pieces is vital for a square and sturdy door frame.
Step 5: Precisely Cut Your Tongue Joints
Now for the “tongue” – not the kind you speak with, but the one that perfectly fits into the dado (groove) you just created. This technique, forming a tongue and groove joint, is what gives your shaker doors their exceptional strength and stability. Cutting the tongue is a bit more nuanced than the dado, but still perfectly achievable with patience and practice.
As before, it’s highly recommended to use scrap wood of the same dimensions for practice before cutting your actual cabinet pieces.
Steps for Cutting Tongues:
- Set Initial Blade Height: Adjust your table saw blade to approximately 1/4 inch high. Starting slightly less than 1/4 inch is often better, as you can always make it taller, but not shorter.
- Set Fence Distance: Move your table saw fence so that it is exactly 1/2 inch away from the center of the blade. This will establish the shoulder of your tongue.
- First Passes on Rails: Carefully run one end of your horizontal rail through the saw, cutting the initial shoulder. Repeat this on the opposite end of the same rail. You will then repeat this on both ends of your second horizontal rail. This creates the basic shape for the tongue on both ends of both horizontal rails. You should end up with something like this:
- Gradually Refine the Tongue: Now, you’ll work to refine the thickness of the tongue so it fits perfectly into the 1/4-inch dados you cut earlier. Move your fence incrementally closer to the blade – perhaps 1/4 inch at a time – and run the horizontal rail ends through again. Continue this process, making small adjustments and test-fitting with one of your dadoed stiles, until the tongue fits snugly into the dado. The goal is a fit that requires gentle persuasion but no hammering. The final piece should have a well-defined tongue on each end, resembling this:

You might notice a slight dip in the center of the tongue – this is generally acceptable, as long as the edges (the shoulders) fit perfectly into the dado. The key is that the outermost edges of the tongue engage fully with the dado for maximum glue surface and strength. If the dip is too pronounced across the entire piece, it indicates the blade was too low or the fence moved too much, and the fit won’t be right.
Once all four tongues (two on each end of the two horizontal rails) are cut and test-fitted, your frame components should be ready for assembly. They should look like this:
Step 6: Accurately Measure and Cut the Center Panel
Before cutting your plywood center panel, it’s crucial to dry-fit your stiles and rails together. This step ensures that you measure the actual internal dimensions of your assembled frame, accounting for any minor variations in your cuts. Even with the utmost precision, small discrepancies can occur, and measuring the dry-fitted frame gives you the most accurate dimensions for your panel.
As you can see in the image, there might be small gaps at the corners during the dry fit. Don’t worry about these just yet; they will be resolved when you clamp the door together after gluing.
Once your frame pieces are temporarily assembled, measure the exact width and height of the opening within the frame. This measurement represents the visible area of your center panel.
To ensure your 1/4″ plywood panel sits securely within the 1/2″ deep dados, you need to add 1 inch to both the measured width and height of the opening. For example, if your opening is 14″ x 34″, your center panel should be cut to 15″ x 35″. This extra inch provides 1/2 inch of panel depth to sit within the dados on all four sides, allowing it to “float” without being glued to the frame, which is crucial for preventing cracking due to wood expansion and contraction. Use these final measurements to cut your 1/4″ red oak plywood center panel.
Step 7: Final Assembly and Gluing for a Lasting Finish
You’re almost there! This final step brings all your carefully crafted components together into a complete, sturdy shaker cabinet door. Take your time, as the glue-up is critical for the door’s structural integrity.
First, after cutting your center panel, do a quick dry-fit by sliding it into the dados of your frame pieces (without glue). This ensures that your panel fits correctly and slides in smoothly. If any adjustments are needed, make them now.
Once you’re satisfied with the fit, disassemble the dry-fit and prepare for gluing. Apply a generous, but not excessive, amount of wood glue to the dados of each of your four frame pieces (stiles and rails). Also, apply glue to the tongues of your horizontal rails. The goal is complete coverage within the joint, ensuring maximum adhesion.
Carefully slide the center panel into the dado of one vertical stile. Then, fit the two horizontal rails onto the tongues of that same stile. Slide the center panel into the dados of the horizontal rails, and finally, bring the second vertical stile into place, aligning its dados with the panel and its tongues with the horizontal rails. Assemble the entire door, ensuring all joints are properly seated.
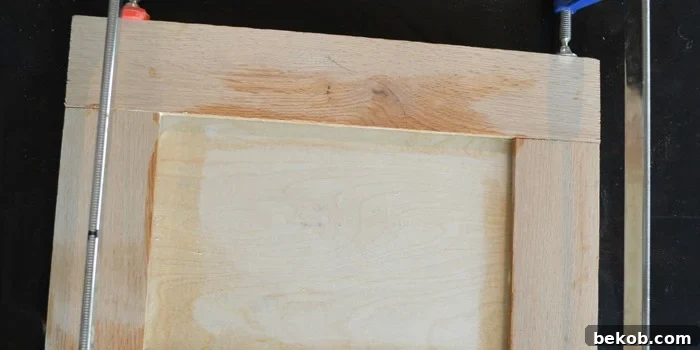
Once all pieces are together, immediately clamp the shaker cabinet door. Use at least two clamps (more for larger doors) across the width and two across the height to apply even pressure. As you tighten the clamps, it’s crucial to regularly check the squareness of your door and measure the width at multiple points (e.g., at each clamp location, and in the middle). When I first started woodworking with clamps, I often overtightened one side more than the other, resulting in a slightly skewed or uneven final product. Measuring at various points is a quick and easy way to guarantee you’ve applied even pressure and that your door remains perfectly square.
Wipe away any excess glue that squeezes out of the joints with a damp cloth immediately. This will save you a lot of sanding later. Allow the clamped door to sit for at least 30 minutes, but for maximum strength, let it dry overnight. Wood glue reaches its full strength after 24 hours.
Finishing Touches and Enjoying Your New Cabinets
And that, my friends, is how you build a shaker cabinet door! Once your newly assembled door has dried completely, the final steps involve preparing it for installation. Start by thoroughly sanding your shaker cabinet door, gradually working through different grits of sandpaper (e.g., 120, 180, 220) to achieve a perfectly smooth finish. This is crucial whether you plan to paint or stain, as a smooth surface ensures an even and professional-looking final coat.
Next, apply your desired finish. If you’re painting, prime the door first with a high-quality primer designed for wood, then apply several thin coats of cabinet-grade paint, lightly sanding between coats. For a stained finish, apply your chosen wood stain, wiping off any excess, and then seal it with several coats of polyurethane or another durable topcoat for protection. The beauty of DIY means you can choose any color or stain that perfectly matches your kitchen’s aesthetic.
Finally, complete your transformation by adding some awesome cabinet handles and hinges. Shaker doors pair beautifully with a wide range of hardware styles, from minimalist bar pulls to classic knobs, allowing you to further customize the look. Install your new hinges, attach your chosen hardware, and mount your stunning, handcrafted shaker cabinet doors. You are now good to go!
The Rewards of DIY Shaker Cabinets
Building your own shaker cabinet doors is an incredibly rewarding project. Not only does each door take approximately 15 minutes to construct (excluding glue drying time), but the cost savings are substantial. At around $20 per door (considering you can get about six center panels from each sheet of plywood), you’re looking at a fraction of the cost of custom-made or even off-the-shelf shaker doors.
In as little as a single weekend, you could completely transform the entire look and feel of your kitchen by making your own shaker doors. Beyond the significant financial savings, you’ll gain immense satisfaction from having created something beautiful and functional with your own hands. These doors aren’t just stylish and easy-to-make; the robust tongue and groove joint construction ensures they are incredibly durable and will hold up to the daily abuse that kitchen cabinetry often endures for many years to come. Embrace the DIY spirit and elevate your home!
Coming up next in #ShutTheFrontDoorDIY:
(Be sure to subscribe by RSS or email to get updates for every post of Shut The Front Door DIY week)