
–
Unveiling the Dream: A DIY Tufted Headboard Transformation by Classy Clutter
Submitted By Classy Clutter
There’s an undeniable magic that happens when creative minds come together, especially when it involves transforming a vision into reality for a cherished space. Recently, during a wonderful visit to Arizona, my dear friend Savannah and I embarked on one of our favorite pastimes: diving headfirst into exciting DIY projects. It’s a tradition almost as sacred as our sushi nights! This time, our focus landed on a particularly heartwarming endeavor: crafting a “big girl bed” for Savannah’s youngest daughter, Millie, who was gracefully transitioning from her baby crib.
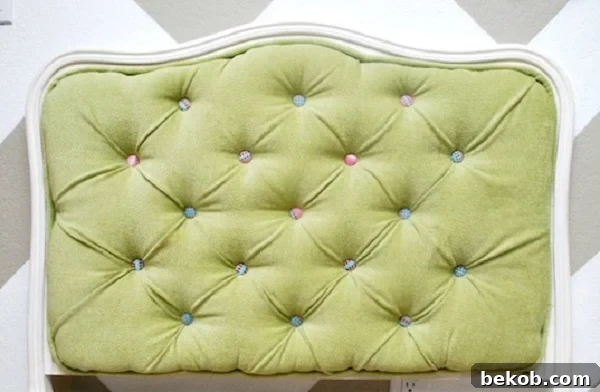
Savannah had a very clear, enchanting vision in mind – a pristine white, sumptuously tufted headboard, adorned with a soft lime green upholstery and a playful scattering of colorful buttons. While her enthusiasm was boundless, the thought of tackling such an intricate upholstery project alone felt a tad daunting. This was where our combined forces truly shone. What initially seemed like a complex undertaking quickly blossomed into an incredibly fun and rewarding two-person project, proving that with a little teamwork and a lot of creativity, any dream home decor project is within reach.
The Inspiration: A Thrift Store Gem Reimagined
Our journey began with a remarkable find: an adorable twin bed frame Savannah discovered at a local thrift store. It was a true steal, boasting classic lines and a sturdy build – the perfect canvas for our creative ambitions. Most people might have seen it as a charming piece needing only a fresh coat of paint to be “fantastic.” But Savannah, with her keen eye for design, envisioned something far more bespoke and whimsical. She dared to dream beyond a simple repaint, picturing a headboard that would not only provide comfort but also serve as a vibrant centerpiece in Millie’s newly decorated big girl room. This project wasn’t just about making a bed; it was about creating a personalized sanctuary for a growing little angel.
Why Choose a DIY Tufted Headboard? The Benefits of Bespoke Decor
Opting for a DIY tufted headboard project, especially when starting with a thrifted piece, offers a myriad of advantages. Firstly, it’s incredibly cost-effective compared to purchasing a custom-made or high-end upholstered bed. You get to control the budget by selecting your materials and repurposing existing furniture. Secondly, and perhaps most compellingly, it allows for unparalleled customization. From the precise shade of paint and the texture of the upholstery fabric to the color and placement of each button, every detail can be tailored to perfectly match your desired aesthetic and the personality of the room’s occupant. For Millie’s room, this meant selecting a cheerful lime green fabric and an assortment of bright, playful buttons that perfectly captured her vibrant spirit. Finally, there’s an immense sense of pride and accomplishment that comes with creating something beautiful and functional with your own hands. It’s a labor of love that adds character and a unique story to your home, transforming a generic piece into a cherished heirloom.
Materials and Tools for Your Tufted Headboard Project
Before diving into the creative process, it’s essential to gather all your supplies. For a project like Millie’s headboard, here’s a comprehensive list of what you’ll need:
- A sturdy bed frame, ideally with a solid headboard (like our thrifted twin bed).
- Creamy white paint (or your chosen color) and painting supplies (brushes, rollers, primer if needed).
- Upholstery foam, 2-inch thickness (available at fabric stores).
- Quilt batting for extra cushioning and a smooth finish.
- Upholstery fabric (soft lime green was our choice).
- Fabric for covering buttons (matching or contrasting, we used colorful scraps).
- Button covering kit (easily found at craft or fabric stores).
- Butcher paper or large pattern paper for creating a template.
- Measuring tape, ruler, and a Sharpie (purple, if you’re feeling fancy!).
- Serrated knife for cutting foam (an electric carving knife works wonders too).
- Drill and a drill bit appropriate for your headboard material (wood).
- Spray adhesive designed for upholstery foam.
- Heavy-duty staple gun and plenty of staples.
- Long upholstery needle.
- Strong upholstery thread.
- Fabric clamps (essential for holding fabric during tufting).
- Piping cord (various thicknesses available).
- Hot glue gun and glue sticks.
Step-by-Step Guide: Crafting Your Custom Tufted Headboard
Step 1: Precision Templating for Perfect Tufting
The foundation of a beautifully tufted headboard lies in a meticulously crafted template. We began by taping large sheets of butcher paper directly onto the headboard frame. This allowed us to visualize the upholstery area accurately. Next, using a measuring tape and ruler, we carefully marked out the precise locations where we wanted each tuft and button to be. Symmetry is key here, so take your time to ensure even spacing. Once the button points were marked, we drew straight lines connecting these points. This visual guide helped us anticipate where the elegant folds and creases of the tufts would naturally form, ensuring a harmonious and balanced design.
Step 2: Preparing the Headboard and Foam
With our template perfected, the next phase involved preparing the core components. While I was busy transferring the tufting pattern onto the upholstery foam, Savannah applied a gorgeous, creamy white paint to the bed frame. This allowed the headboard to dry thoroughly before we added the upholstery layers. For the foam, we carefully laid our butcher paper template over a 2-inch thick piece of upholstery foam. Using a trusty Sharpie (yes, a purple one!), I meticulously traced the outline. We then used a serrated knife – which provides excellent control for cutting foam – to carefully cut along the traced edges. Before moving on, we also poked holes through the foam at each marked tuft location, ensuring our future buttons would align perfectly with the headboard’s drilled holes.
Step 3: Drilling for Deep Tufting
Once the creamy white paint on the headboard was completely dry, we carefully re-taped our butcher paper template back onto the headboard. This template now served as our precise guide for drilling. Using an appropriate drill bit, we drilled holes through the headboard at each tuft marking. This step is critical for ensuring that your upholstery needle can pass through smoothly and that your tufts will be evenly spaced and deeply set.
Step 4: Crafting Custom Buttons for a Pop of Color
One of the most charming elements of Millie’s bed was the vibrant, colorful buttons. We needed 17 of these little beauties! Using a button covering kit (which can be found at any fabric store like JoAnn’s Fabrics), we meticulously covered each button with our chosen fabrics. While it might lead to a few sore thumbs, the result is absolutely worth the effort. Custom-covered buttons not only match your fabric perfectly but also add a bespoke, high-end touch that elevates the entire project from good to extraordinary.
Step 5: Layering for Comfort – Foam and Batting Application
With the headboard painted and the foam cut, it was time to build up the plush layers. We started by applying an even coat of spray adhesive to the headboard, then carefully positioned and attached the 2-inch upholstery foam piece. Ensure good adhesion across the entire surface. Next, we draped a generous piece of batting over the foam. Batting is crucial for two reasons: it adds an extra layer of softness and provides a smooth, even surface for your upholstery fabric, preventing any lumps or bumps from showing through. We used a staple gun to loosely secure the batting around the edges of the headboard, then trimmed away any excess. For a smooth finish, the batting should wrap slightly around the edges.
Step 6: The Art of Tufting – Creating Deep, Luxurious Folds
This is where the magic of tufting truly comes alive! Before you do anything else, here’s a crucial tip: **perform all your tufting before you permanently staple the main upholstery fabric to the headboard.** If you staple the fabric first, your tufts might appear too tight or shallow. We wanted nice, deep, luxurious tufts, so we made sure not to pull the fabric tight until the very end. We used clamps to temporarily hold the upholstery fabric in place over the batting and foam. Then, armed with a long upholstery needle and strong upholstery thread, we began the tufting process. Starting from the back of the headboard, thread your needle through the pre-drilled hole, through the foam, batting, and finally through the front upholstery fabric. Attach one of your custom-covered buttons to the front, then guide the needle back through to the reverse side of the headboard. Pull the thread really tight to create that desired deep tuft, then securely staple the thread to the back of the headboard. Repeat this process for every single button, ensuring consistent tension for even tufts.
Once all the buttons are securely tufted, the back of your headboard should look something like this, with all the threads stapled neatly:
Step 7: Securing the Upholstery Fabric
With all the tufting complete, it’s time to permanently secure the upholstery fabric. Carefully pull the fabric taut around the edges of the headboard, ensuring there are no wrinkles or loose spots. Use your staple gun to firmly attach the fabric to the back of the headboard, working your way around the entire perimeter. Trim any excess fabric neatly, leaving a clean edge. The headboard is really taking shape now, looking incredibly professional and inviting!
Step 8: The Polished Finish – Adding Custom Piping
The headboard is looking fantastic, but there’s one more essential step to elevate it to a truly professional finish: adding piping. Piping not only hides any raw fabric edges but also provides a crisp, defined border, enhancing the overall aesthetic. We chose to make our own piping using the same soft lime green fabric to ensure a perfect match. If you’re new to making piping, there are many excellent tutorials available online, such as this helpful guide: How to Make Piping. Once your piping is made, simply use a hot glue gun to carefully attach it around all the raw edges of your upholstered headboard. This final touch truly ties the whole look together, resulting in a flawless and bespoke creation. And with that, your magnificent DIY tufted headboard is complete! TA-DA!!!
The Joy of a Completed Project: Millie’s Big Girl Bed
The finished bed is an absolute dream come true, a vibrant and cozy haven perfectly suited for a little girl transitioning into her “big girl room.” Here’s an up-close look at the beautiful piping and the meticulously crafted tufting – every detail speaks of the care and effort poured into this project. Seeing the final result, especially after not having the chance to collaborate on a big project for about six months, filled us with immense joy and satisfaction. Our teamwork truly paid off, yielding a stunning piece of furniture that we are both incredibly proud of. Little Millie’s reaction to her new bed was priceless, making every minute of the work worth it.
This project was more than just a bed makeover; it was a testament to the power of friendship, creativity, and the desire to create something truly special for a loved one. Savannah is now working diligently to complete the rest of Millie’s nursery transformation into her ultimate big girl room, drawing inspiration from beautiful elements like the bed’s design and other creative endeavors we’ve shared, such as her ideas for frame arrangements. We hope this detailed guide inspires you to tackle your own DIY tufted headboard project. With a little planning and patience, you too can create a custom piece that brings unparalleled style and comfort to any bedroom.